

- Thread starter
- #1
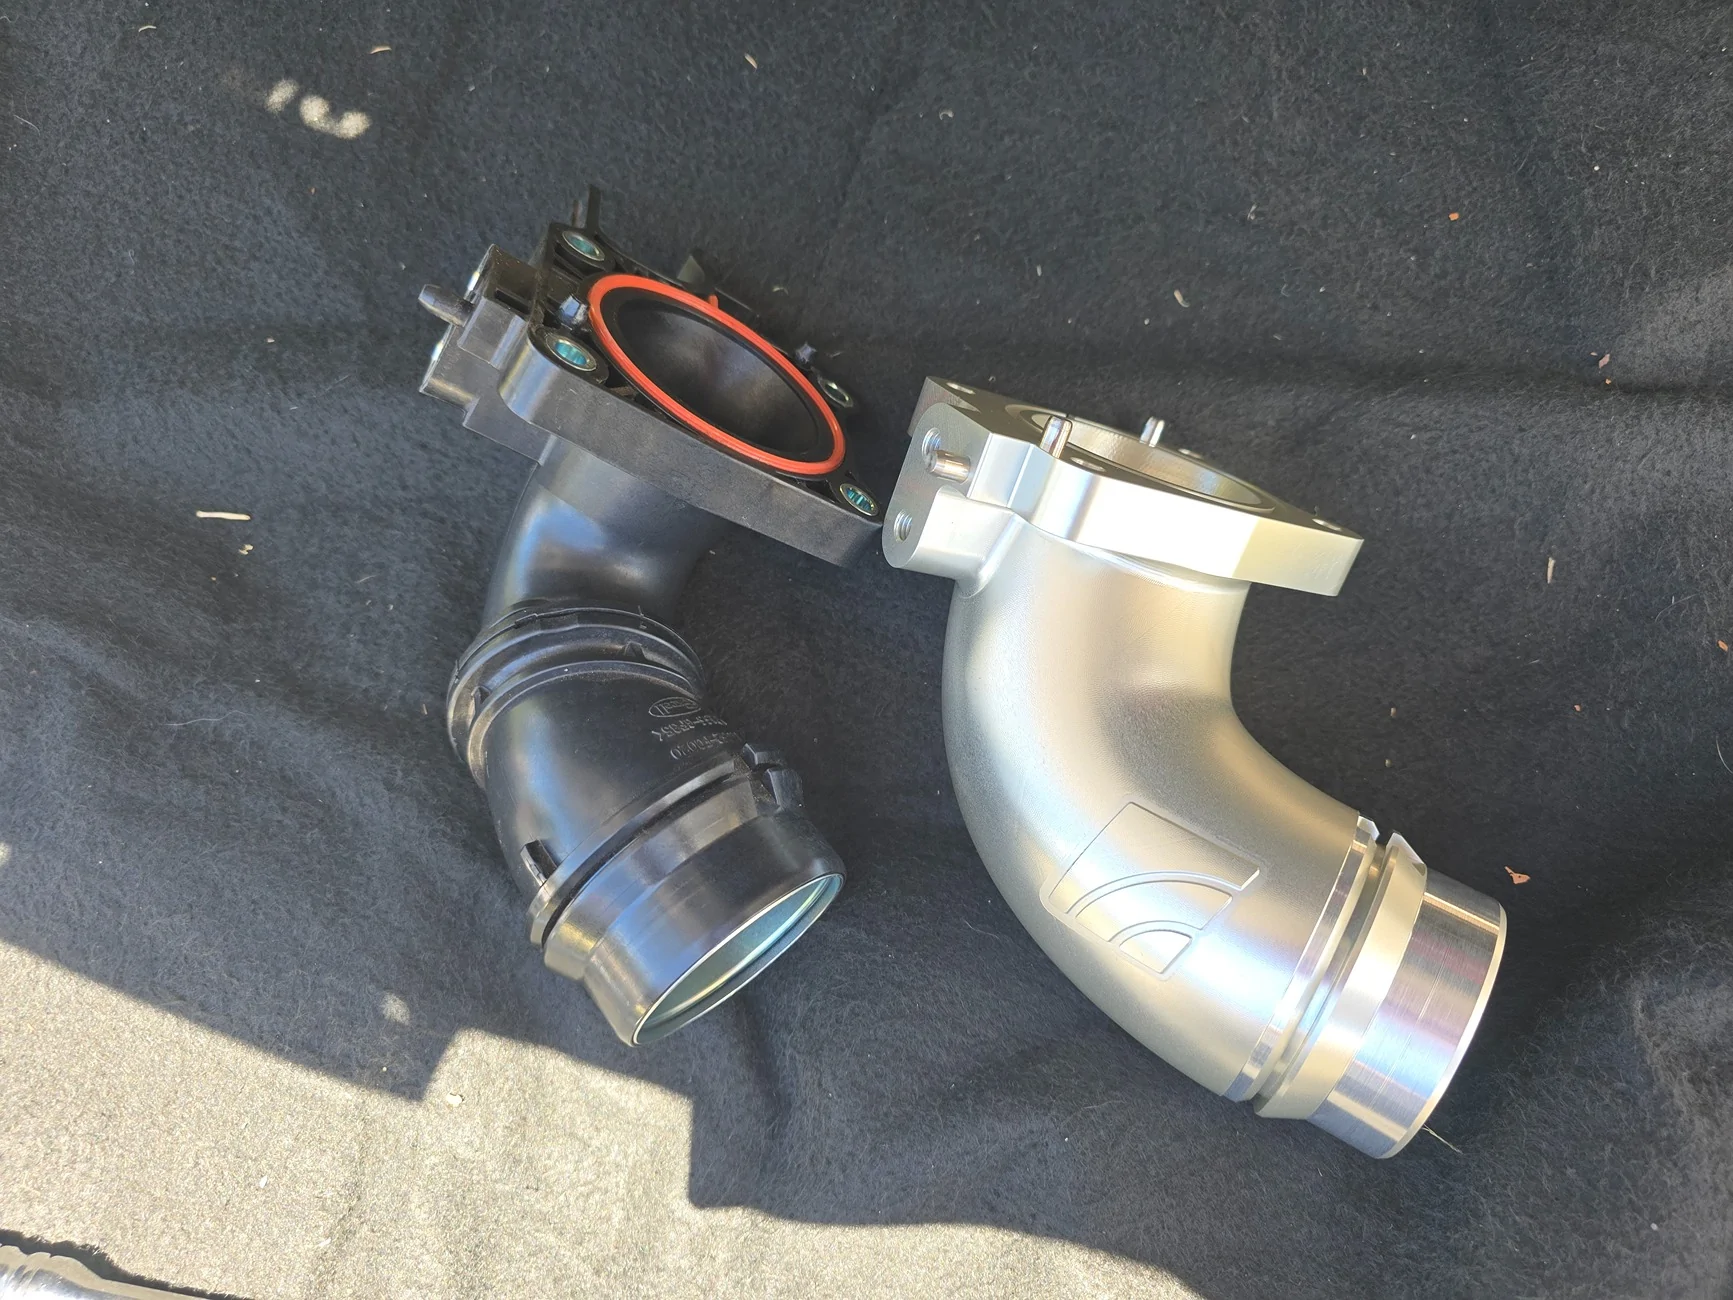
Finally got around to installing the AMS throttle body inlet today. Took me longer than I thought! Super sunburned from being out there for almost 4 hours. I'm a mechanically inclined person, too. Could have just been me or just one of those days, though, I'm not sure.
Happy with the results, though. Subtle effects, but it is obvious the truck likes it. In short - everything feels smoother.
No check engine lights. Yes you could possibly void your warranty if Toyota can prove this mod caused a failure of something you are trying to get covered by warranty. No I did not retune it yet to take full advantage of it. No I do not have a dyno to check gains, but AMS has a dyno chart on their website. Can't think of any of the other most common questions I see. I'm sure I will get asked eventually.
Some lessons learned during install and initial driving notes recorded below:
You can, for the most part, get it done following the AMS instructions. However, the very last step of removing the original throttle body inlet says you can get to the aft two bolts from the bottom of the truck. I found this to be not true. I think their pictures are of the truck on a lift so the suspension is drooped which creates a lot more space. They also do not list or mention any torque specifications anywhere, instructions or website description.
To start, the tensioner release for the serpentine belt/drive belt/V-ribbed belt uses a 14mm socket. If you can get a ratchet or bar on there with a handle longer than the 12 inch one I had, it would make releasing the tension easier. A 5mm Allen wrench works to hold the tensioner assembly in place for the remainder of the work.
If you're a driveway mechanic like me, you'll eventually be following AMS instructions and find yourself laying on your back staring at lower control arms, CV axles, the rest of your suspension, a mess of hoses and wires, your front skid plate that will need to be removed, and then once the skid is gone, if your head is in just the right spot, you'll see the tiniest little edge of the aft passenger bolt head way up on the side of the engine. A black bolt against a black plastic throttle body inlet at that, so a flashlight might help. I had to use two 6 inch extensions and two more 6 inch flex extensions to reach it (had a 20 inch extension but couldn't get a straight 20 inch shot to the bolt at all). When I did reach it, it was impossible to get the socket around the bolt head square. It is an 8mm bolt head. When I did get a grip, it was half ass and it was torqued just tight enough to cause the socket to slip when trying to loosen. U-joints were no help. If you have a second person reach from above and place the socket on there, you might be able to loosen from below easier. There may be better tools for this, but I was working with what I had.
It is tedious and your arm might get a bit busted up, but it is easier and trust me it is possible to just reach blindly from above the engine from the driver headlight/fender, feeling with your fingers under the throttle body with a small ratchet and normal 8mm socket to find the 4 bolts. Unless you're massive, like bodybuilder forearms, or huge hands, or you got those stiff construction worker hands that don't have much dexterity but 150% of normal people hand strength after years of manual labor, you should be able to reach everything. If you have one of those fine tooth ratchets, like the 100 position ones, that would be best. The aft inboard bolt really only allows 1 to 2 clicks on a normal Husky ratchet from Home Depot because the oil level dipstick is in the way and there's a hose there. You may want to loosen the oil level dipstick. I did not, but bro it took a while to unscrew that last one. Kept thinking I wasn't actually on the bolt, but it is threaded for like 2 inches so it just takes a lot of 1-2 click resets to get it off. Had to take a couple breaks because my back and arms were sore from the weird position I was in. Laid face first on the radiator a couple times, just for a little bit. You know how it goes.
The instructions also don't tell you that the entire throttle body will come off once the last bolt is removed, so be prepared for that. I saw it happening while loosening the last bolt, so I was prepared to catch it. Really try your best not to drop the throttle body or bang it around too much. Toyota repair manual straight up says if you drop it or whack it too hard to just replace it.
I saw what looked like oil on the engine side of the throttle body valve. Should have taken a picture. It covered a good portion of the valve, probaby 60%. The metal underneath the oil and any untouched metal was in excellent condition though. This is about 18,000 miles using Banks oiled filter for about 3,000 and the rest TRD pro performance intake conical oiled filters. Not sure if the oil was from those or if this is what those catch cans they been selling are trying to prevent? Got me thinking. Anyways...
Removing the original throttle body elbow from the throttle body is a bit more complex than it looks because the elbow is a weird shape with the bracket and the various hoses and wire harnesses are in the way. Just be careful and gently snake it out of there while maintaining control of the throttle body that is now loose. Once separated, the throttle body can be laid gently in the engine bay and will hang on the various hoses and wires harness connected to it.
I was wondering exactly what AMS meant about the bolt closest to the bracket needing to be walked in before installing the new throttle body, but it makes sense when you try to stick the bolt in that position. Try this before you go to install the new elbow in the engine bay. The screw is literally blocked by the throttle body elbow bend. This ended up being more good than bad unlike what I thought. Walk it in gently like they say to get it past the elbow bend, then once it clears, you can pretty much let it hang there and tighten it last. It didn't fall out for me for the rest of the install.
At this point, take a good look and ensure there are no more bright orange gaskets from your throttle body inlet elbow, or from the throttle body to intake manifold in your engine bay. I dropped the inlet elbow gasket initially when removing the elbow and had to go retrieve it, then had to clean it off because it was dirty from the engine bay. Luckily, my throttle body to intake manifold gasket was stuck in the intake manifold. You can see the manifold orange gasket from below the truck if you need to confirm. I just trusted and moved on, but i should have checked for peace of mind.
When installing the throttle body and new inlet elbow, I would first snake the bracket behind the hoses and get it set in position on the engine block. Get the elbow and throttle body roughly matched up then start installing the bracket to engine block bolt by a couple of turns. You want that bracket pretty loose to allow for movement of the throttle body and elbow, and it does help to hold everything up as you move forward.
There are positioning features for both parts to their connecting parts, i.e., throttle body inlet elbow has pins sticking out to position into the throttle body, and the throttle body lines up with positioning features on the intake manifold plastic. You can see when the throttle body is in place relative to the manifold from above. Be gentle as you don't want to damage or dislodge your bright orange gaskets. The elbow is harder to see, but the holes will match up with the throttle body and they sit pretty flush to each other even without the screws installed. The other method, although a bit risky, is to hold a bolt inside one of the new inlet elbow holes, then go to line it up with the throttle body until the bolt slips through, then line up the throttle body to the intake manifold and start threading when it goes through all the way. Risky because of the amount of time holding a loose bolt blind and under the elbow in the engine bay. The easiest bolt is the forward driver side bolt.
Once everything is positioned correctly and if all the gaskets are in place correctly, all the bolts will actually thread in very nicely and can be run down by hand to hold everything together. Leave everything loose until you can get the bolt closest to the bracket through the elbow, through the throttle body, and started into the intake manifold threads. If you tighten everything too much initially, you won't be able to get the bolt closest to the bracket in. This part takes some wiggling and moving the elbow and throttle body around to get all the bolts started in the intake manifold threads.
From there tighten everything the way you removed it (have fun!). Then comes torquing. AMS said OEM torque specs per my email to them. I figured this was the case but I had to ask, there was nothing anywhere from them about torque.
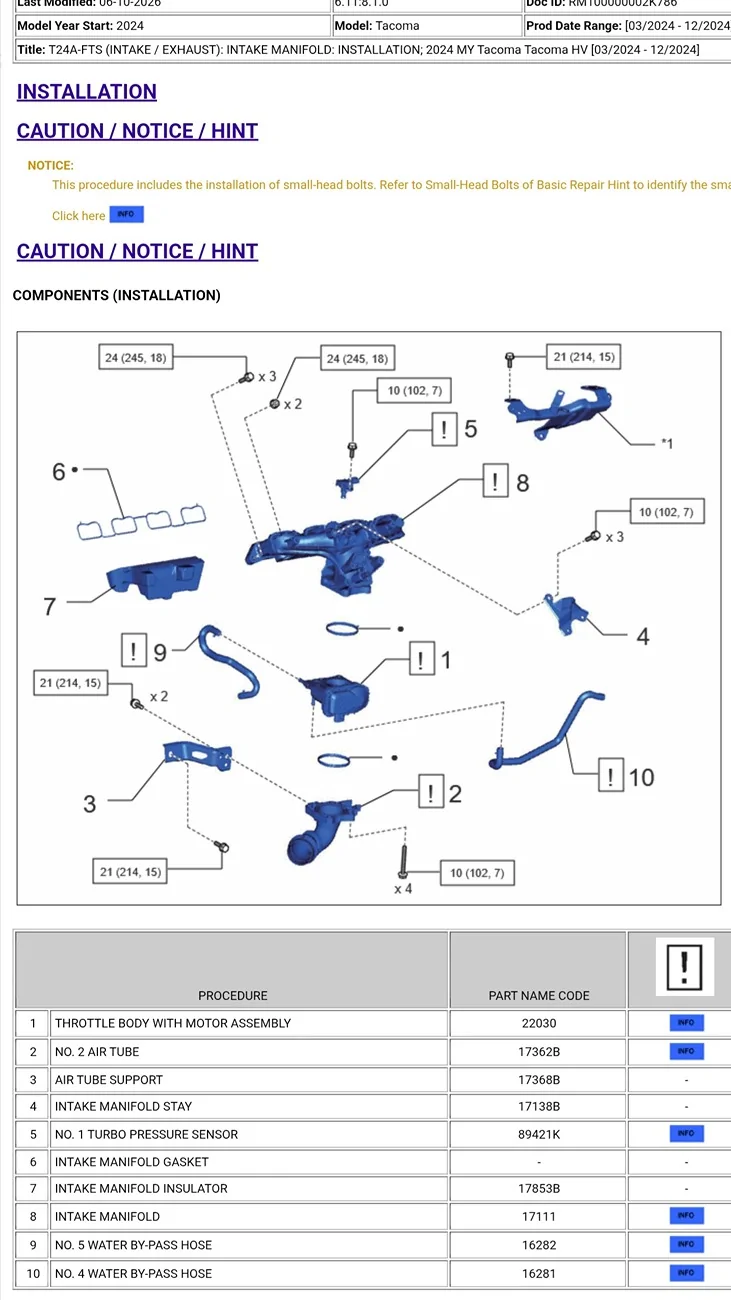
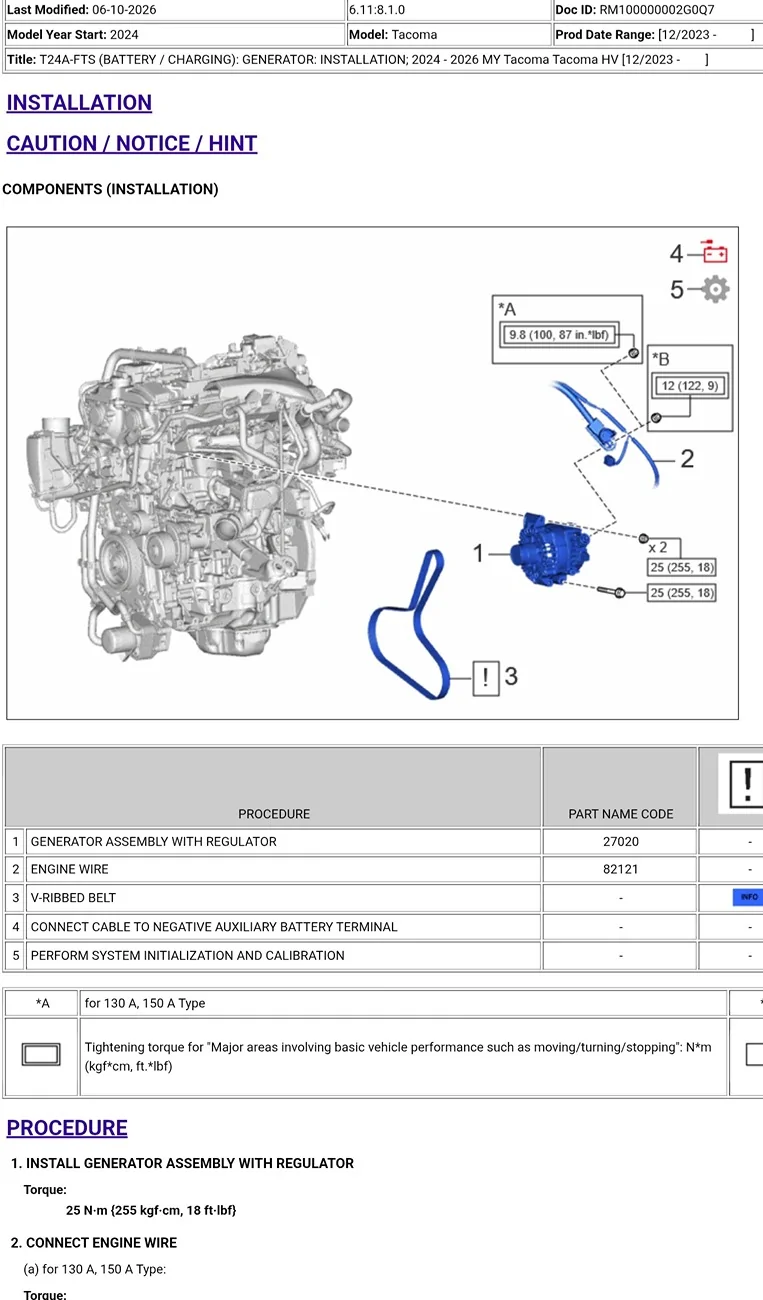
From Toyota TIS:
7 ft-lbs for the 4 throttle body bolts
15 ft-lbs for the throttle body elbow to engine bracket all around (bracket to the throttle body and bracket to the engine block)
Around 8-9 ft-lbs for the alternator power wire harness bolt
18 ft-lbs for all the alternator fasteners (nuts and long bolt)
I'll be straight up and say I could only torque one of the throttle body inlet elbow bolts with a torque wrench when it was finally in the engine bay, so 3 of 4 were by hand using the forward driver bolt as a reference (e.g., try to get it to turn by hand and apply the same torque feel to the rest). Will be carrying a tool set with me for the foreseeable future just in case ;) also, the reason here is the new elbow is significantly larger and takes away any space you previously had there for your ratchet. The forward passenger side bolt I ended up having to use a normal wrench for final tightening because the hoses really get in the way anything else there.
Even the long alternator bolt closest to the engine, just gave it a couple ugga duggas by hand because the torque wrench wasn't fitting in there for shit. Used the other nuts for reference similarly there too (same torque feel). The alternator I am less worried about just by how the fasteners are set up.
I now understand why the Toyota repair manual says to remove the entire intake manifold to get to the throttle body elbow. It makes it easier to work with everything off the truck, torque it all back together, then all you do is line up the intake manifold with its gasket on the engine and torque it in the engine bay. I wanted to try the AMS instructions this time, but maybe next time I'll learn how to do an intake manifold replacement.
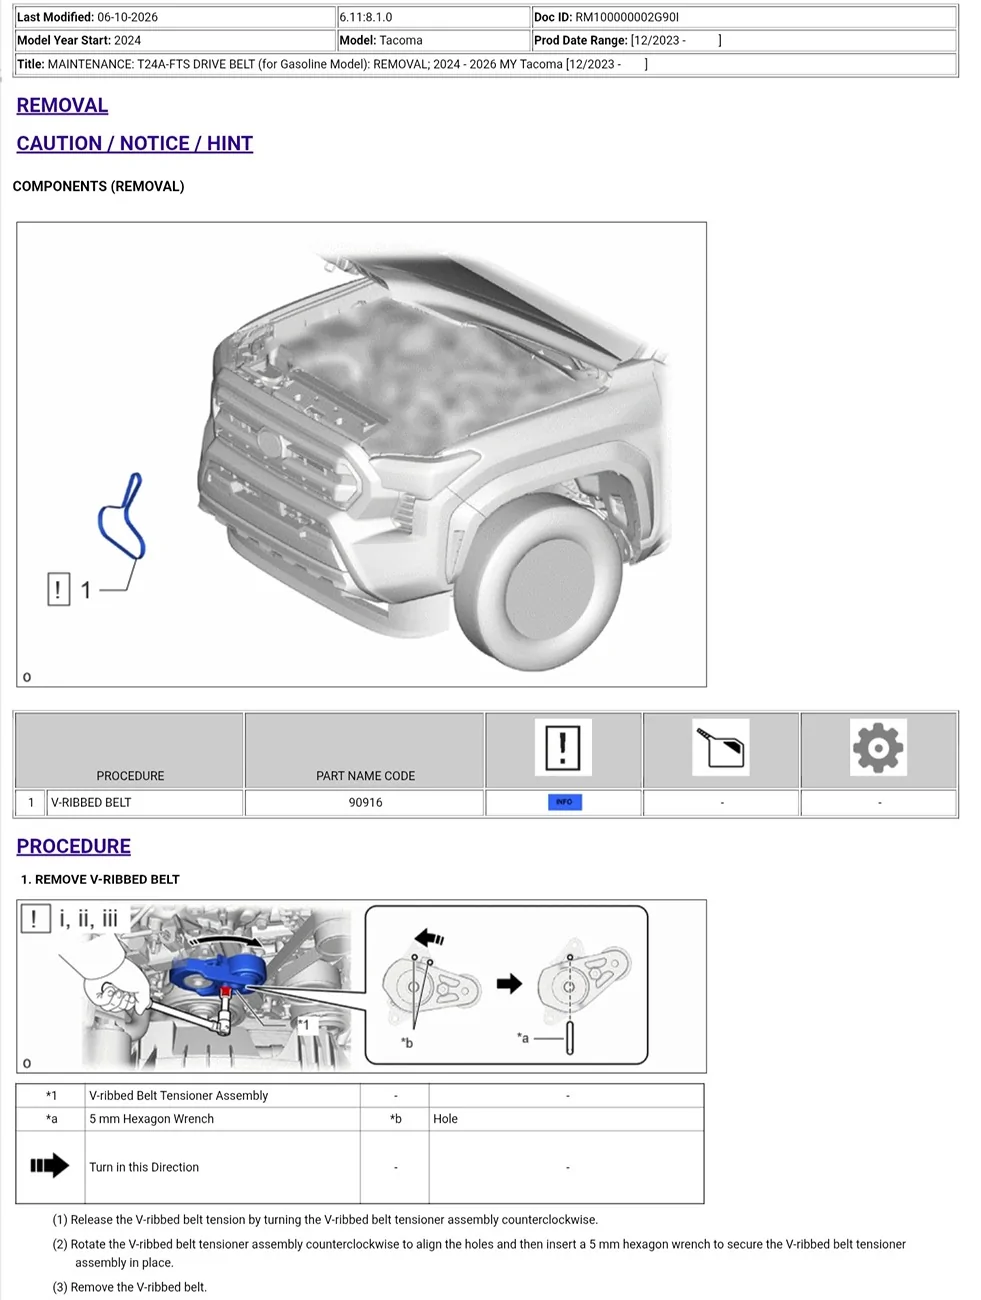
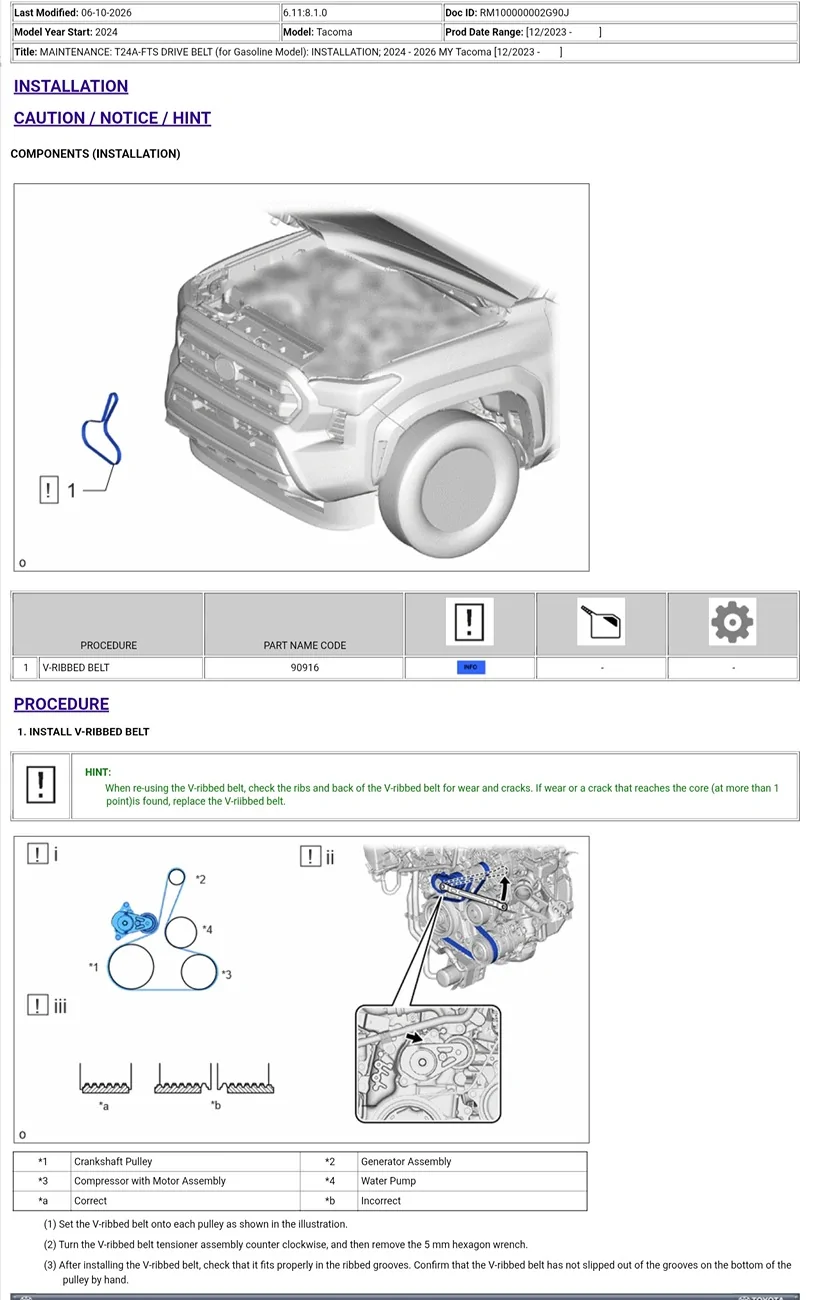
When installing the v-ribbed belt back on everything, ensure you check from above and below to confirm ribs are on ribbed pulleys and smooth belt sides are on smooth pulleys. I watched team oil drop 3rd gen Tacoma video before this job and it was a good visual of the concept. Here's the diagram from 4th gen TIS:
Okay, so onto driving! In short - everything felt smoother. It was a subtle effect overall on my test drive, yet it was obvious the truck liked the AMS elbow.
First thing I noticed was the idle. Unsure if it was because the battery was disconnected for so long and it reset the idle learning or what, but the idling was noticeably quieter. Instead of the usual noisy clickety-clackity rumble I was used to, the truck had this quiet hum. RPMs were steady at the usual 900ish RPM range. Still could hear my AC compressor squeak. At least I knew the drive belt was installed correctly since there was no other squeaking or squealing.
Next thing I noticed was the power delivery and recovery was smoother. On acceleration, the truck was responding to my gas inputs nicely. But really the biggest thing I noticed here was the recovery when taking my foot off the gas. Before, I noticed that when I would accelerate and then suddenly take my foot off the gas, especially if I had it the manual shift mode/gear limiting mode and the RPMs were higher, the truck would do what I described as a herky-jerk motion that was quite noticeable. Used to think my transmission was dying, but it did it everytime so I figured it was just the engine doing its thing. The AMS elbow smoothed that out significantly. Hard to describe, it almost feels like someone put shocks on each corner of the engine. It still herky-jerks, but its like 10% of what it was to nonexistent. Kind of interesting.
Floored it a few times to expose the new elbow to some boost and test if I torqued everything enough. One thing I noticed was how the shifting was smoothed out. Especially shifting while in boost, I am used to the truck accelerating, completely dropping power to shift with a heavy jerk/leaning forward, then a jerk backward as the throttle opens again, the truck leans back on the rear wheels, and the acceleration continues. My truck seemd to roll through the boosted shifts smoother, much less of a shock when the throttle slams shut before the shift and when reopening afterwards.
I have the trailhunter snorkel, so it is easy to hear what the turbo/engine is doing as you progress through the gears with the windows rolled down. I have the front grille scoop of the TRD Pro intake open, too, so the snorkel train whistle sound only really comes on with boost. Otherwise, it sounds like breathing through the snorkel as you listen to the engine's air demands changing as you drive around. I noticed the tone of the snorkel train sound changed slightly. There is usually the train sound, but there used to be this high pitched treble peak in there that could sometimes be piercing depending on how much boost I was in. I could not produce the high pitched treble peak on my test drive. I will continue to monitor this and see if different times of day or boost conditions effects the pitch and update if I learn anything.
I live up a pretty steep hill, its gotta be one or two miles of uphill ranging from 5-10% grade, so good opportunity to test how the elbow handled sustained boost. I let the truck shift automatically to higher gears instead of capping it at 3rd or 4th gear and only using the engine torque. Surprisingly, I noticed my truck staying closer to a 1/4 to a 1/2 of the boost gauge most of the time instead of closer to the 3/4 boost gauge I am used to going up the hill. This is with OTT tune stage 1, base throttle mapping, so probably like 9-10 psi boost all the way instead of 11-12 psi I am used to up this hill.
I noticed in general the truck did not seem as eager to use the turbo, drove a lot during the test run on the engines own power which was pretty cool. Hoping it saves some fuel in the long run.
All in all, satisfied with the outcome even though it was more difficult to install than expected. I think it should pair well with a higher flow downpipe I am hoping to order soon. Seems the truck likes having more efficient intake and exhaust tracts.
Hope this helps someone in the future.
Sponsored
Last edited:


