Sponsored

Baltimore

Well-known member
Joined
Jul 23, 2024
Threads
29
Messages
683
Reaction score
391
Location
Maryland
Vehicle(s)
4g hybrid
I'm being annoying. But just to be perfectly clear.

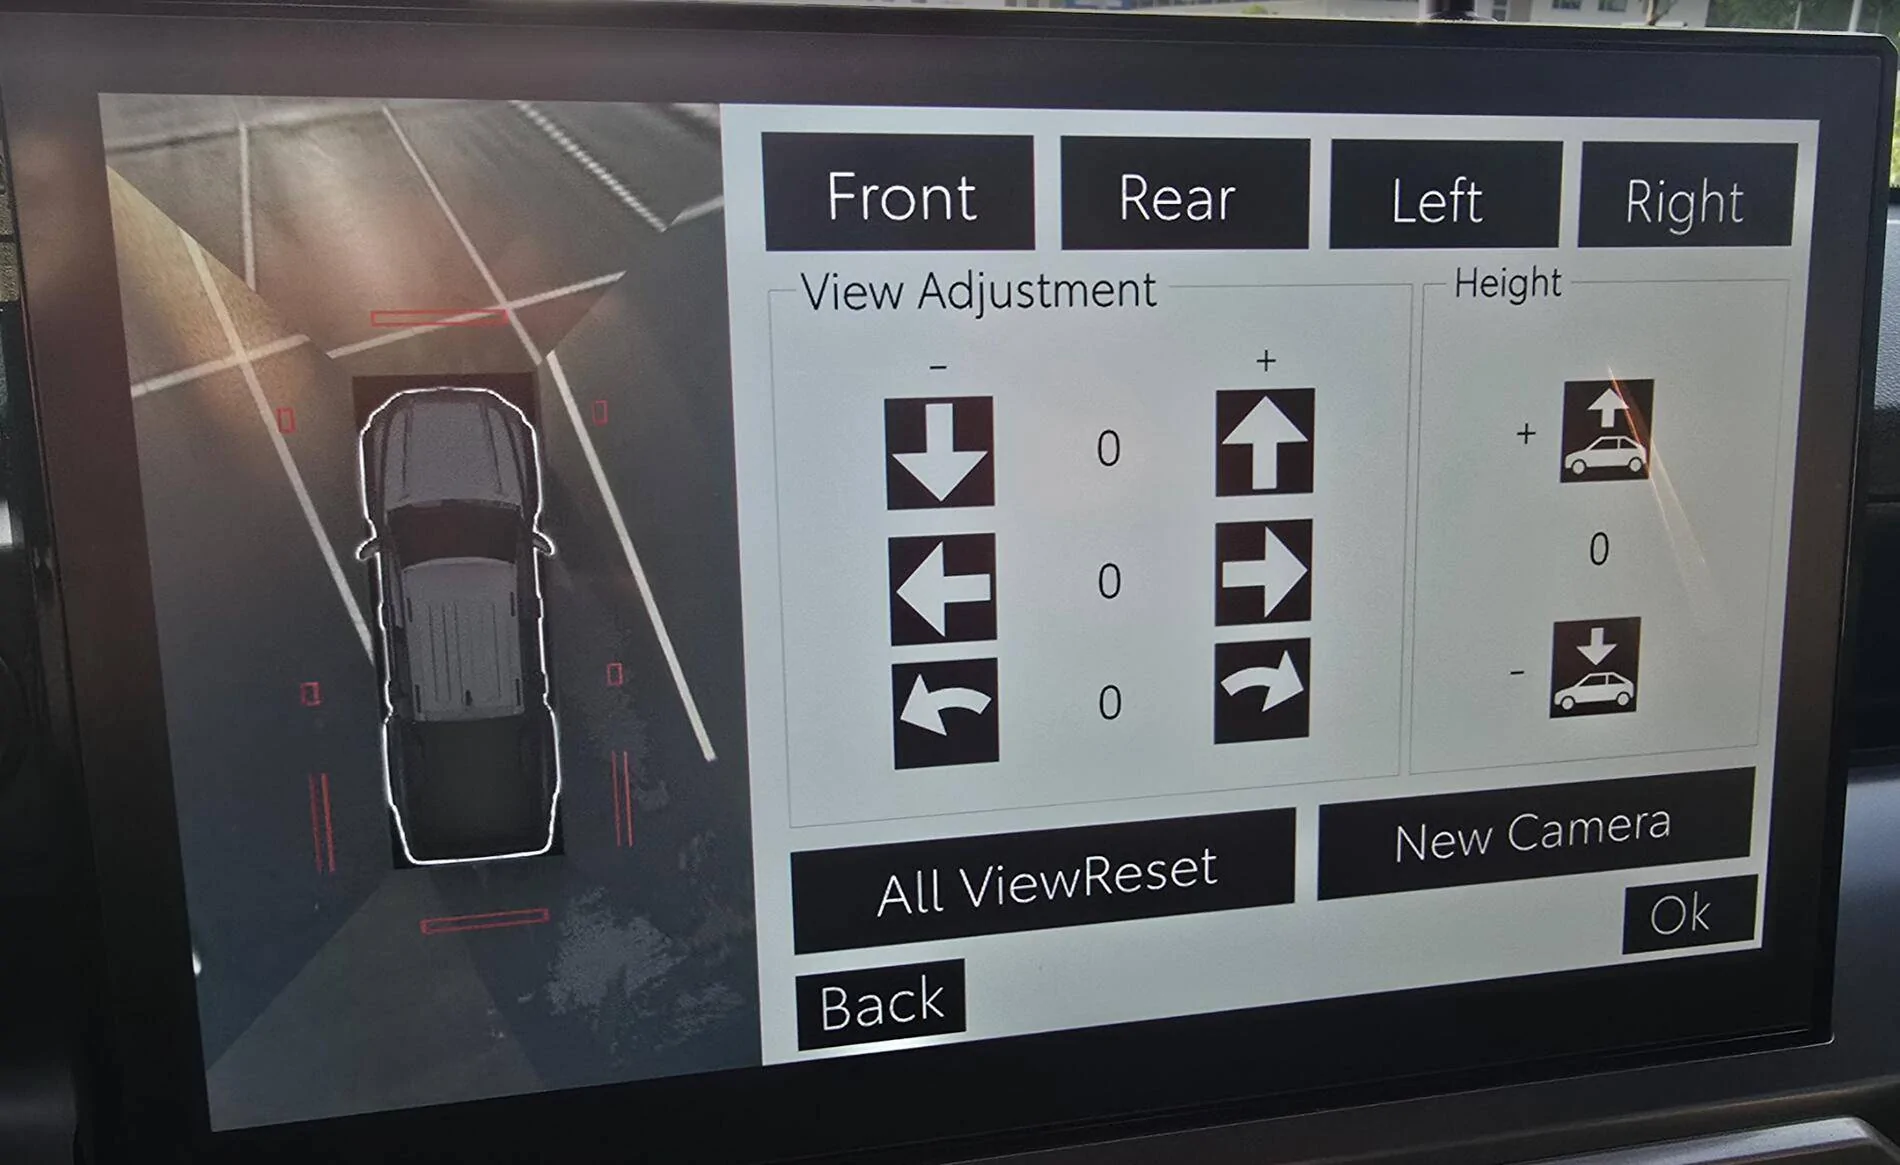
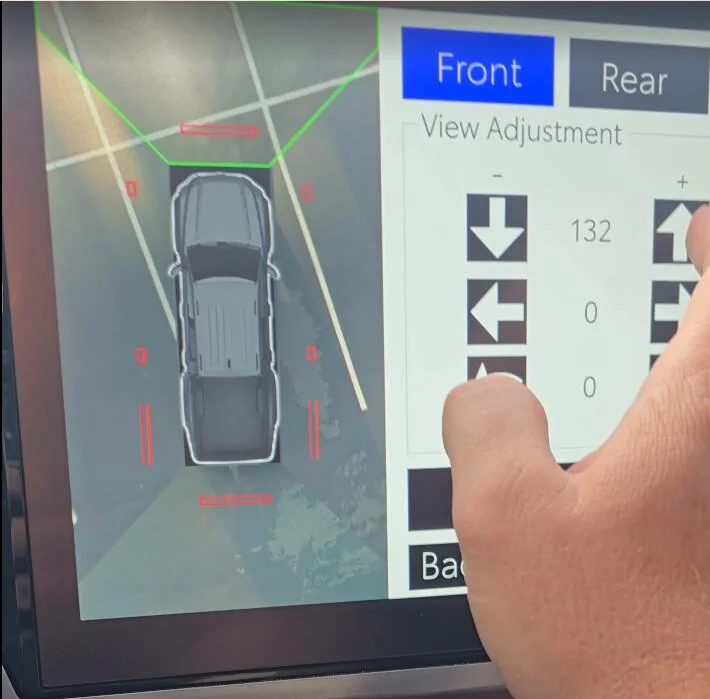
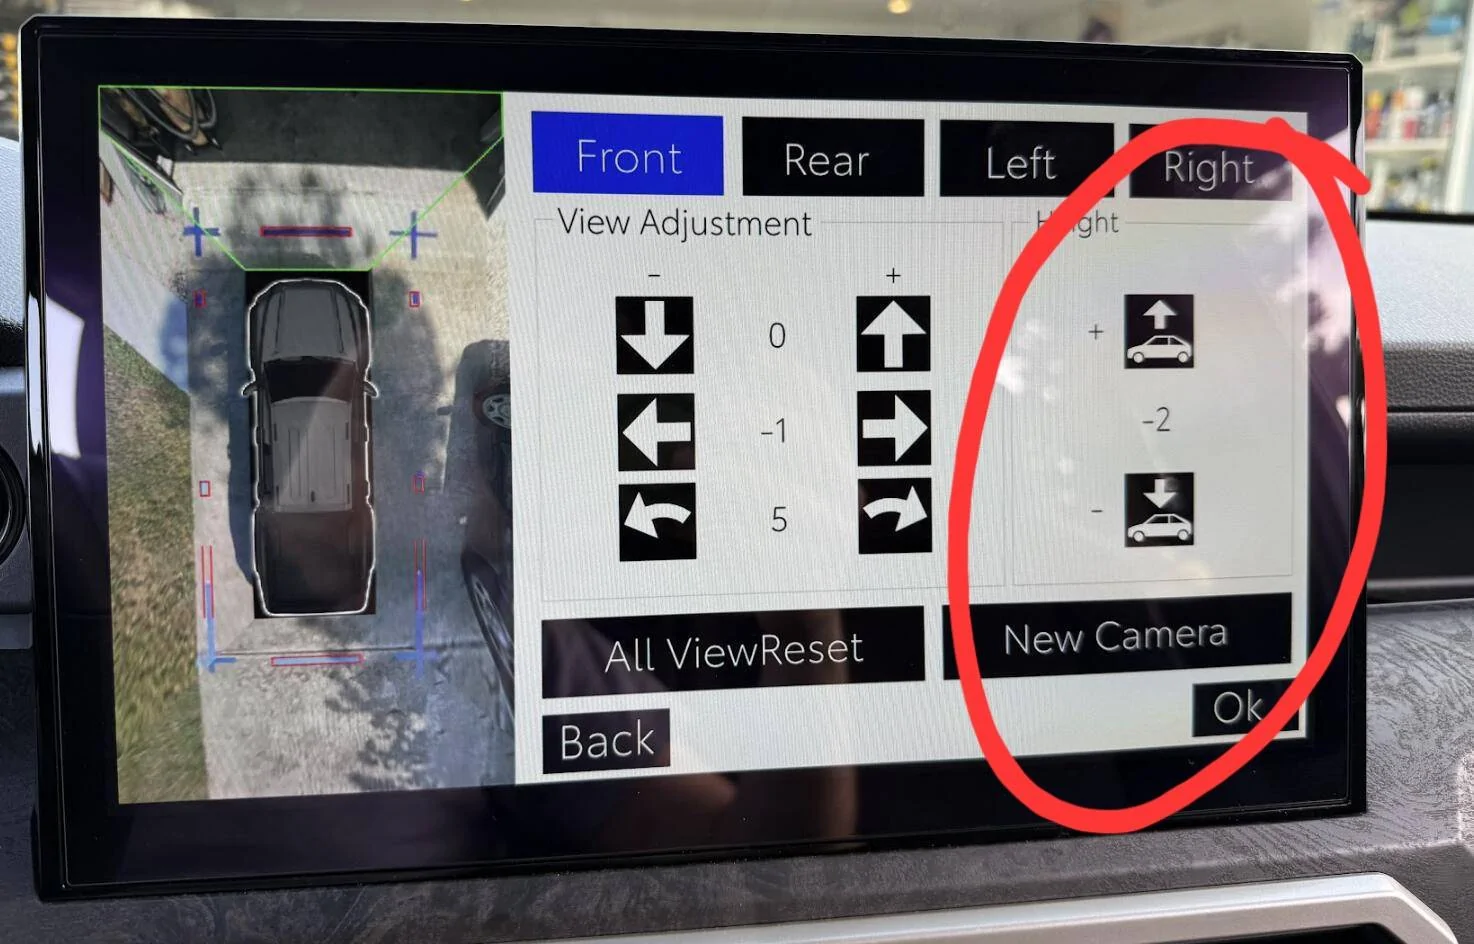
What I have circled in red is where the +160 up to +165 change that people are making correct? As in not those other values on the left side of the screen.

1744997187680-wq.jpg
No, that's the lift/height adjustment that will zoom the camera in/out.
The adjustment you want is the up+ arrow that current reads zero. You'd send that up to the value.

That said, if this is a live image of your vehicle, your crosses look pretty aligned already.

Take note that if you're working any of the cameras, what the left side UP DOWN LEFT RIGHT arrows do changes... it's all about the installation angle of the camera. so even in the tech instructions they tell you to play with each direction to understand which moves the camera in which direction, then make the necessary adjustment accordingly.
Sponsored

 

emerica243

TRD Off-Road Premium
Well-known member
First Name
Matt
Joined
Dec 26, 2024
Threads
50
Messages
226
Reaction score
154
Location
PA
Vehicle(s)
Fusion
No, that's the lift/height adjustment that will zoom the camera in/out.
The adjustment you want is the up+ arrow that current reads zero. You'd send that up to the value.

That said, if this is a live image of your vehicle, your crosses look pretty aligned already.

Take note that if you're working any of the cameras, what the left side UP DOWN LEFT RIGHT arrows do changes... it's all about the installation angle of the camera. so even in the tech instructions they tell you to play with each direction to understand which moves the camera in which direction, then make the necessary adjustment accordingly.
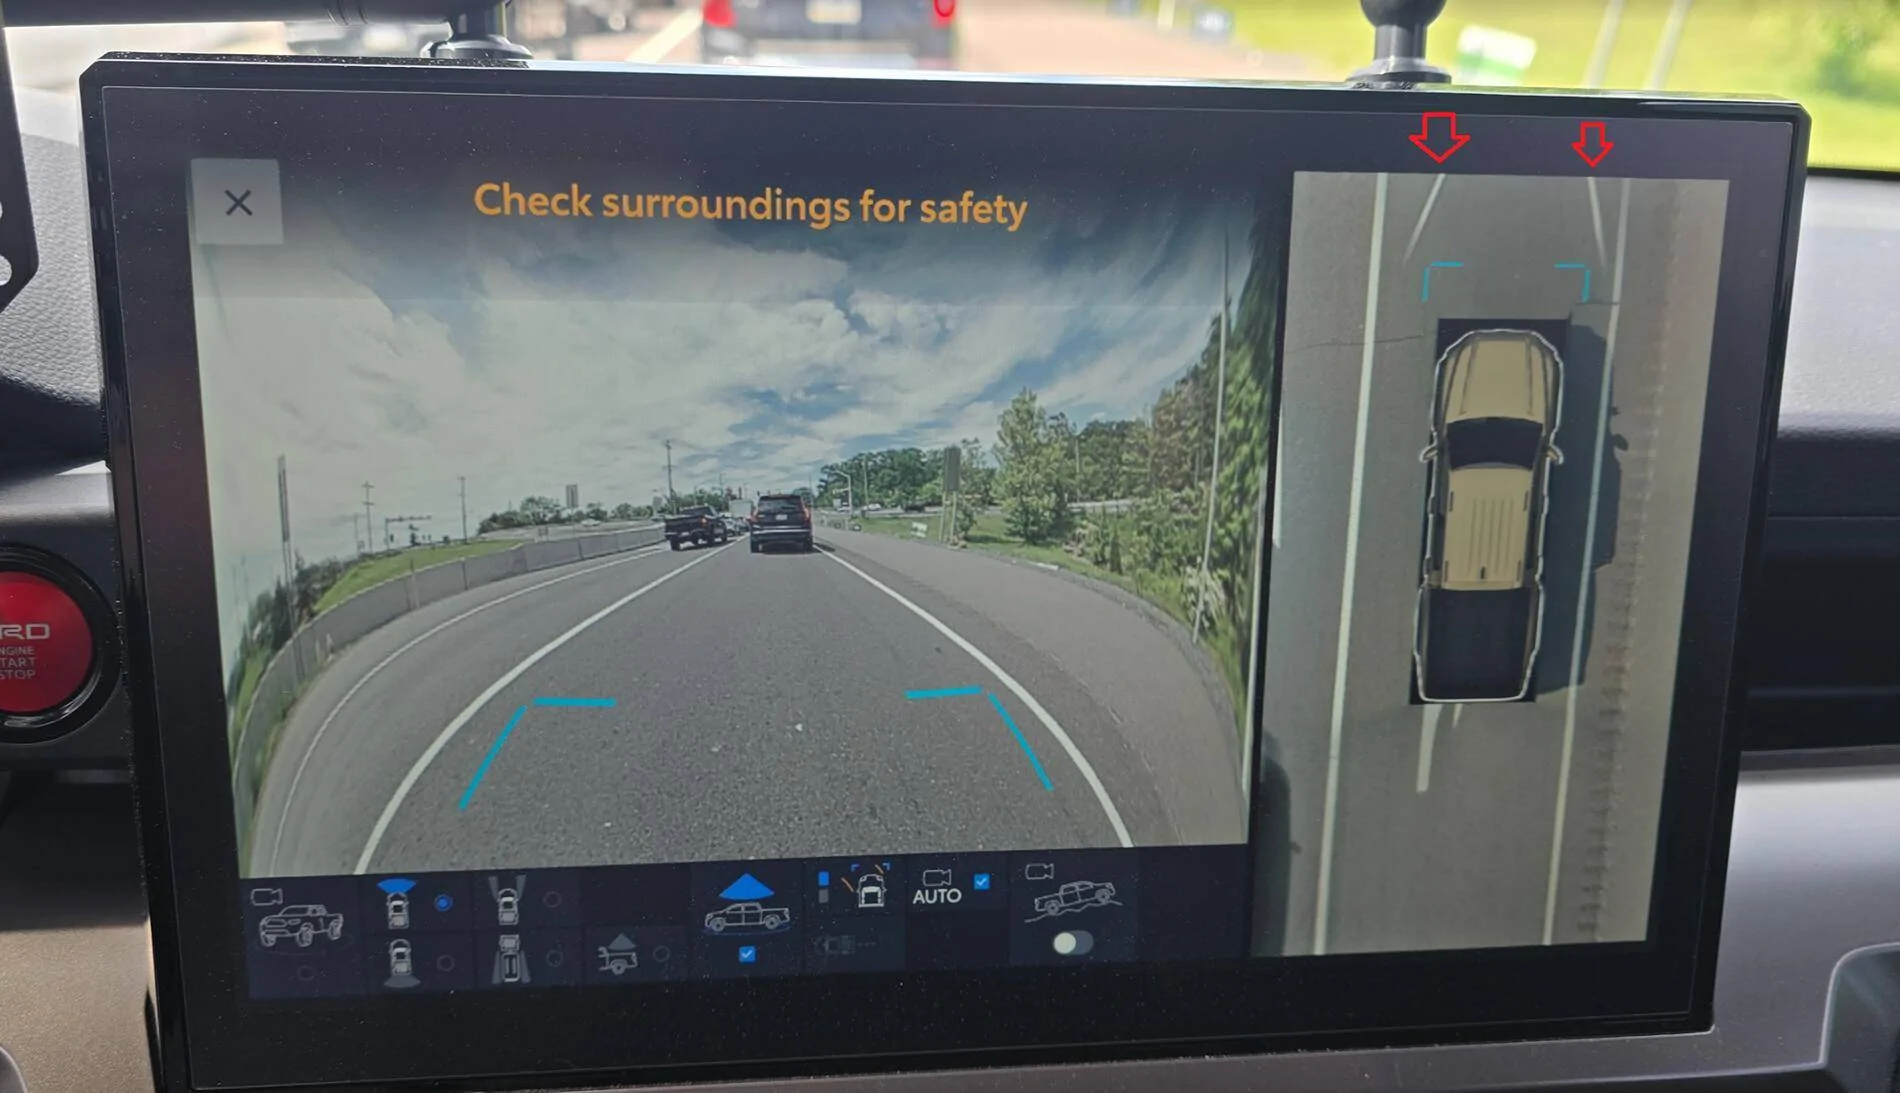
The image i showed above, is actually the image supplied on this threads original post. I was just using it for context of my question.

I did the grille swap to TH\Heritage grille from RAVE and used Gurveys camera bracket. Im guessing by doing that thats why these lines here from the front camera arent lining up straight on the overall image? So I was trying to get clarity where on that diag screen i actually put the +165 adjustment.

2024 Tacoma Loading... 1747770045113-v0
 

Baltimore

Well-known member
Joined
Jul 23, 2024
Threads
29
Messages
683
Reaction score
391
Location
Maryland
Vehicle(s)
4g hybrid
The image i showed above, is actually the image supplied on this threads original post. I was just using it for context of my question.

I did the grille swap to TH\Heritage grille from RAVE and used Gurveys camera bracket. Im guessing by doing that thats why these lines here from the front camera arent lining up straight on the overall image? So I was trying to get clarity where on that diag screen i actually put the +165 adjustment.

1747770045113-v0.jpg
Correct. If your lines aren't matching, or when you roll up to a stop stripe, the image is broken/misaligned from the edges to the middle, this is the adjustment you need to make. For me, since in order to not lose the guidelines I had to set up the entire lines and crosses, I went ahead and adjusted all the cameras for better total alignment. Which also then, if all the blue alignment markers fit within the red target boxes, allows your blue and yellow line guides to be available.
 

emerica243

TRD Off-Road Premium
Well-known member
First Name
Matt
Joined
Dec 26, 2024
Threads
50
Messages
226
Reaction score
154
Location
PA
Vehicle(s)
Fusion
Around +130 to +132 seemed to be the sweet spot for me.

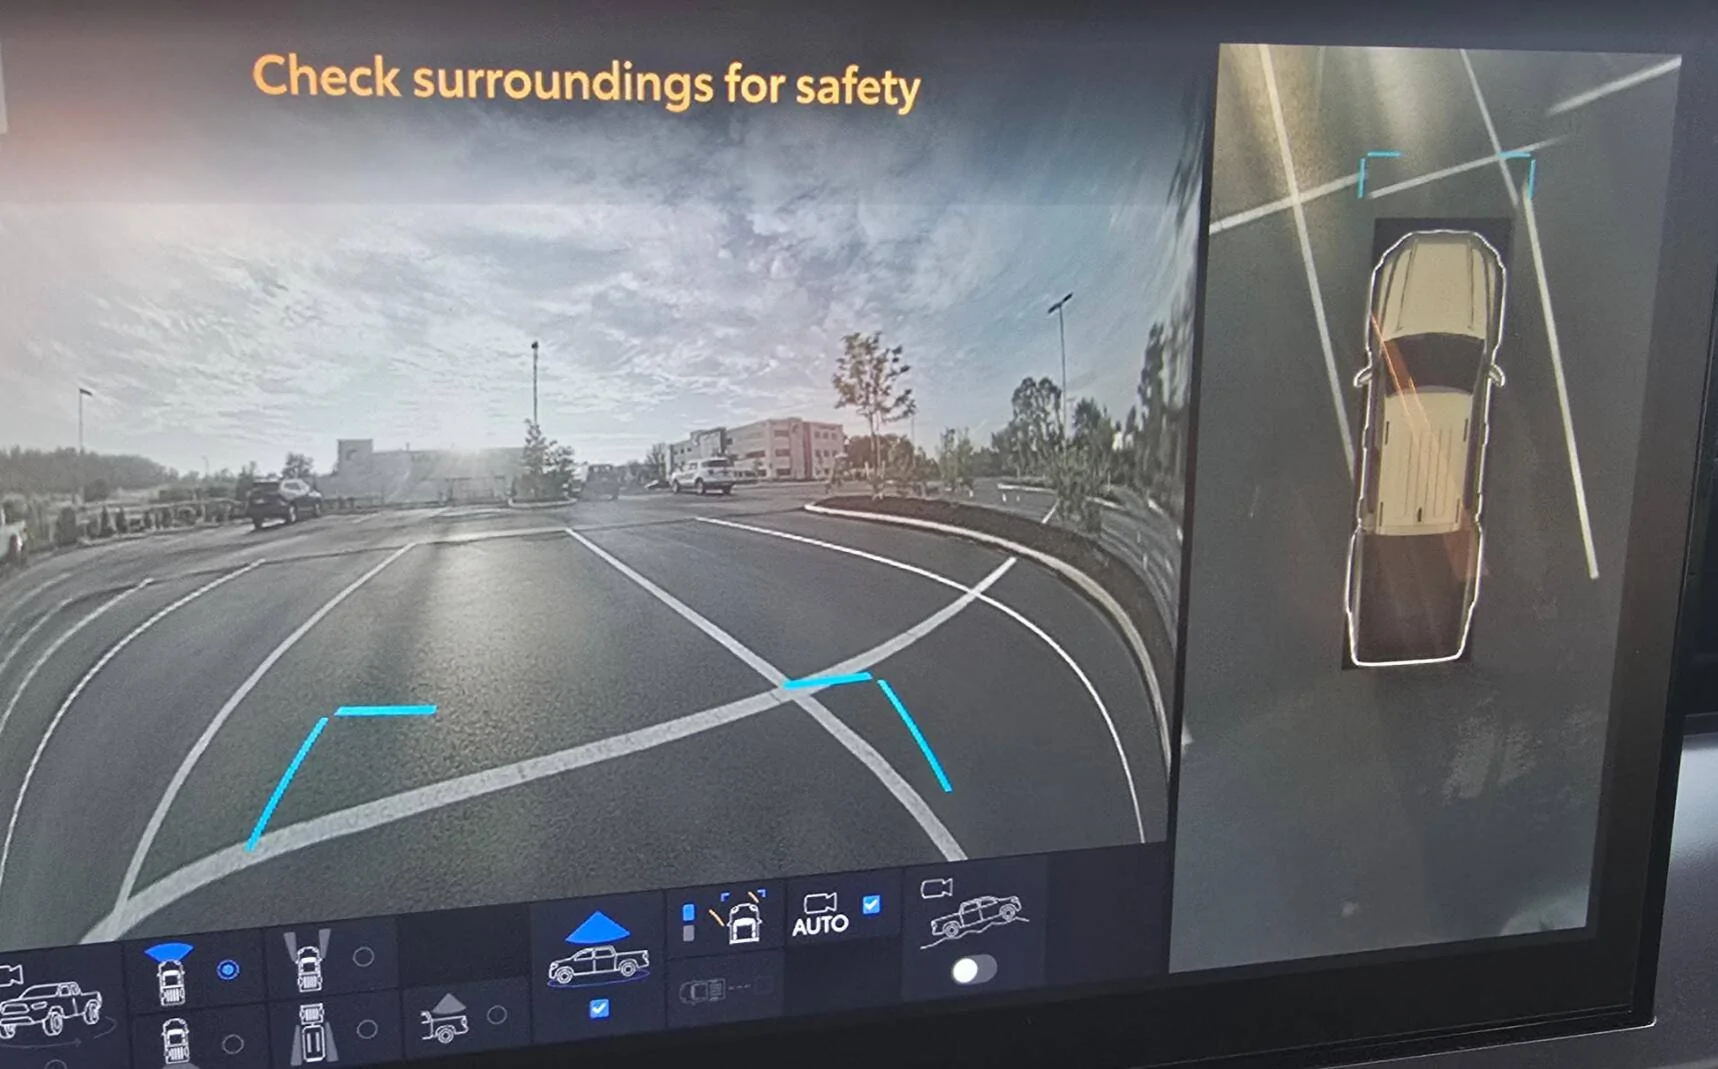
BEFORE(heritage grille installed + Gurvy bracket)
2024 Tacoma Loading... 1750424749073-n2


2024 Tacoma Loading... 1750424775965-cy


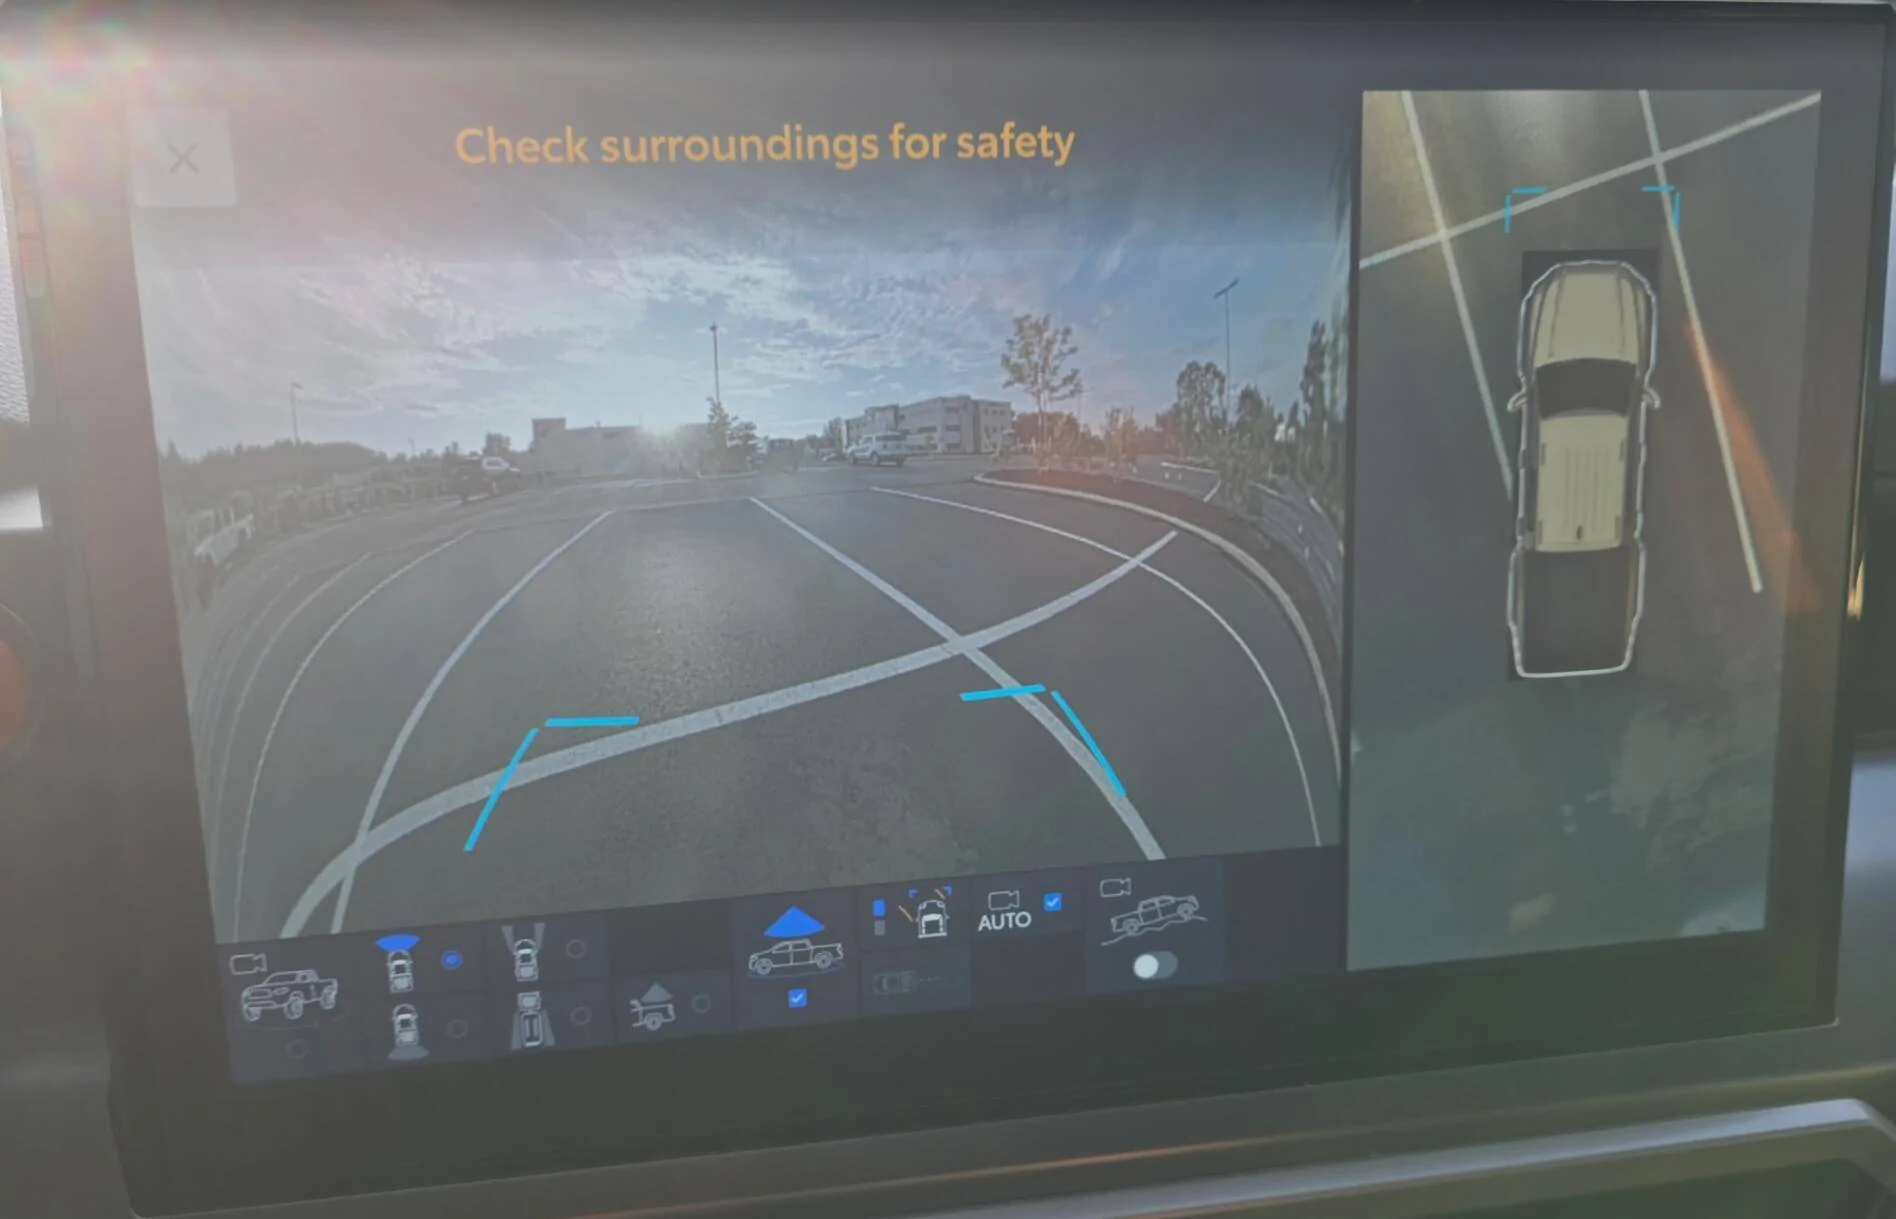
AFTER adjustment (+130)
2024 Tacoma Loading... 1750424803956-gf


2024 Tacoma Loading... 1750424860917-h6


DURING
 

Baltimore

Well-known member
Joined
Jul 23, 2024
Threads
29
Messages
683
Reaction score
391
Location
Maryland
Vehicle(s)
4g hybrid
I think it's heavily dependent on your trim level, wheels/tires and lift/suspension as to what the final numbers end up being.

I didn't even bother to track the results, since it "zeros" them after the commit. I just focused on image line up. Including the sides and rear.
 

Sponsored

J_wgz

TRD Sport Premium
New member
First Name
Joel
Joined
Aug 10, 2025
Threads
0
Messages
1
Reaction score
1
Location
Florida
Vehicle(s)
2025 Tacoma TRD Sport Premium 4x4
So a few weeks ago I went down the rabbit hole on how to re-calibrate my 360 cameras after I swapped my Limited Grill for a Heritage Grill.

To calibrate your cameras, it's actually fairly simple. You can do it all on your radio infotainment screen.

Steps to access the Calibration Menu (service menu):

1. Get in your truck and close all the doors and windows. From my testing, you cannot access the Service Menu if a door or window is open. Once you access the Service Menu, you then can open a door or window.
2. With your foot off the brake pedal, double click your stop/start button to access Accessory Mode
2. Wait until the infotainment (radio) screen boots up
3. Turn the volume all the way off
3. Go to Settings > Display > Screen > Turn off Display
4. Okay so here is the hardest part. You have to swipe left to right 5 times, and then right to left 5 times. Your screen may display "Touch to turn screen on" while you are swiping, but ignore the message.
4a. It may take 1 or 2 tries to get this to work. If you mess up, you just have to tap the screen to turn it back on, then turn it back off in the settings. Then continue with step #4 again.​
5. If swiped correctly, you should see a Service Menu pop up.
6. Navigate to Function Check > Camera Settings > View Adjustment
6a. If an option is greyed out, just hold the desired option for appx. 5 seconds and it will let you select it.​
7. After selecting View Adjustment, select Next.
8. You will now see the birds eye view of your truck where you can make adjustments.
9. After making your adjustments, select Ok.
10. Once it completes saving, click OK and you can exit the Service Menu. The next time you start the truck, it will ask you to complete service mode and just choose ok to complete.

Notes:

- Accessory Mode only stays on for 15-20 minutes, so make sure you don't take too long to adjust all your cameras otherwise you will have to restart the process.
- I don't think it's possible to get the cameras aligned 100% perfectly. I got it like 95% good and I was happy with the result
- While adjusting the cameras, where both cameras line up and meet in the image, there is no blending effect of how they mesh together. Once you exit the Service Menu, and start driving, the normal 360 camera view adds a blending effect to where the cameras mesh together to hide some of the imperfections of misalignment, so don't worry if the service menu doesn't look 100% perfect.
- If you are only looking to realign your front camera after swapping grills, you can follow the above steps (change the front camera angle to +165 should get you close to spot on, adjust + or - 1 until you get it perfect).


Be cautious when making changes in the Service Menu. It appears you can change other settings in this menu as well, and I recommend not doing so unless you know what you are doing. I am not an export and I am just sharing some of the information I have found.

If you are looking to do a full recalibration of all the cameras, I have attached the official Camera Calibration Procedure from the Service Manual that I found shared online. This procedure is very in depth, and honestly probably not recommend if you are only swapping your front grill camera (I believe other forum members were able to change their front camera calibration to +162 or +165 to get it adjusted correctly) With my tailgate camera also being misaligned from the factory, I performed this calibration to get everything dialed in. It did take some time, especially settings up all the tape.

The official calibration procedure of laying tape down in precise locations was time consuming and very tedious to get all the tape lined up perfectly. Honestly, I think if you just take a 2ft x 2ft piece of wood or cardboard, put some painters tape on it, and move it around to each corner of your truck where your cameras 'mesh' together in the view, it will work almost as good. I've saw someone else mentioned they just went to a parking lot and used the painted lines.


View attachment 31179
Tape laid out per the Service Manual Procedure


View attachment 31180
This was as close as perfect as I could get it. It's not perfect, but I was happy with the results. Much better than how it came from factory. The adjustment values in this picture are not accurate, as each time you save, the value returns to zero.

View attachment 31177
Using wood instead to save time.

View attachment 31188
Can’t thank you enough for this post! Just recalibrated front camera after my grille swap and it was a breeze thanks to these detailed instructions.

If I were to add just one detail (and maybe it was just me)… I entered into accessory mode with the engine off…once already in accessory mode, the camera settings button was grayed out (pressing and holding wasn’t activating it)… I turned the engine on and it instantly activated the button to be able to move on to the next step.
 
Last edited:

potaoo

TRD Off-Road
Member
First Name
Aidan
Joined
Apr 24, 2025
Threads
2
Messages
15
Reaction score
25
Location
IL
Vehicle(s)
2024 tacoma
So a few weeks ago I went down the rabbit hole on how to re-calibrate my 360 cameras after I swapped my Limited Grill for a Heritage Grill.

To calibrate your cameras, it's actually fairly simple. You can do it all on your radio infotainment screen.

Steps to access the Calibration Menu (service menu):

1. Get in your truck and close all the doors and windows. From my testing, you cannot access the Service Menu if a door or window is open. Once you access the Service Menu, you then can open a door or window.
2. With your foot off the brake pedal, double click your stop/start button to access Accessory Mode
2. Wait until the infotainment (radio) screen boots up
3. Turn the volume all the way off
3. Go to Settings > Display > Screen > Turn off Display
4. Okay so here is the hardest part. You have to swipe left to right 5 times, and then right to left 5 times. Your screen may display "Touch to turn screen on" while you are swiping, but ignore the message.
4a. It may take 1 or 2 tries to get this to work. If you mess up, you just have to tap the screen to turn it back on, then turn it back off in the settings. Then continue with step #4 again.​
5. If swiped correctly, you should see a Service Menu pop up.
6. Navigate to Function Check > Camera Settings > View Adjustment
6a. If an option is greyed out, just hold the desired option for appx. 5 seconds and it will let you select it.​
7. After selecting View Adjustment, select Next.
8. You will now see the birds eye view of your truck where you can make adjustments.
9. After making your adjustments, select Ok.
10. Once it completes saving, click OK and you can exit the Service Menu. The next time you start the truck, it will ask you to complete service mode and just choose ok to complete.

Notes:

- Accessory Mode only stays on for 15-20 minutes, so make sure you don't take too long to adjust all your cameras otherwise you will have to restart the process.
- I don't think it's possible to get the cameras aligned 100% perfectly. I got it like 95% good and I was happy with the result
- While adjusting the cameras, where both cameras line up and meet in the image, there is no blending effect of how they mesh together. Once you exit the Service Menu, and start driving, the normal 360 camera view adds a blending effect to where the cameras mesh together to hide some of the imperfections of misalignment, so don't worry if the service menu doesn't look 100% perfect.
- If you are only looking to realign your front camera after swapping grills, you can follow the above steps (change the front camera angle to +165 should get you close to spot on, adjust + or - 1 until you get it perfect).


Be cautious when making changes in the Service Menu. It appears you can change other settings in this menu as well, and I recommend not doing so unless you know what you are doing. I am not an export and I am just sharing some of the information I have found.

If you are looking to do a full recalibration of all the cameras, I have attached the official Camera Calibration Procedure from the Service Manual that I found shared online. This procedure is very in depth, and honestly probably not recommend if you are only swapping your front grill camera (I believe other forum members were able to change their front camera calibration to +162 or +165 to get it adjusted correctly) With my tailgate camera also being misaligned from the factory, I performed this calibration to get everything dialed in. It did take some time, especially settings up all the tape.

The official calibration procedure of laying tape down in precise locations was time consuming and very tedious to get all the tape lined up perfectly. Honestly, I think if you just take a 2ft x 2ft piece of wood or cardboard, put some painters tape on it, and move it around to each corner of your truck where your cameras 'mesh' together in the view, it will work almost as good. I've saw someone else mentioned they just went to a parking lot and used the painted lines.


View attachment 31179
Tape laid out per the Service Manual Procedure


View attachment 31180
This was as close as perfect as I could get it. It's not perfect, but I was happy with the results. Much better than how it came from factory. The adjustment values in this picture are not accurate, as each time you save, the value returns to zero.

View attachment 31177
Using wood instead to save time.

View attachment 31188
do you know if there is anyway to flip a camera i had my driver mirror assembly replaced and the camera is showing opposite like on the sides the front tire is in the back of the view, and its only on the driver side. don't know if there is any way to flip the entire view
 

alairmore

Trailhunter
Member
First Name
Adam
Joined
Aug 20, 2025
Threads
2
Messages
22
Reaction score
19
Location
Tustin
Vehicle(s)
2025 Tacoma Trailhunter
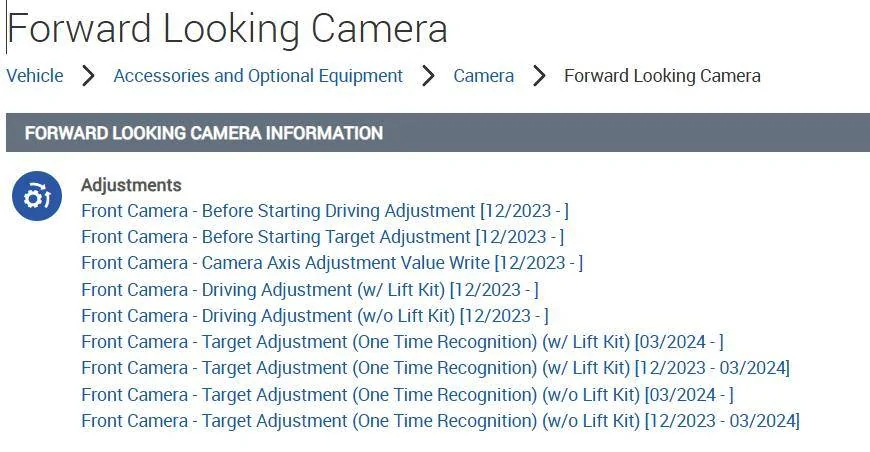
I have an ALLDATA account and found this. Several options depending on what your driving.

1745005233965-ee.webp
Are the ones with the lift kit for the TRD Pro /Trailhunter?

I had to replace my passenger side mirror assembly and need to calibrate. Wondering if it's any different?
 

TRD_OnRoad

TRD Off-Road Premium
Member
Joined
Dec 3, 2025
Threads
1
Messages
7
Reaction score
19
Location
New Jersey
Vehicle(s)
2024 Toyota Tacoma TRD-OR
So a few weeks ago I went down the rabbit hole on how to re-calibrate my 360 cameras after I swapped my Limited Grill for a Heritage Grill.

To calibrate your cameras, it's actually fairly simple. You can do it all on your radio infotainment screen.

Steps to access the Calibration Menu (service menu):

1. Get in your truck and close all the doors and windows. From my testing, you cannot access the Service Menu if a door or window is open. Once you access the Service Menu, you then can open a door or window.
2. With your foot off the brake pedal, double click your stop/start button to access Accessory Mode
2. Wait until the infotainment (radio) screen boots up
3. Turn the volume all the way off
3. Go to Settings > Display > Screen > Turn off Display
4. Okay so here is the hardest part. You have to swipe left to right 5 times, and then right to left 5 times. Your screen may display "Touch to turn screen on" while you are swiping, but ignore the message.
4a. It may take 1 or 2 tries to get this to work. If you mess up, you just have to tap the screen to turn it back on, then turn it back off in the settings. Then continue with step #4 again.​
5. If swiped correctly, you should see a Service Menu pop up.
6. Navigate to Function Check > Camera Settings > View Adjustment
6a. If an option is greyed out, just hold the desired option for appx. 5 seconds and it will let you select it.​
7. After selecting View Adjustment, select Next.
8. You will now see the birds eye view of your truck where you can make adjustments.
9. After making your adjustments, select Ok.
10. Once it completes saving, click OK and you can exit the Service Menu. The next time you start the truck, it will ask you to complete service mode and just choose ok to complete.

Notes:

- Accessory Mode only stays on for 15-20 minutes, so make sure you don't take too long to adjust all your cameras otherwise you will have to restart the process.
- I don't think it's possible to get the cameras aligned 100% perfectly. I got it like 95% good and I was happy with the result
- While adjusting the cameras, where both cameras line up and meet in the image, there is no blending effect of how they mesh together. Once you exit the Service Menu, and start driving, the normal 360 camera view adds a blending effect to where the cameras mesh together to hide some of the imperfections of misalignment, so don't worry if the service menu doesn't look 100% perfect.
- If you are only looking to realign your front camera after swapping grills, you can follow the above steps (change the front camera angle to +165 should get you close to spot on, adjust + or - 1 until you get it perfect).


Be cautious when making changes in the Service Menu. It appears you can change other settings in this menu as well, and I recommend not doing so unless you know what you are doing. I am not an export and I am just sharing some of the information I have found.

If you are looking to do a full recalibration of all the cameras, I have attached the official Camera Calibration Procedure from the Service Manual that I found shared online. This procedure is very in depth, and honestly probably not recommend if you are only swapping your front grill camera (I believe other forum members were able to change their front camera calibration to +162 or +165 to get it adjusted correctly) With my tailgate camera also being misaligned from the factory, I performed this calibration to get everything dialed in. It did take some time, especially settings up all the tape.

The official calibration procedure of laying tape down in precise locations was time consuming and very tedious to get all the tape lined up perfectly. Honestly, I think if you just take a 2ft x 2ft piece of wood or cardboard, put some painters tape on it, and move it around to each corner of your truck where your cameras 'mesh' together in the view, it will work almost as good. I've saw someone else mentioned they just went to a parking lot and used the painted lines.


View attachment 31179
Tape laid out per the Service Manual Procedure


View attachment 31180
This was as close as perfect as I could get it. It's not perfect, but I was happy with the results. Much better than how it came from factory. The adjustment values in this picture are not accurate, as each time you save, the value returns to zero.

View attachment 31177
Using wood instead to save time.

View attachment 31188
Absolute life saver! Took me less than 5 minutes to fix my camera after installing the grille. Thank you so much for the write up!!
 

Taco Ji

TRD Off-Road Premium
Banned
Banned
Joined
Jul 19, 2025
Threads
7
Messages
363
Reaction score
292
Location
New Jersey
Vehicle(s)
2025 Toyota Tacoma
How do you know if your camera needs to be calibrated? I swapped to an aftermarket grill and checked my cameras and all seem fine.
 

Sponsored

TRD_OnRoad

TRD Off-Road Premium
Member
Joined
Dec 3, 2025
Threads
1
Messages
7
Reaction score
19
Location
New Jersey
Vehicle(s)
2024 Toyota Tacoma TRD-OR
How do you know if your camera needs to be calibrated? I swapped to an aftermarket grill and checked my cameras and all seem fine.
I can’t speak for ‘aftermarket’ grilles, but the OEM TRD Pro and Trailhunter grille camera brackets are angled differently than the other trims (slightly more upward facing). It’s obvious in the corners of the front camera view where it meets up with the side cameras and looks a little warped, especially in the 360° view.
Recalibrating the front view fixes the issue. Saved me a lot of time not having to go to the dealership. If yours looks fine, then the grille you have probably has the same bracket camera angle I’m guessing.
 

SkinnyT

TRD Sport
Member
First Name
Bryce
Joined
Jun 26, 2025
Threads
2
Messages
15
Reaction score
15
Location
California, US
Vehicle(s)
2025 Bronze Oxide Tacoma TRD Sport
I wonder if this applies to aftermarket head units/360° panoramic camera setups.
 

ramcoma

TRD Off-Road Premium
Active member
Joined
Aug 2, 2025
Threads
4
Messages
29
Reaction score
9
Location
united states
Vehicle(s)
2025 Tacoma TRD OR HYBRID
So a few weeks ago I went down the rabbit hole on how to re-calibrate my 360 cameras after I swapped my Limited Grill for a Heritage Grill.

To calibrate your cameras, it's actually fairly simple. You can do it all on your radio infotainment screen.

Steps to access the Calibration Menu (service menu):

1. Get in your truck and close all the doors and windows. From my testing, you cannot access the Service Menu if a door or window is open. Once you access the Service Menu, you then can open a door or window.
2. With your foot off the brake pedal, double click your stop/start button to access Accessory Mode
2. Wait until the infotainment (radio) screen boots up
3. Turn the volume all the way off
3. Go to Settings > Display > Screen > Turn off Display
4. Okay so here is the hardest part. You have to swipe left to right 5 times, and then right to left 5 times. Your screen may display "Touch to turn screen on" while you are swiping, but ignore the message.
4a. It may take 1 or 2 tries to get this to work. If you mess up, you just have to tap the screen to turn it back on, then turn it back off in the settings. Then continue with step #4 again.​
5. If swiped correctly, you should see a Service Menu pop up.
6. Navigate to Function Check > Camera Settings > View Adjustment
6a. If an option is greyed out, just hold the desired option for appx. 5 seconds and it will let you select it.​
7. After selecting View Adjustment, select Next.
8. You will now see the birds eye view of your truck where you can make adjustments.
9. After making your adjustments, select Ok.
10. Once it completes saving, click OK and you can exit the Service Menu. The next time you start the truck, it will ask you to complete service mode and just choose ok to complete.

Notes:

- Accessory Mode only stays on for 15-20 minutes, so make sure you don't take too long to adjust all your cameras otherwise you will have to restart the process.
- I don't think it's possible to get the cameras aligned 100% perfectly. I got it like 95% good and I was happy with the result
- While adjusting the cameras, where both cameras line up and meet in the image, there is no blending effect of how they mesh together. Once you exit the Service Menu, and start driving, the normal 360 camera view adds a blending effect to where the cameras mesh together to hide some of the imperfections of misalignment, so don't worry if the service menu doesn't look 100% perfect.
- If you are only looking to realign your front camera after swapping grills, you can follow the above steps (change the front camera angle to +165 should get you close to spot on, adjust + or - 1 until you get it perfect).


Be cautious when making changes in the Service Menu. It appears you can change other settings in this menu as well, and I recommend not doing so unless you know what you are doing. I am not an export and I am just sharing some of the information I have found.

If you are looking to do a full recalibration of all the cameras, I have attached the official Camera Calibration Procedure from the Service Manual that I found shared online. This procedure is very in depth, and honestly probably not recommend if you are only swapping your front grill camera (I believe other forum members were able to change their front camera calibration to +162 or +165 to get it adjusted correctly) With my tailgate camera also being misaligned from the factory, I performed this calibration to get everything dialed in. It did take some time, especially settings up all the tape.

The official calibration procedure of laying tape down in precise locations was time consuming and very tedious to get all the tape lined up perfectly. Honestly, I think if you just take a 2ft x 2ft piece of wood or cardboard, put some painters tape on it, and move it around to each corner of your truck where your cameras 'mesh' together in the view, it will work almost as good. I've saw someone else mentioned they just went to a parking lot and used the painted lines.


View attachment 31179
Tape laid out per the Service Manual Procedure


View attachment 31180
This was as close as perfect as I could get it. It's not perfect, but I was happy with the results. Much better than how it came from factory. The adjustment values in this picture are not accurate, as each time you save, the value returns to zero.

View attachment 31177
Using wood instead to save time.

View attachment 31188
I am trying to recalibrate my front camera, since i will be changing out to the Trail hunter grille with Rave offroad bracket i have a few questions for all you experts out there.

1. How many times can I do this recalibration? is it just a one time one shot only?.. what if I have to adjust multiple times to get the right number for my truk?

2. lets say i adjust the settings, to +165, save and exit, but then for whatever reason I have to go back into the menu to make adjustments again... does the previous set value show "+165" or does it go back to zero? I also ask because i want to take picture of the Default factory numbers, just in case i have to revert back to the factory default numbers.
 

ramcoma

TRD Off-Road Premium
Active member
Joined
Aug 2, 2025
Threads
4
Messages
29
Reaction score
9
Location
united states
Vehicle(s)
2025 Tacoma TRD OR HYBRID
1. I've recalibrated mine twice so far so at least 2 times, maybe unlimited?

2. If you save +165 and then enter the menu again, the numeric value will be back to 0, but the adjustments will remain the same from what you have already saved.
Thank you for responding. Do you mind sharing what bracket you used for your camera and what number you adjusted to? I have been reading that the Rave offroad bracket is not the best and the camera gets flipped due to it not being designed correctly.
 

ramcoma

TRD Off-Road Premium
Active member
Joined
Aug 2, 2025
Threads
4
Messages
29
Reaction score
9
Location
united states
Vehicle(s)
2025 Tacoma TRD OR HYBRID
I 3d printed one I found on this forum (posted by @Gurvy522) I don't remeber the exact numbers.
i just purchased one of his brackets since i do not have a 3d printer. Are you happy with the way the camera's are functioning without doing the whole 360 resync??
Sponsored


Top