
Sponsored

Add fuel door release?

Toy-truck

TRD Off-Road Premium
Well-known member
Joined
Mar 5, 2024
Threads
4
Messages
103
Reaction score
62
Location
Houston, TX
Vehicle(s)
2024 Tacoma
A quick update. I have bought a few parts in the recent sale, learned a lot about the published parts lists :oops: but now have most of what is needed to add an electric locking fuel door. A few more items to clear up, but a full write up coming soon.
Any update on this?
Sponsored
 

socotaco

TRD Off-Road Premium
Member
Joined
Jan 28, 2026
Threads
1
Messages
18
Reaction score
37
Location
NorCal
Vehicle(s)
26 TRD OR
It has been a while (and a process), so here is the state of my project to add a locking, electric release fuel door to my 2026 TRD OR Premium. Spoiler alert - I have all the pieces needed and have tested what I plan to install, but the whole is not yet on the truck.

First, a little introduction. I continue to be amazed that a $50k vehicle these days does not come with some form of locking fuel door. I realize that the fuel filler pipe makes any attempts to siphon fuel difficult, but I also don't like the idea of anything that should not be in the fuel tank being added just for fun. So, I have already put on a locking fuel cap, pretty cheap and works fine, but it is not very slick.

And, Toyota has already done the engineering and put a suitable locking, electric release fuel filler door on the hybrid trucks. I'll give the benefit of the doubt here and say that this is likely because there are some additional requirements on pressure control and venting on a hybrid vehicle and not that Toyota are just being cheap. Specifically, because the vehicle can run without the gasoline engine running, although not for long on a Tacoma, this means that hybrid vehicle fuel tanks can become pressurized and they must then be vented, and this has to be done through a complex emissions control system to achieve the lower overall emissions. Because of this, I believe that the electric fuel door on the Tacoma is a kind of interlock that allows the fuel tank to be depressurized before the driver loosens and takes off the fuel filler cap. This is achieved by pugging the fuel door release button into the body control unit, which then monitors the pressure, vents the tank and then opens the fuel door. For the purposes of this project, what this means is that the fuel door uses the hybrid body harness, which is different to the gas model body harness, so there are no wires and no connectors for a plug and play solution to adding an electric release fuel door.

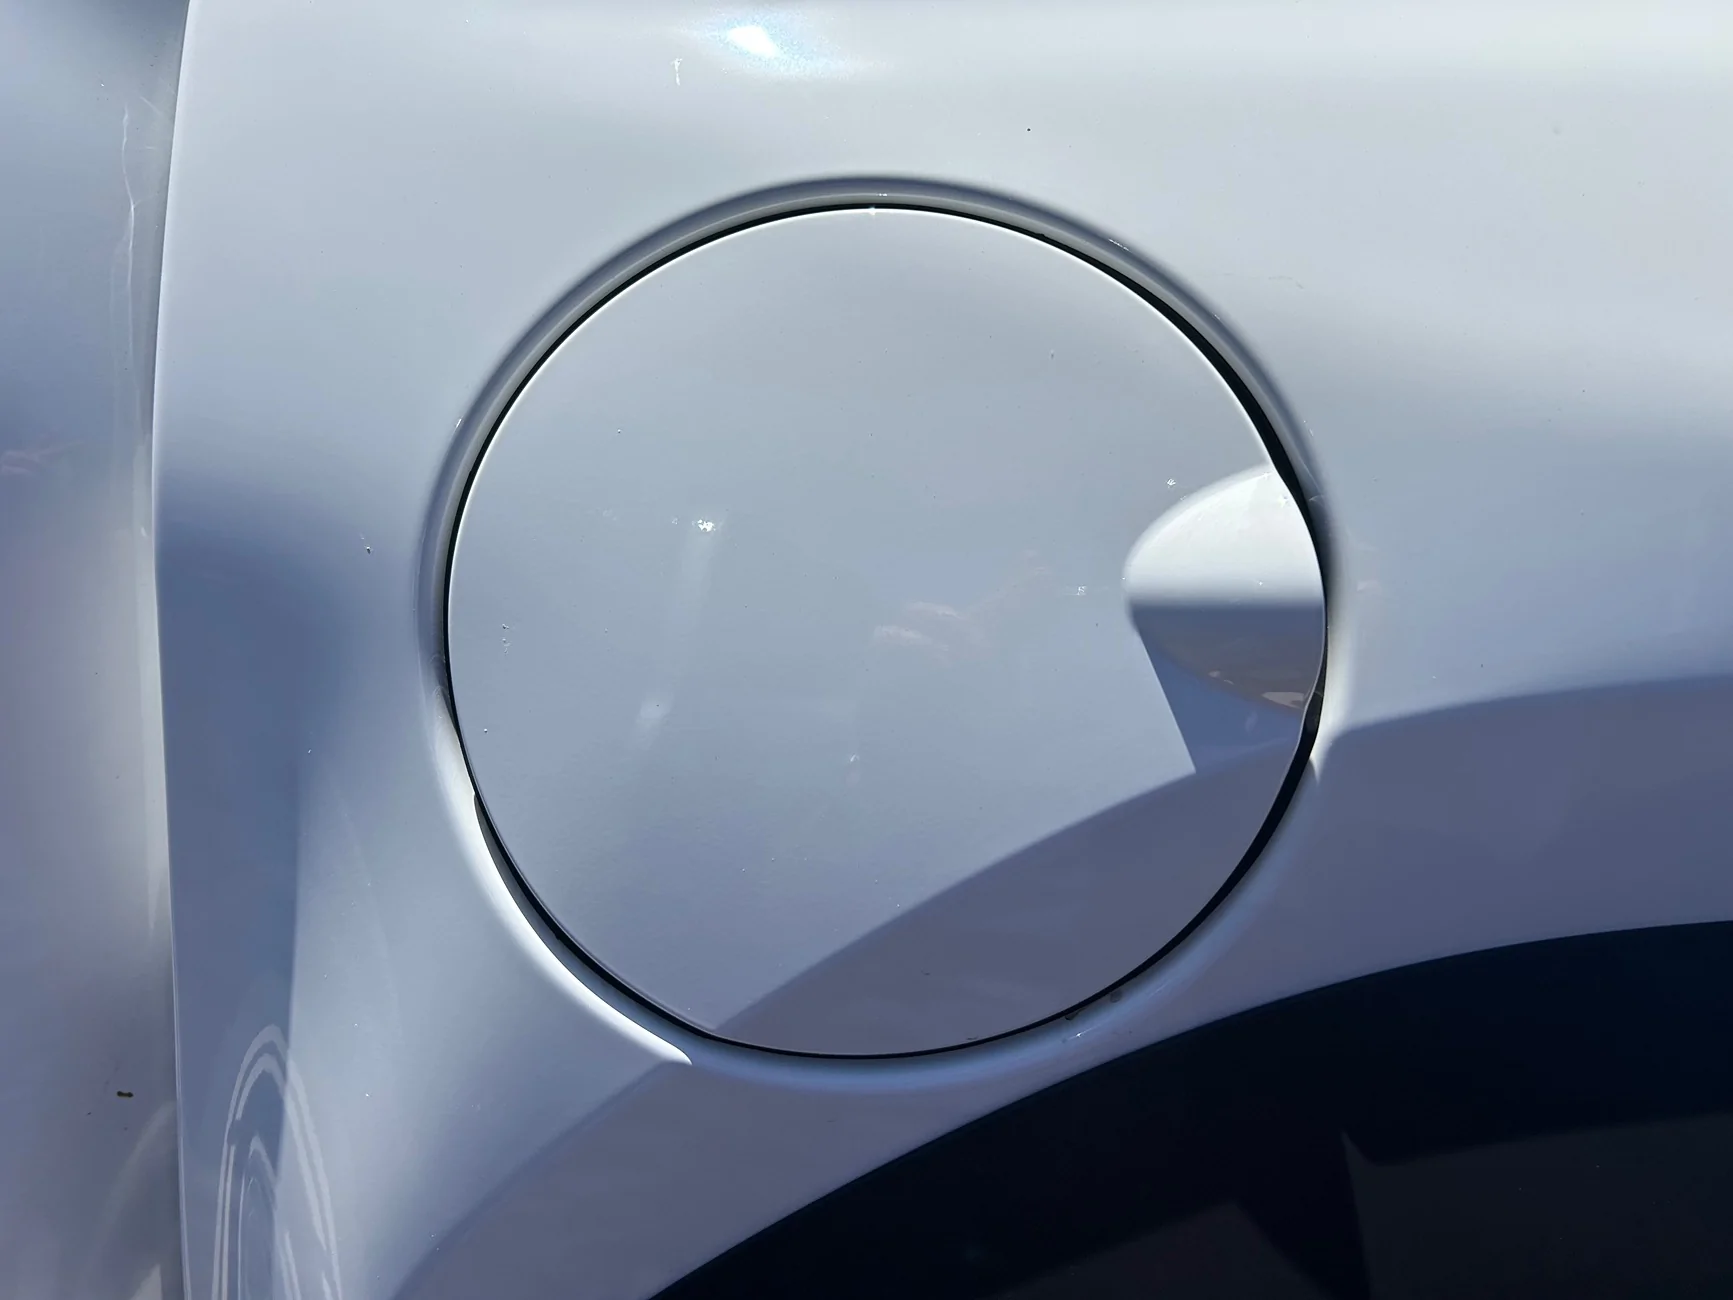
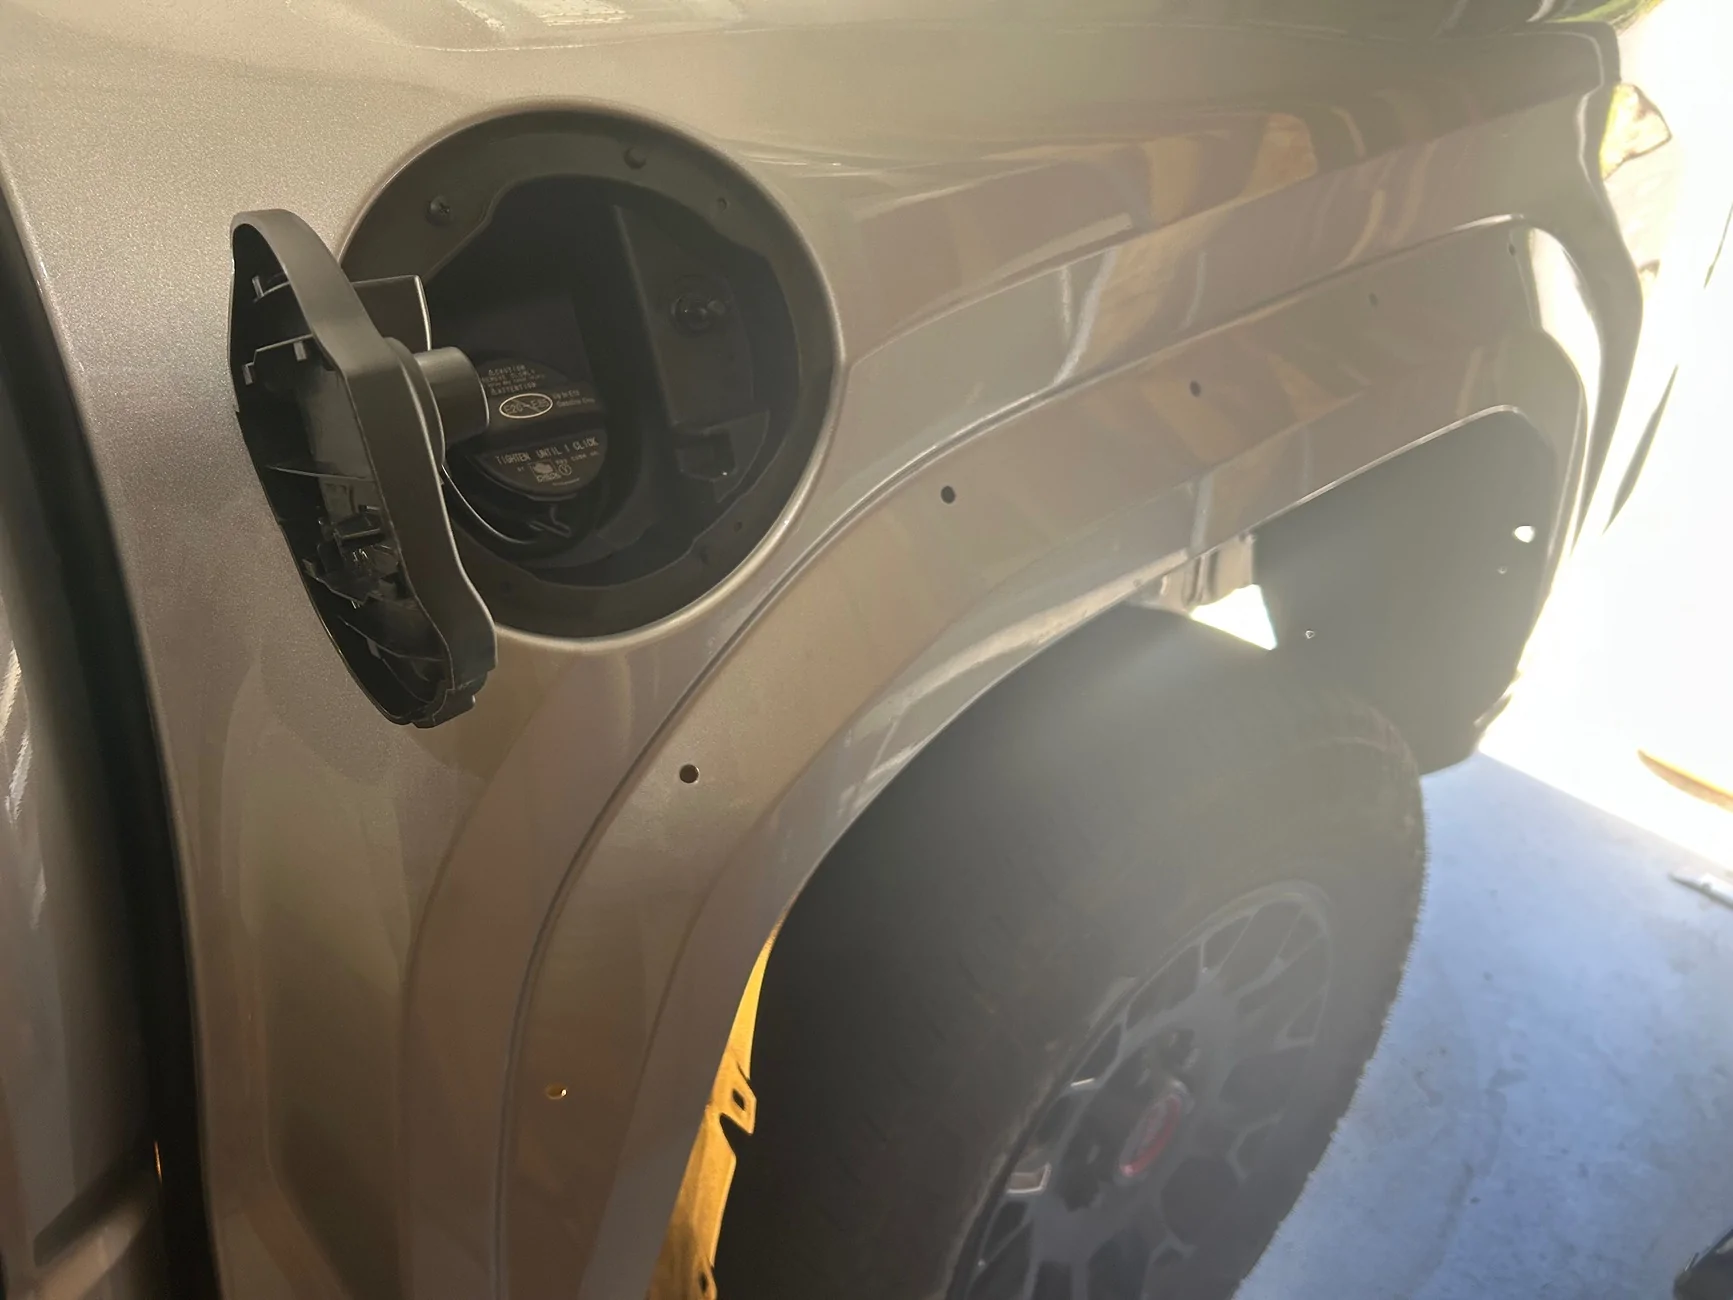
Here are some photos to compare the fuel door mechanisms on a gas only and hybrid Tacoma.

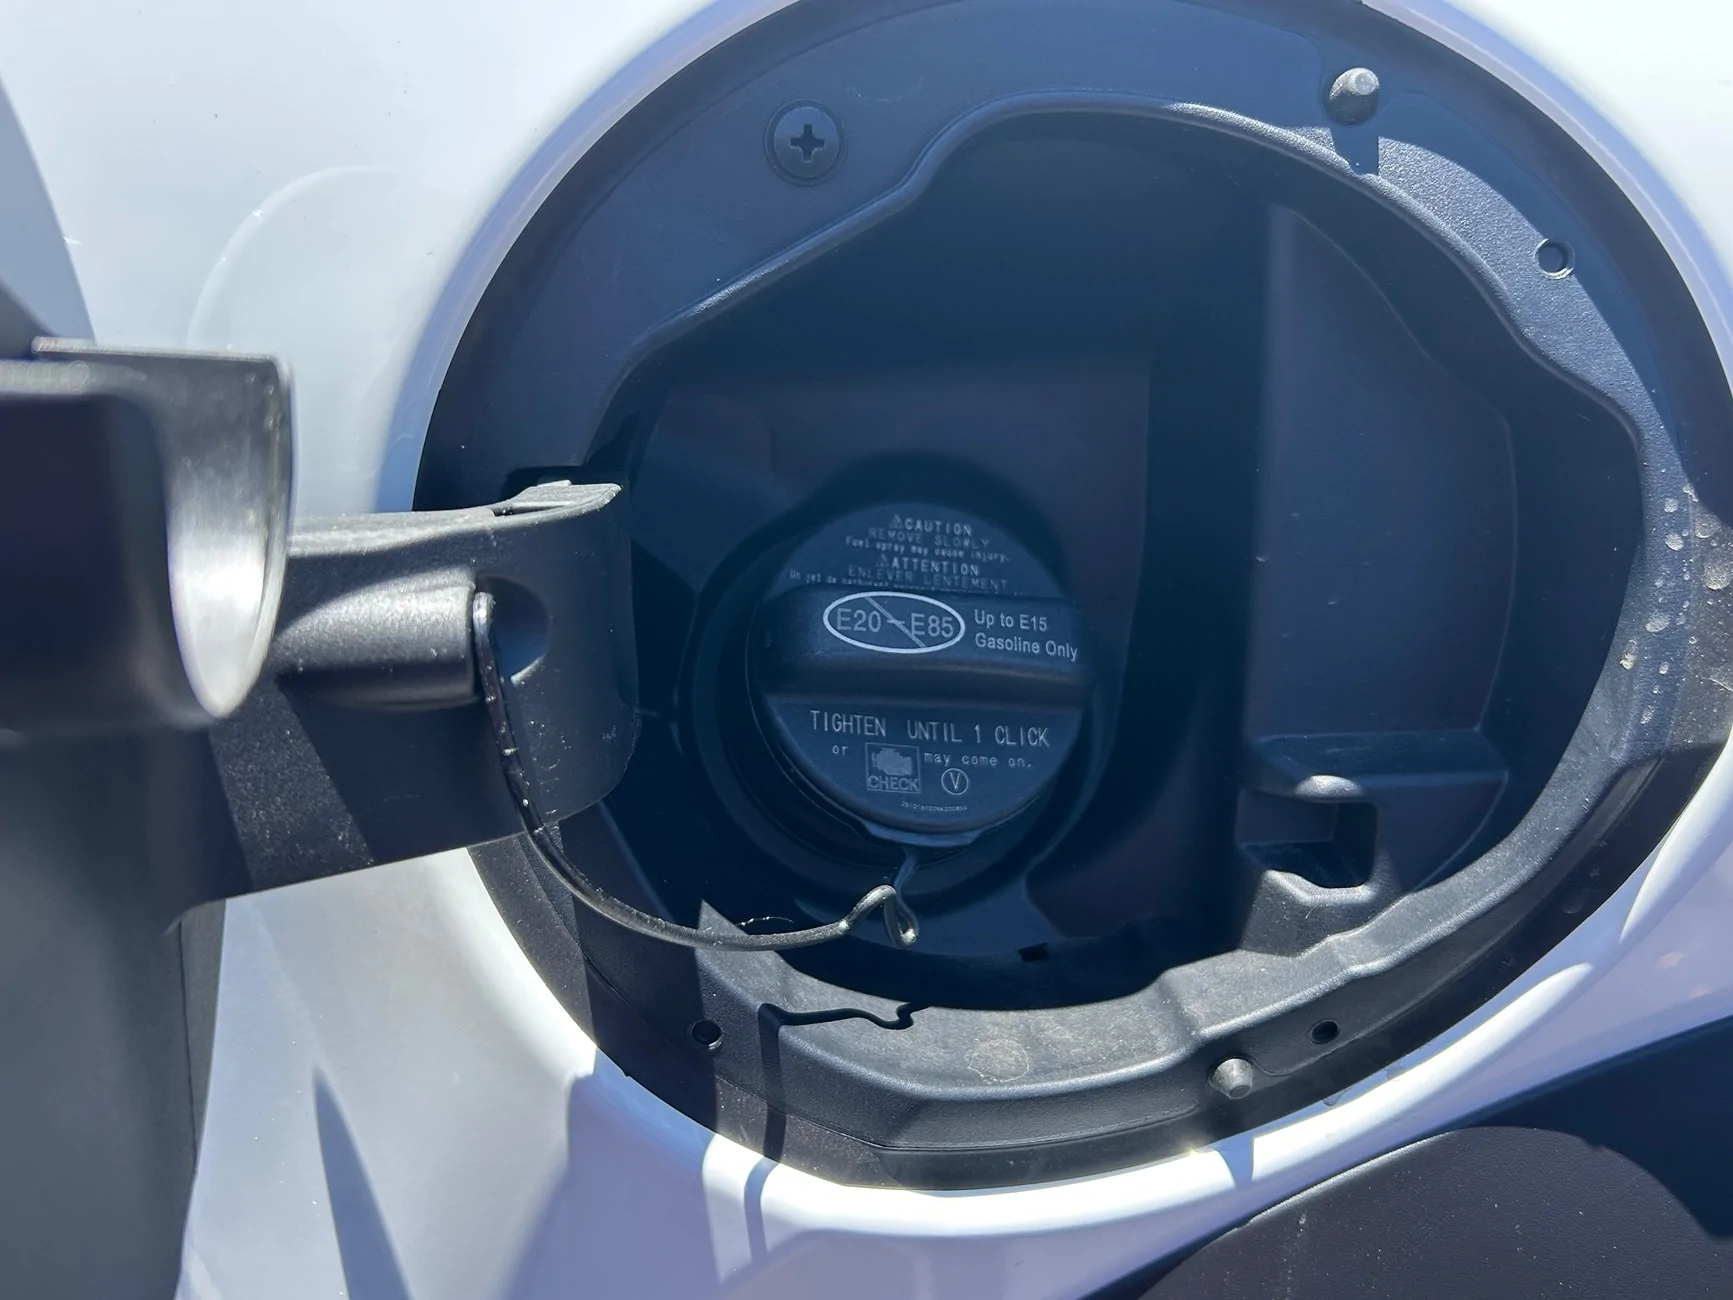
Here is the gas only filler area:
2024 Tacoma Add fuel door release? IMG_7335


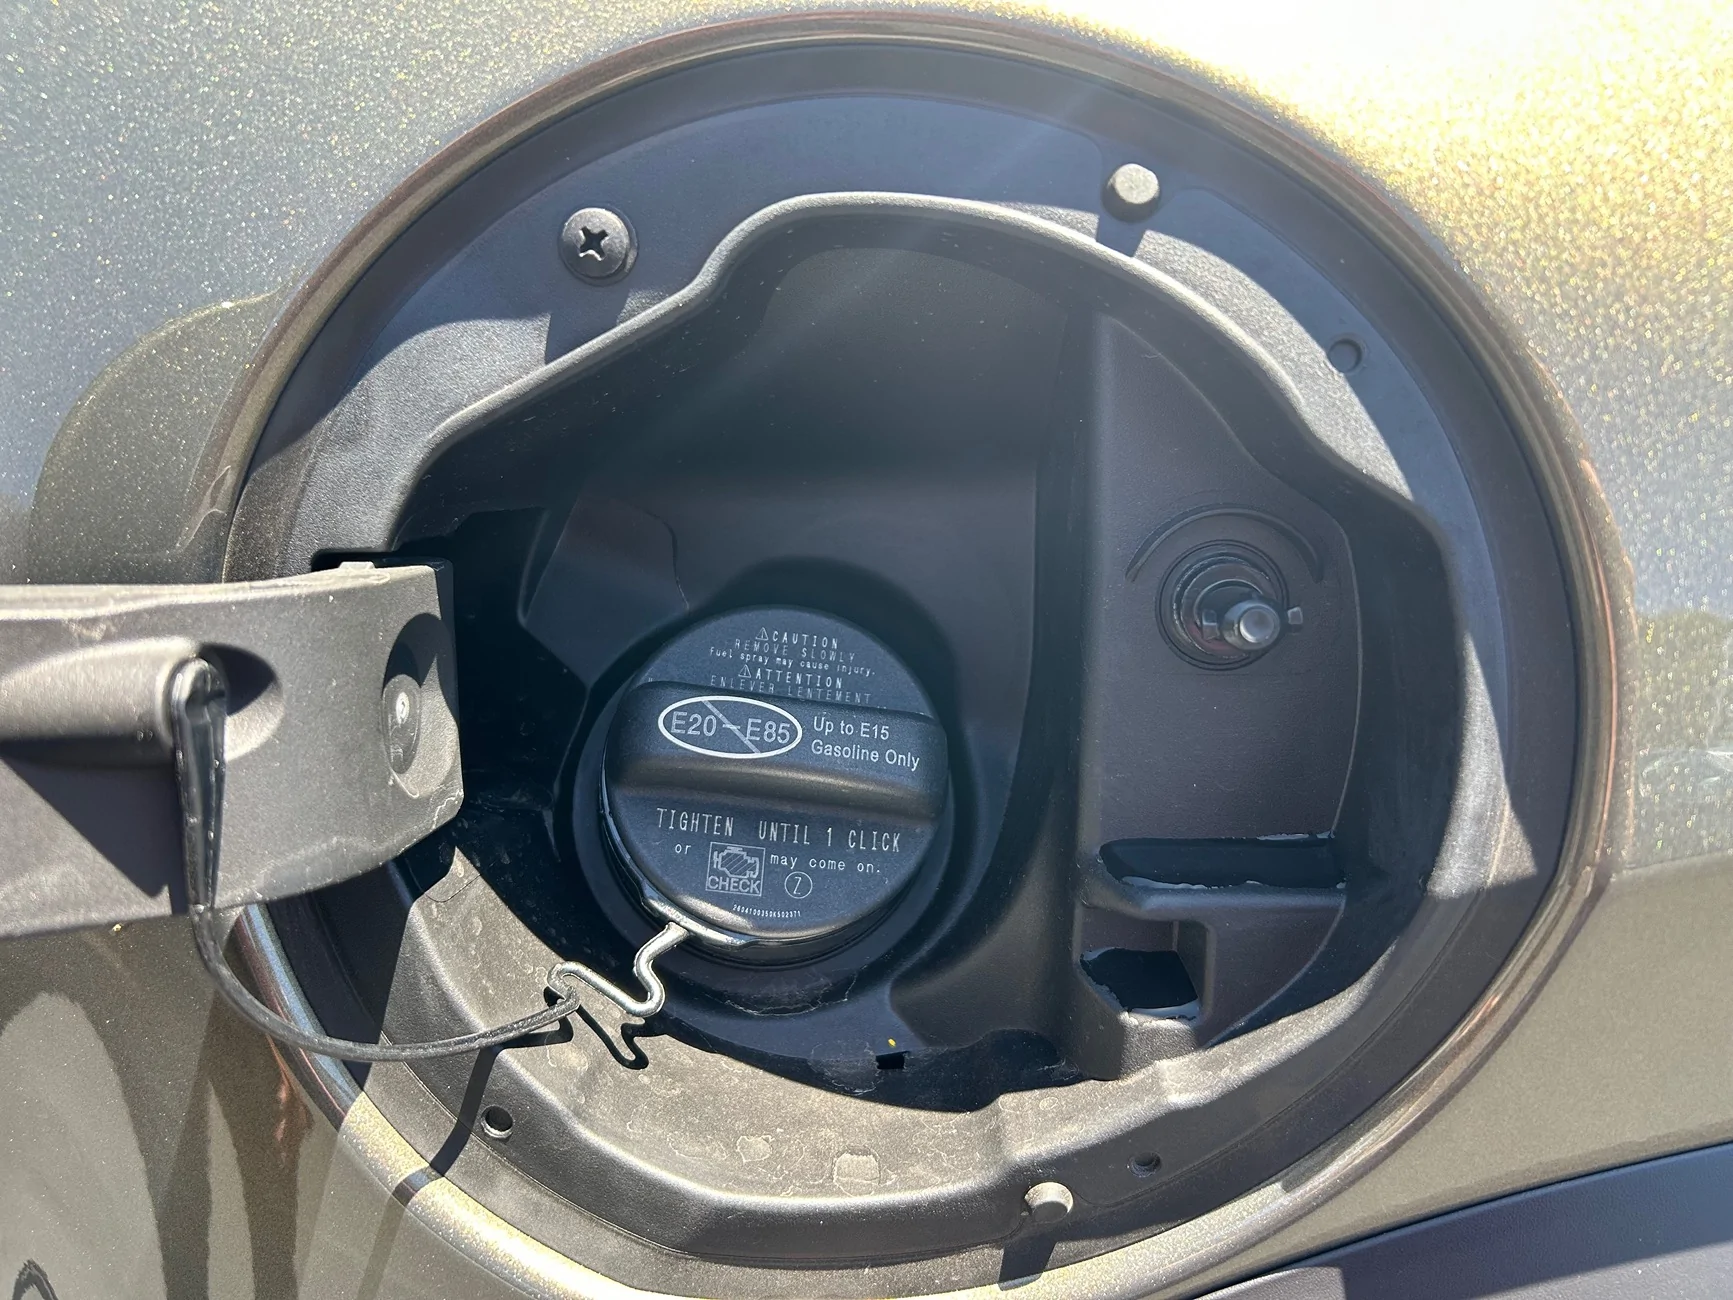
And the one for the hybrid:
2024 Tacoma Add fuel door release? IMG_7337


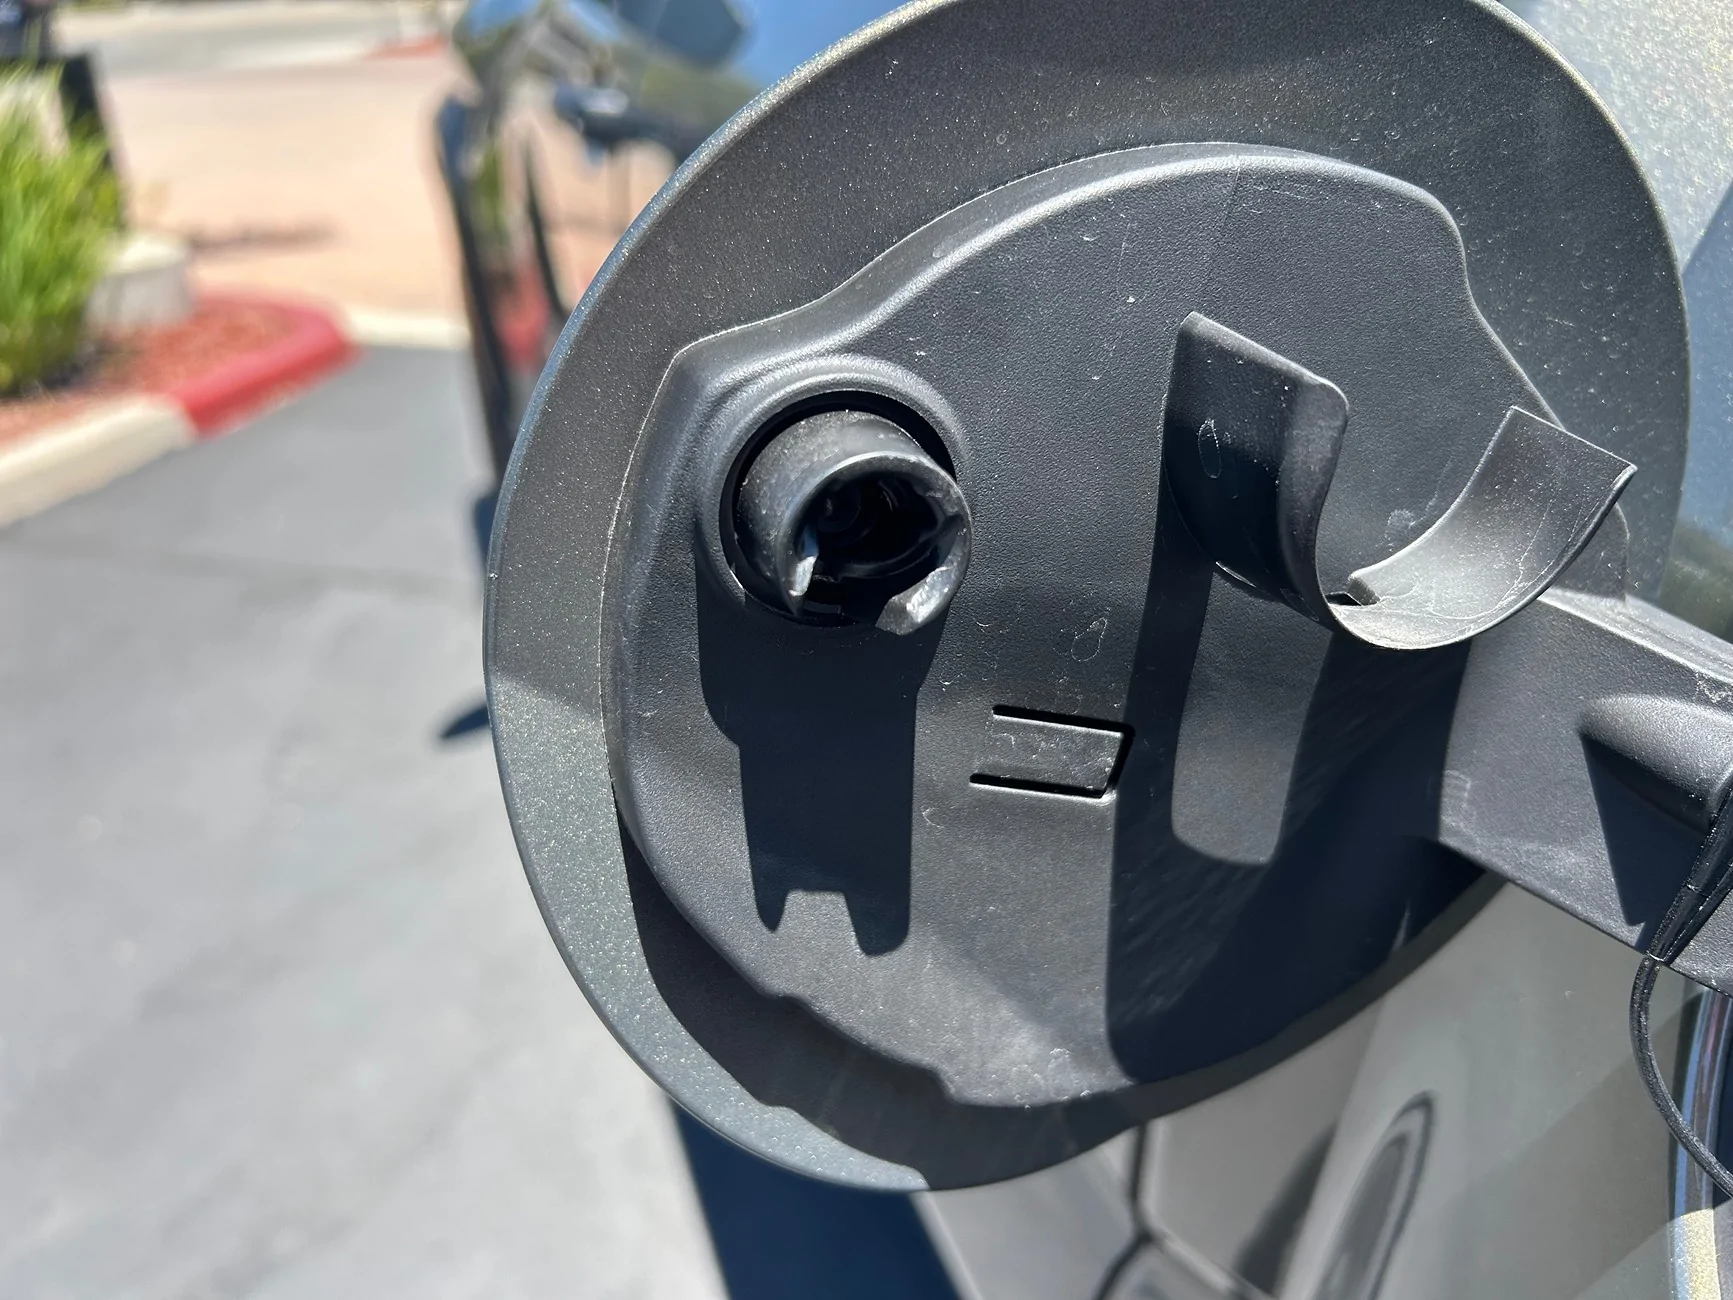
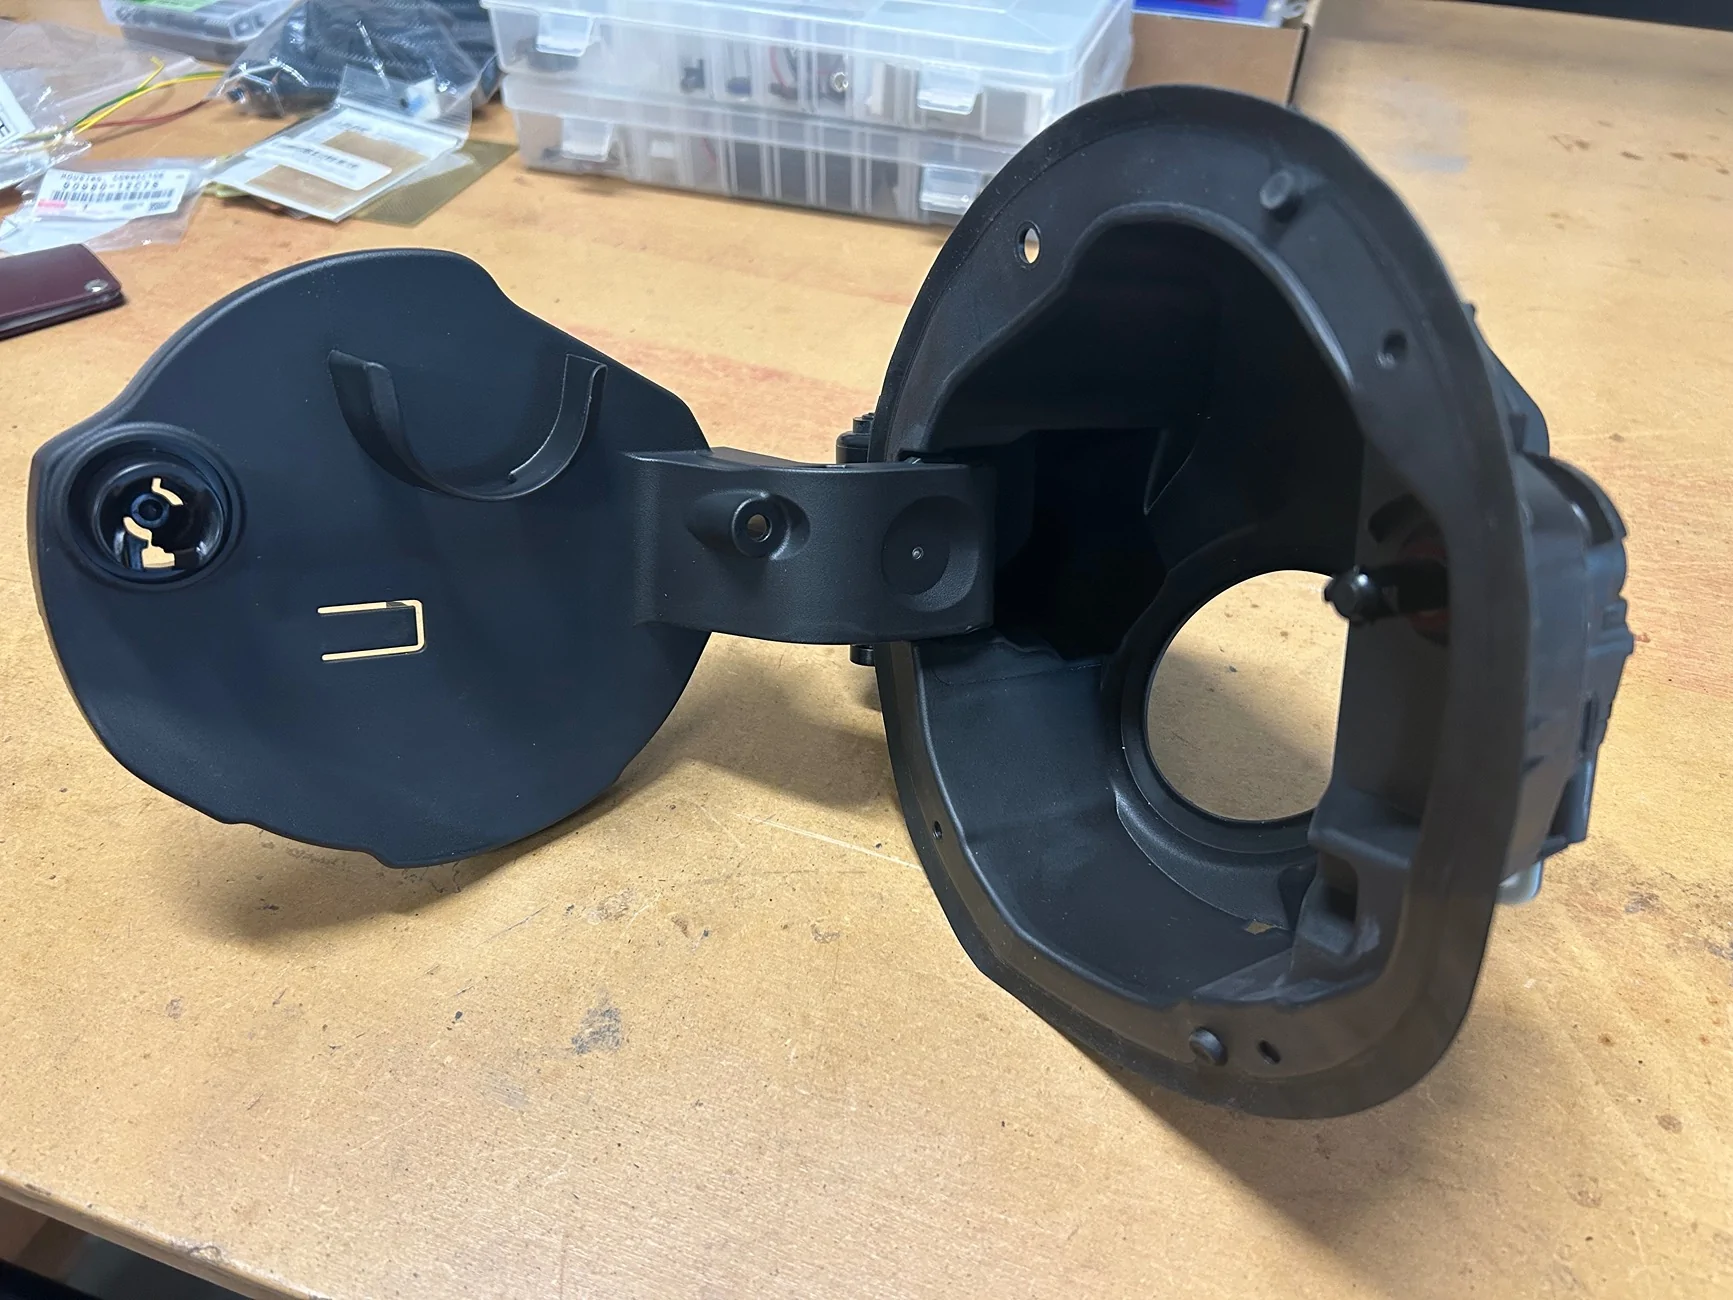
This is almost the same as on the gas truck, except for the electric locking/actuator mechanism on the right hand side. This has a matching piece on the moving part of the door mechanism:
2024 Tacoma Add fuel door release? IMG_7338


Unlike some modern fuel doors, the actuator is only a door release mechanism. When you close the door and press it shut, the sloping cam shape on the moving part of the fuel door rotates the actuator pin, which then locks into position, holding the door shut. When the fuel release door button is pressed, the actuator operates and releases the fuel door which then pops partially open driven by a spring.

Therefore, what is needed to retrofit this?

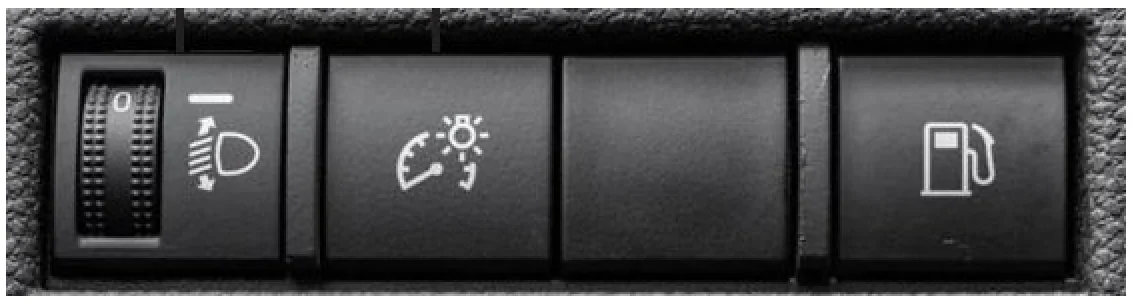
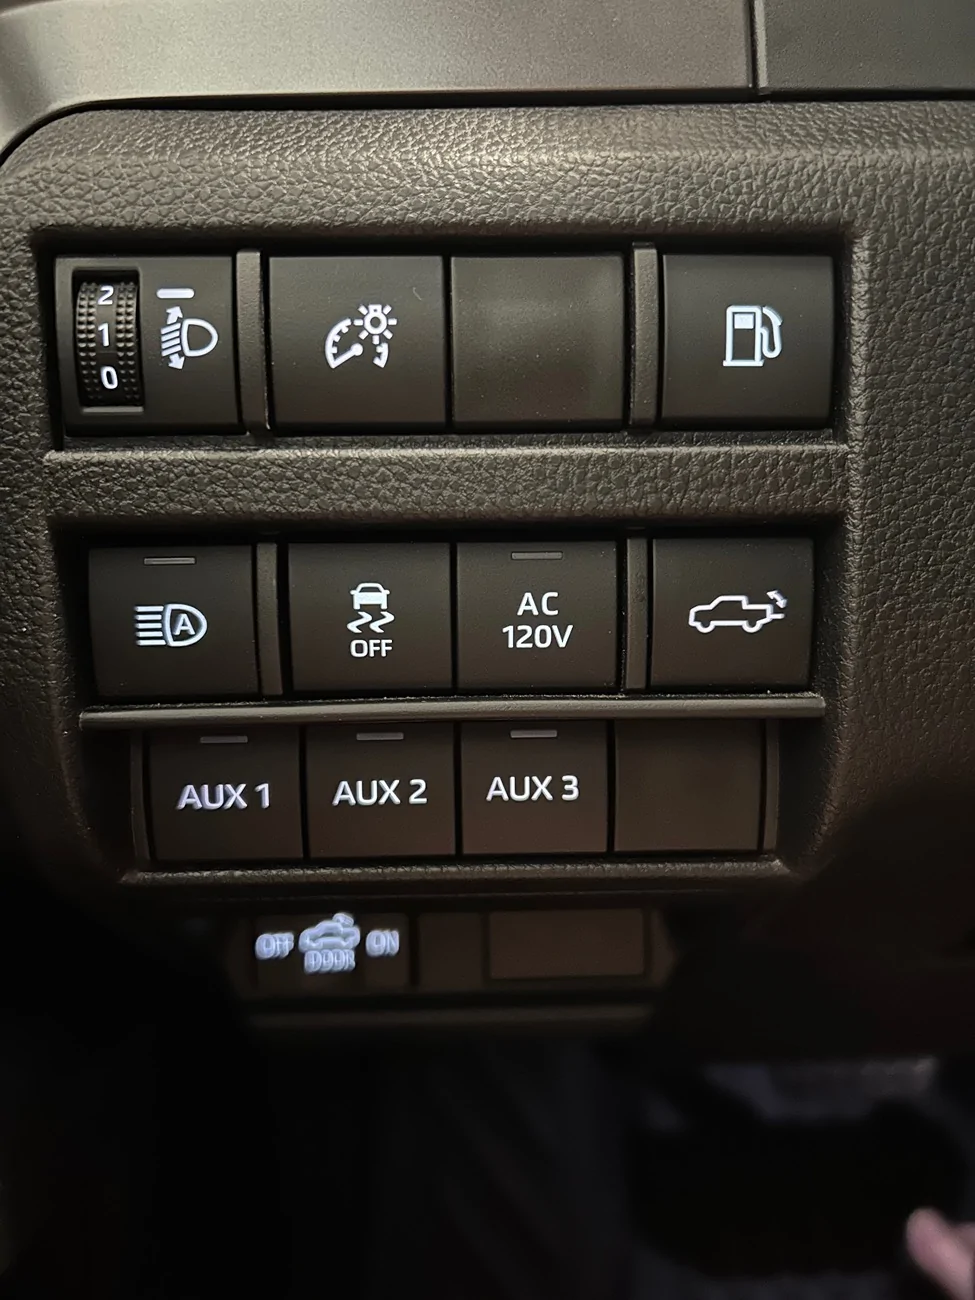
1) The fuel door release switch, which is positioned on the left of the steering column, in the upper right area of this panel above the Aux switches:
2024 Tacoma Add fuel door release? Screenshot 2026-07-25 at 16.36.52


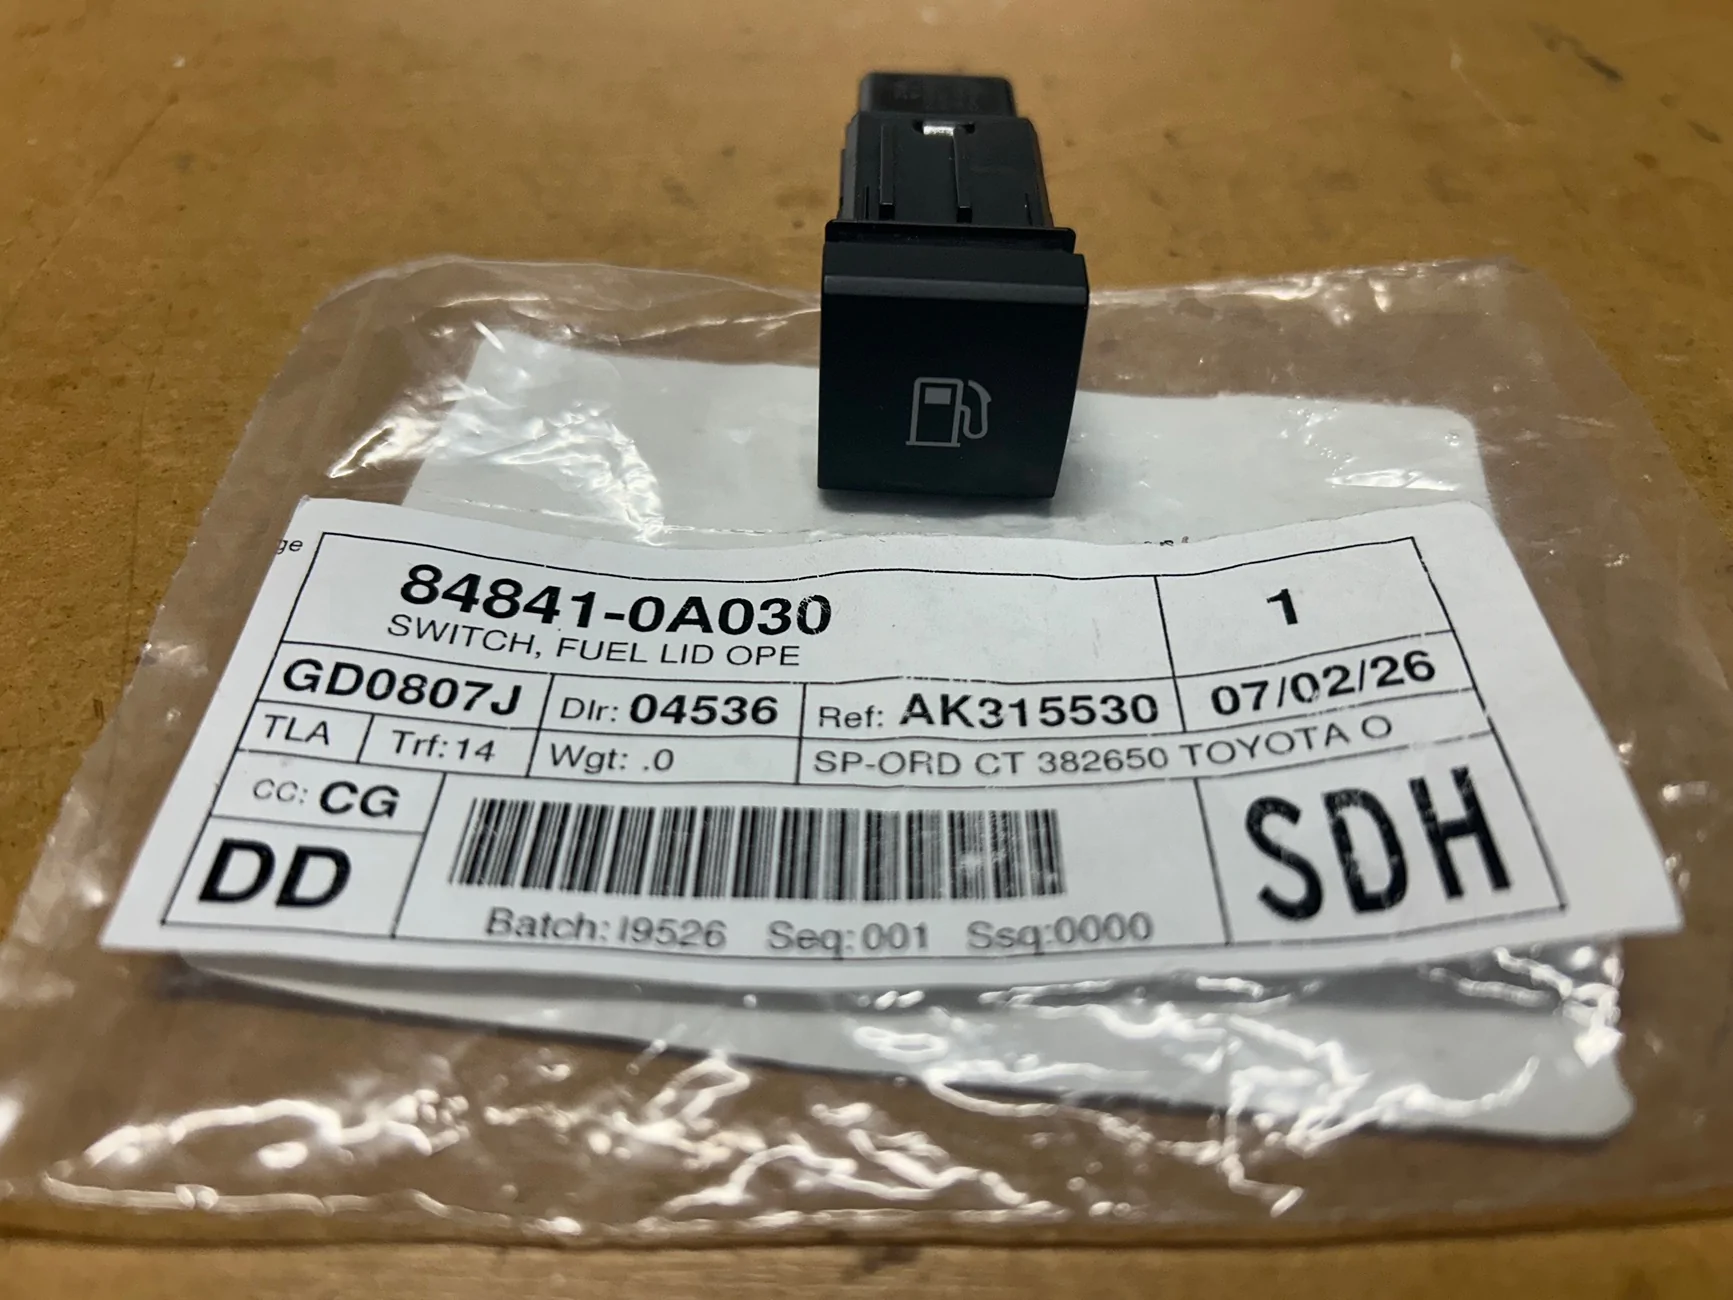
The Toyota part number for this switch is 84841-0A030 and seems pretty expensive at $74.62 less any discount from sales that may be on at the time of ordering. As we shall see though, it is not just the look of the plastic, but also the fact that these switches all have adjustable backlights, more on this later.

2024 Tacoma Add fuel door release? IMG_7425


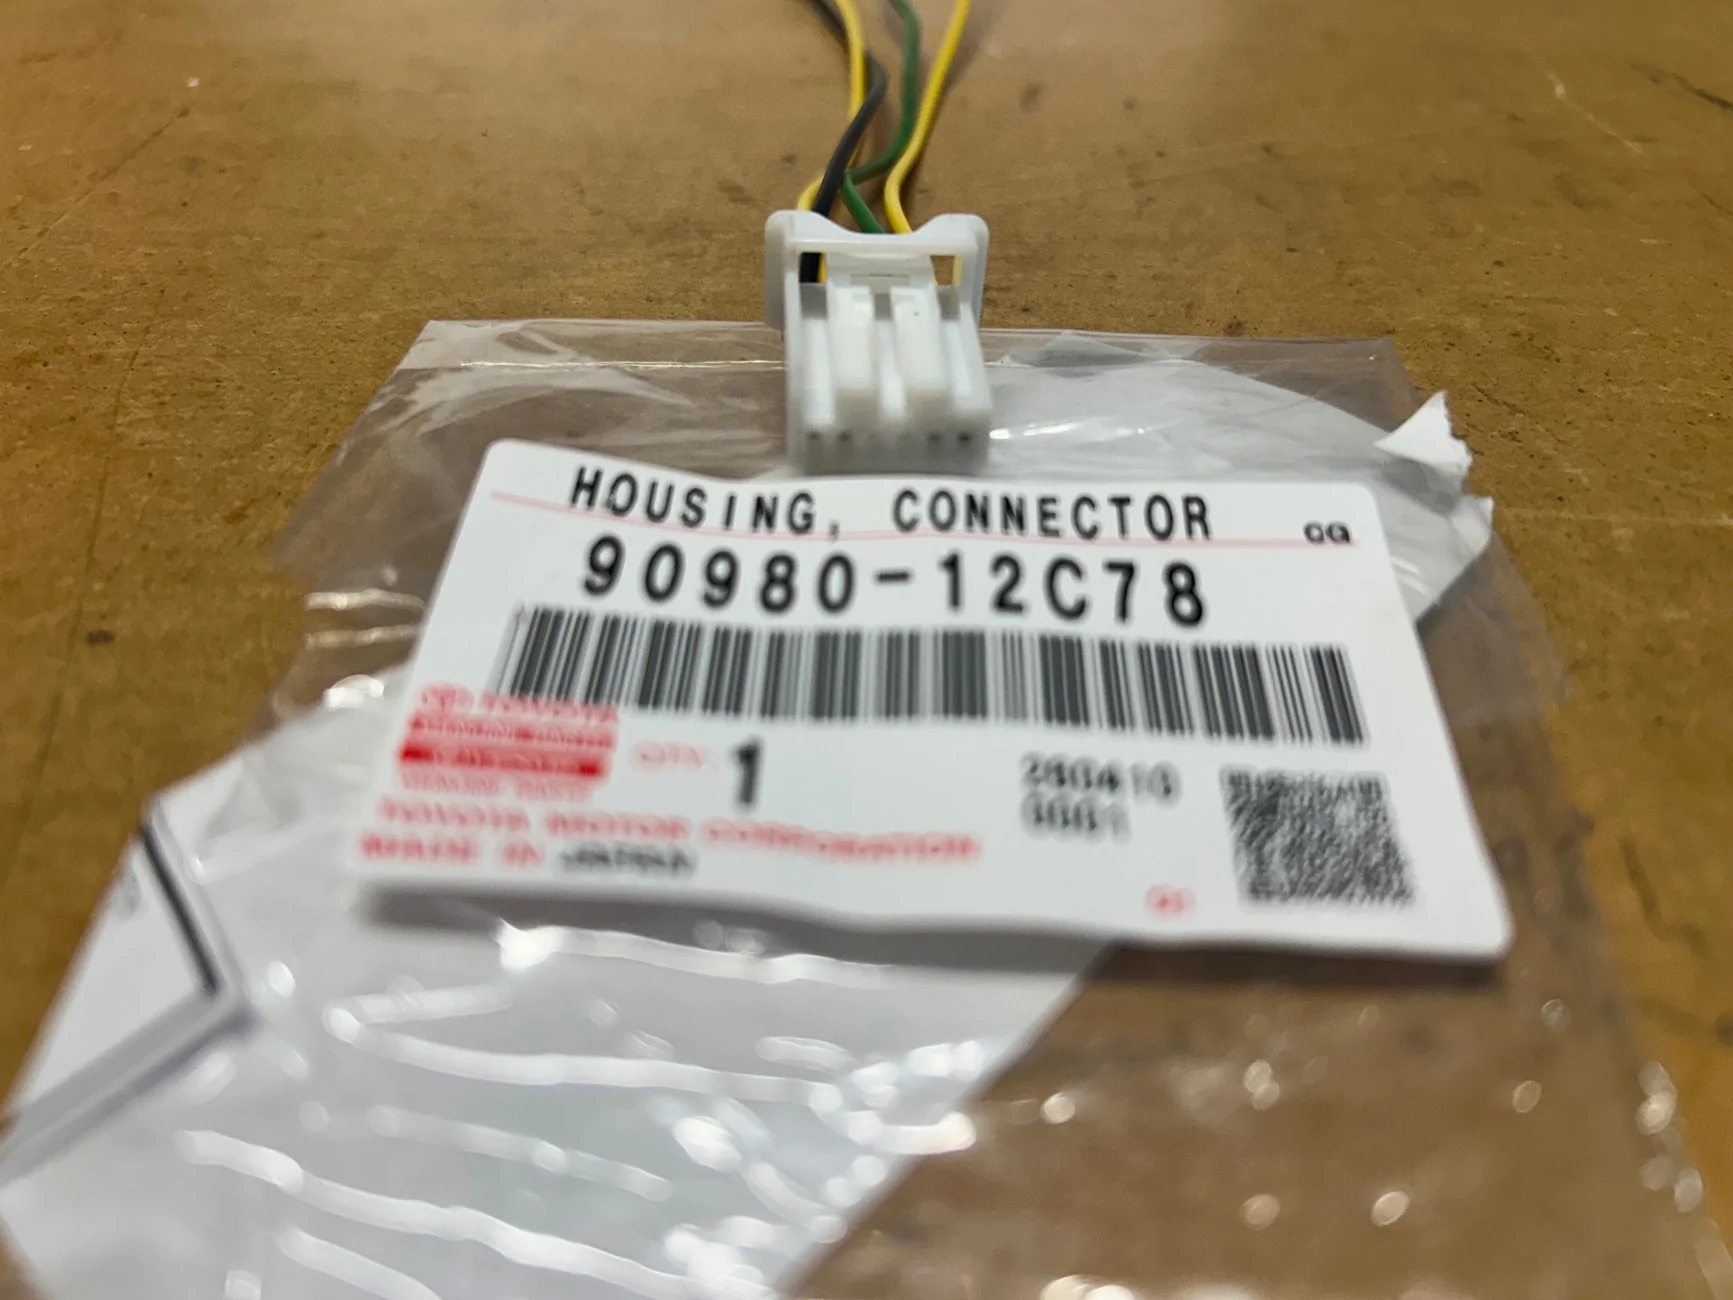
2) The connector for this switch, thanks to some excellent posts on Tacoma World is 90980-12C78. These can be bought for little more than a dollar, but minimum postage from Japan is $70, so back to Toyota and ~$10.

2024 Tacoma Add fuel door release? IMG_7426


This is just for the white connector housing, so to add the wires, I had some standard connector pins in a kit and made up 4 wires using a 625B-0.6 female pin. They are a tight fit, but once inserted fully work fine. If you want to use the Toyota provided connector pin and wire pigtail, the part number is 82998-24290 and you need 4 of these for this application. From Toyota they are ~$18, but can be had from eBay for ~$5 each.

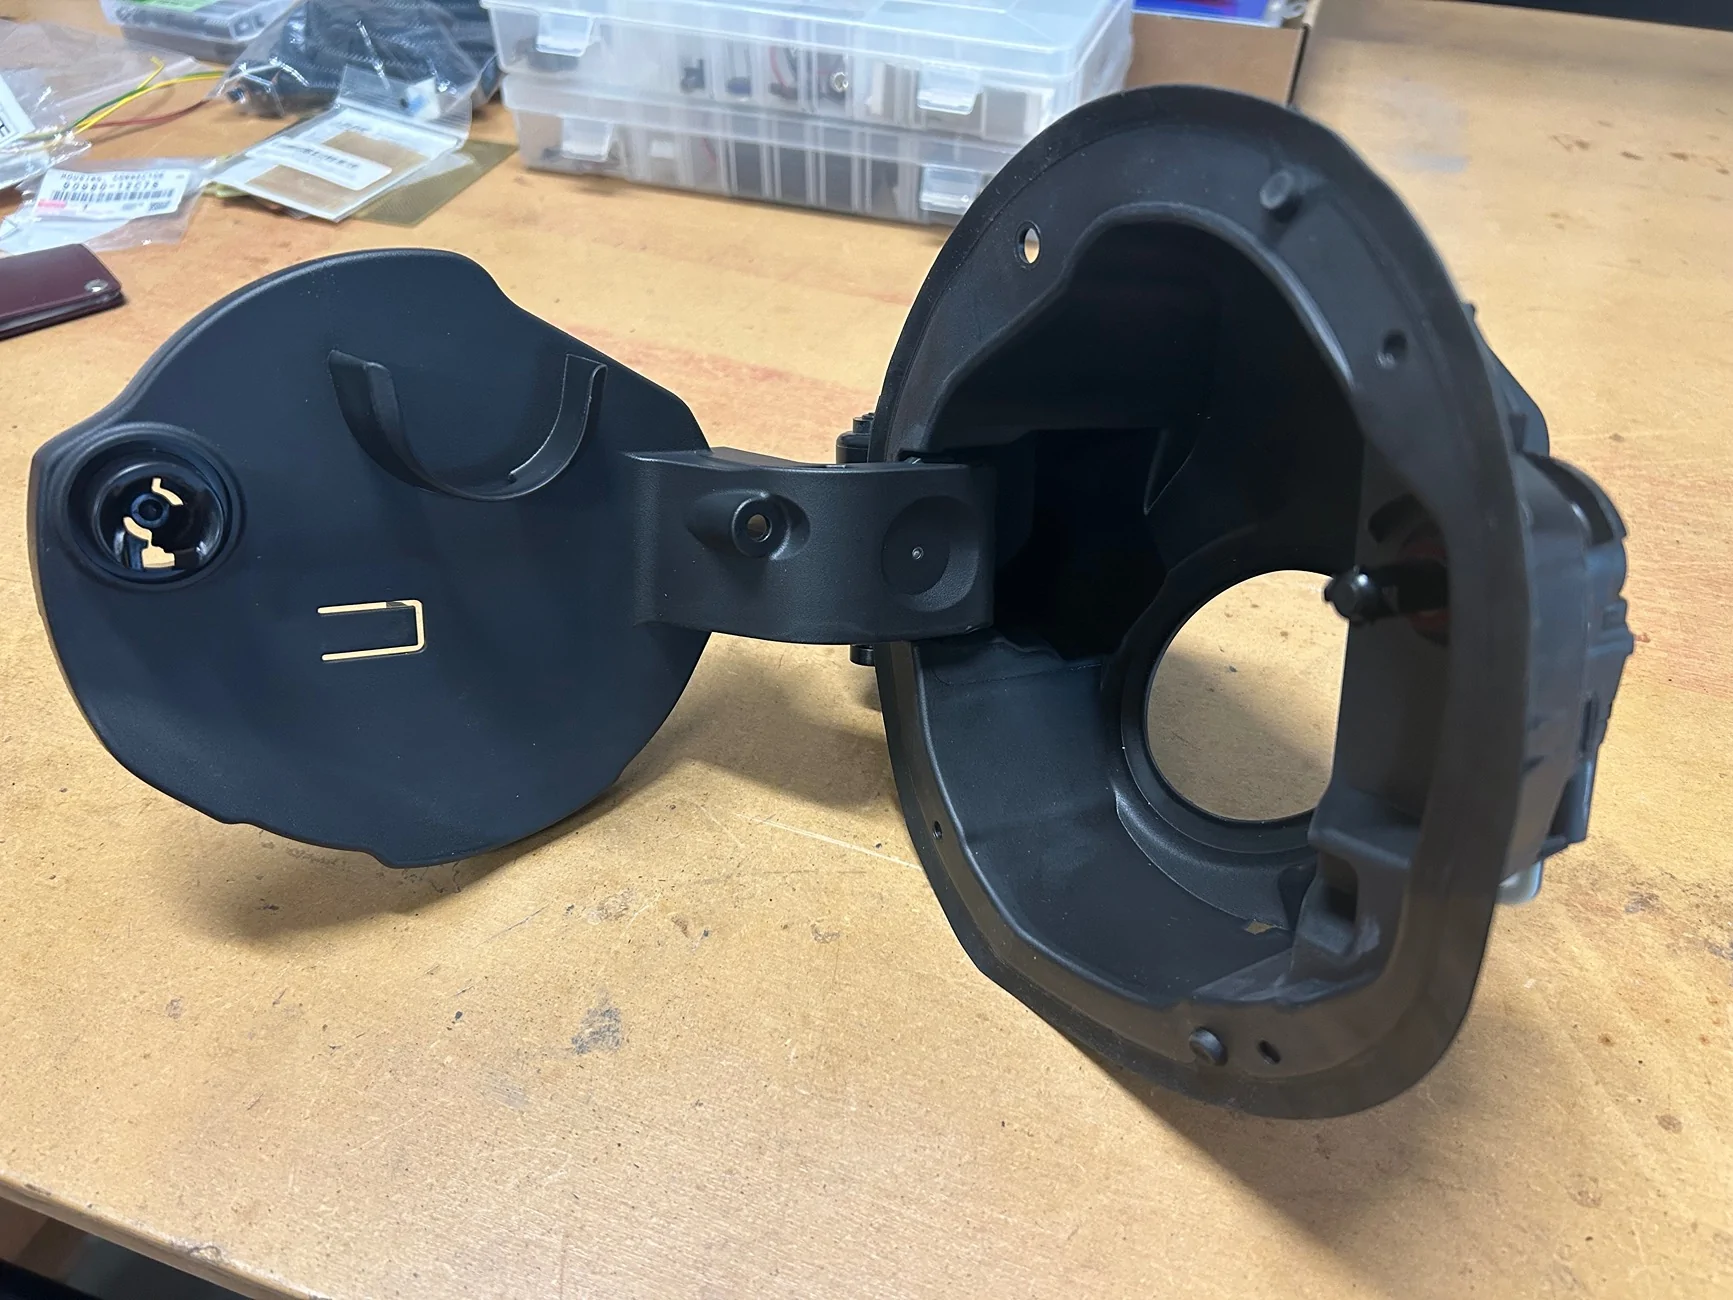
3) The fuel filler door and actuator. These are different for a 5' and 6' bed and if you order the right part number it comes as a complete package with the motor. This is typical Toyota, but ordering just the actuator motor on its own is 50% more expensive than the whole fuel door (don't ask me how I know). The correct part numbers are:

5' bed: 77305-AK030
6' bed: 77305-AK040

Either are ~$122.81 less any sales discounts, which is only ~$7 more than the regular manual gas fuel door. This is what you get with the actuator on the right already fitted.

2024 Tacoma Add fuel door release? IMG_7423


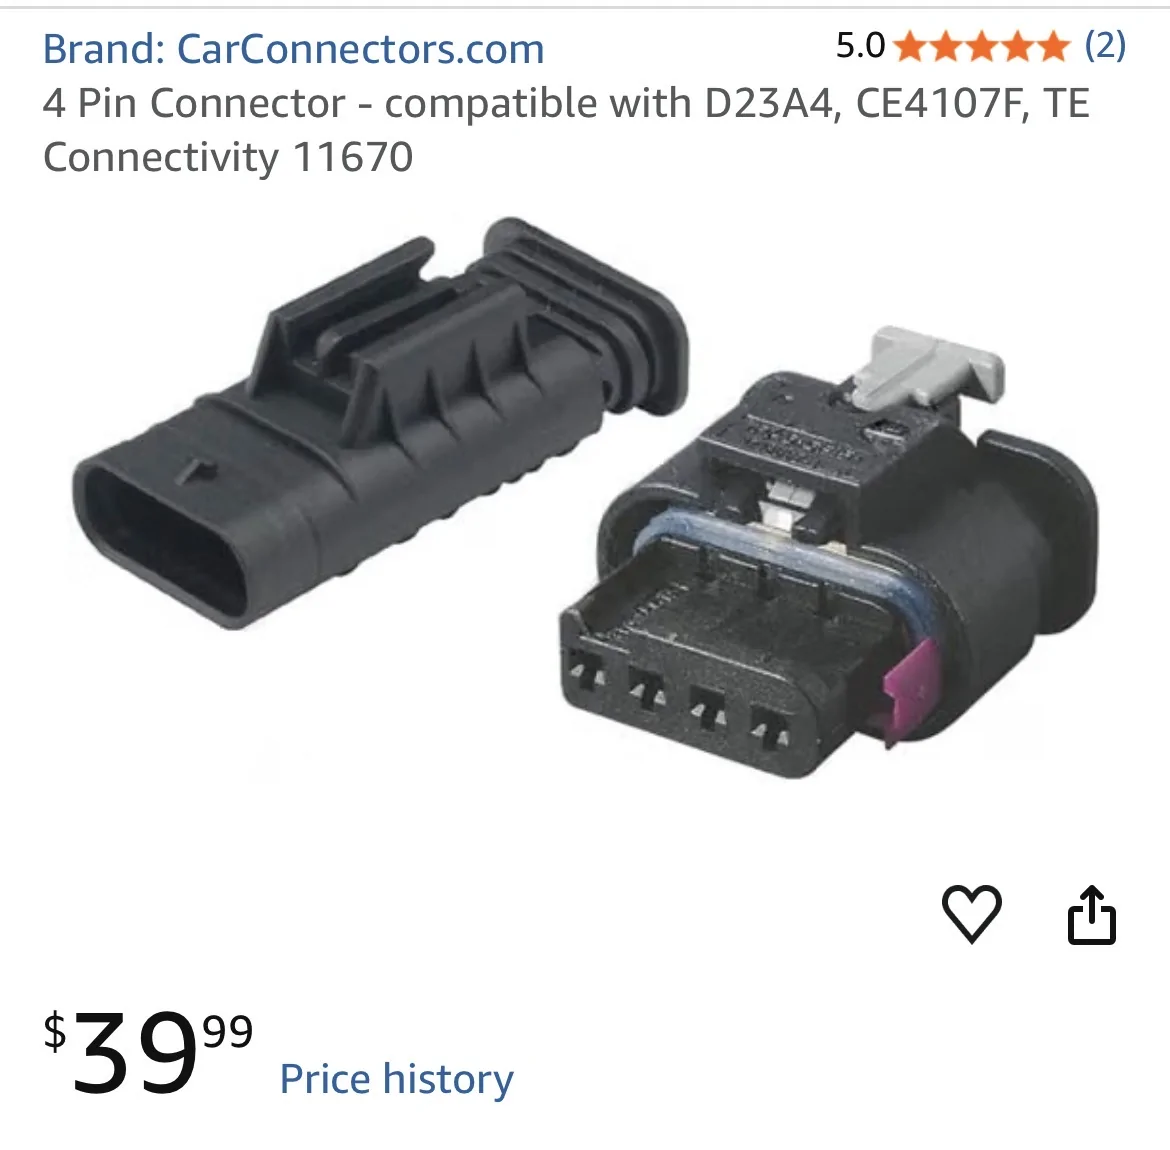
4) The connector for the actuator was a complete pain to find and after several failed attempts with a couple of different Toyota parts departments, an email exchange with Connector Experts confirmed that it is a CE4107F connector. Unfortunately for them they were selling these for ~$86 plus $20 delivery, ugh, sorry guys but I found this on Amazon:

2024 Tacoma Add fuel door release? IMG_7410


These come as a male/female pair and pigtail wires in place and we only need the female side for this project.

What about the wiring connections that will be needed?

Switch

2024 Tacoma Add fuel door release? Screenshot 2026-07-25 at 17.04.48


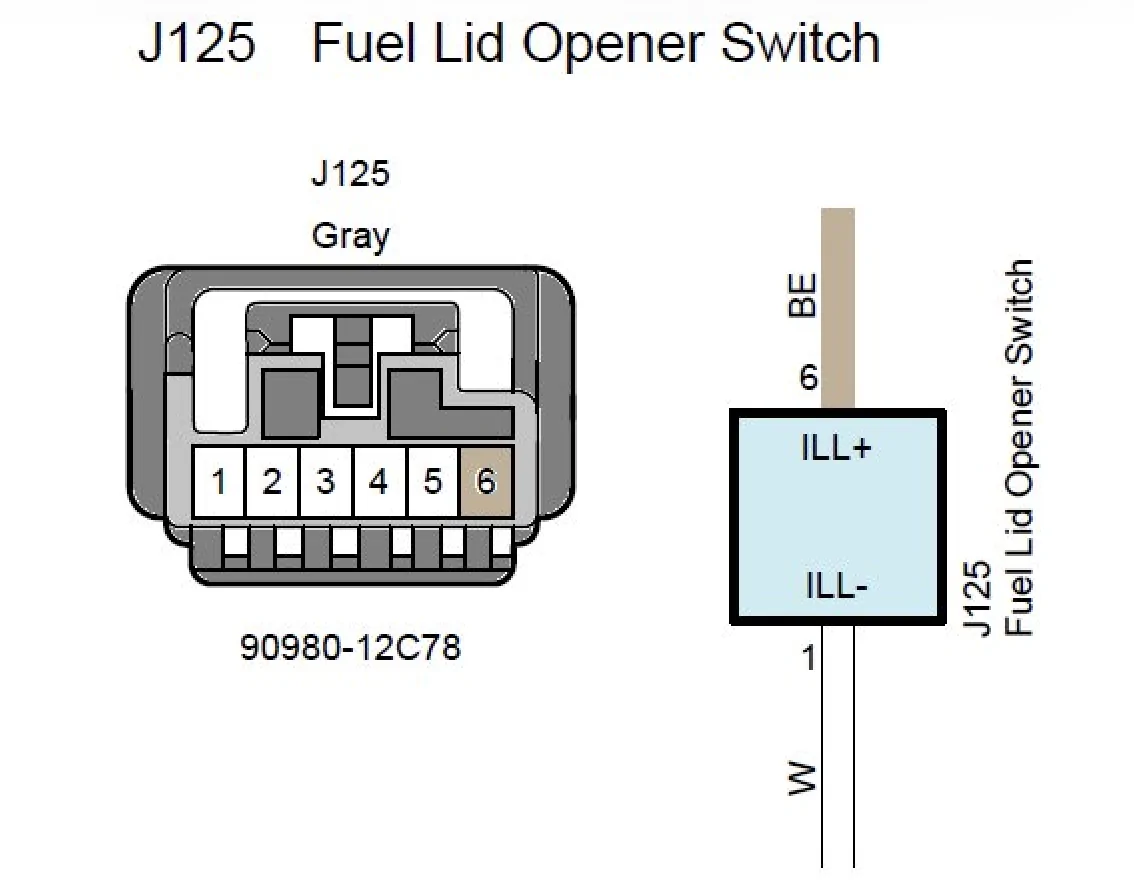
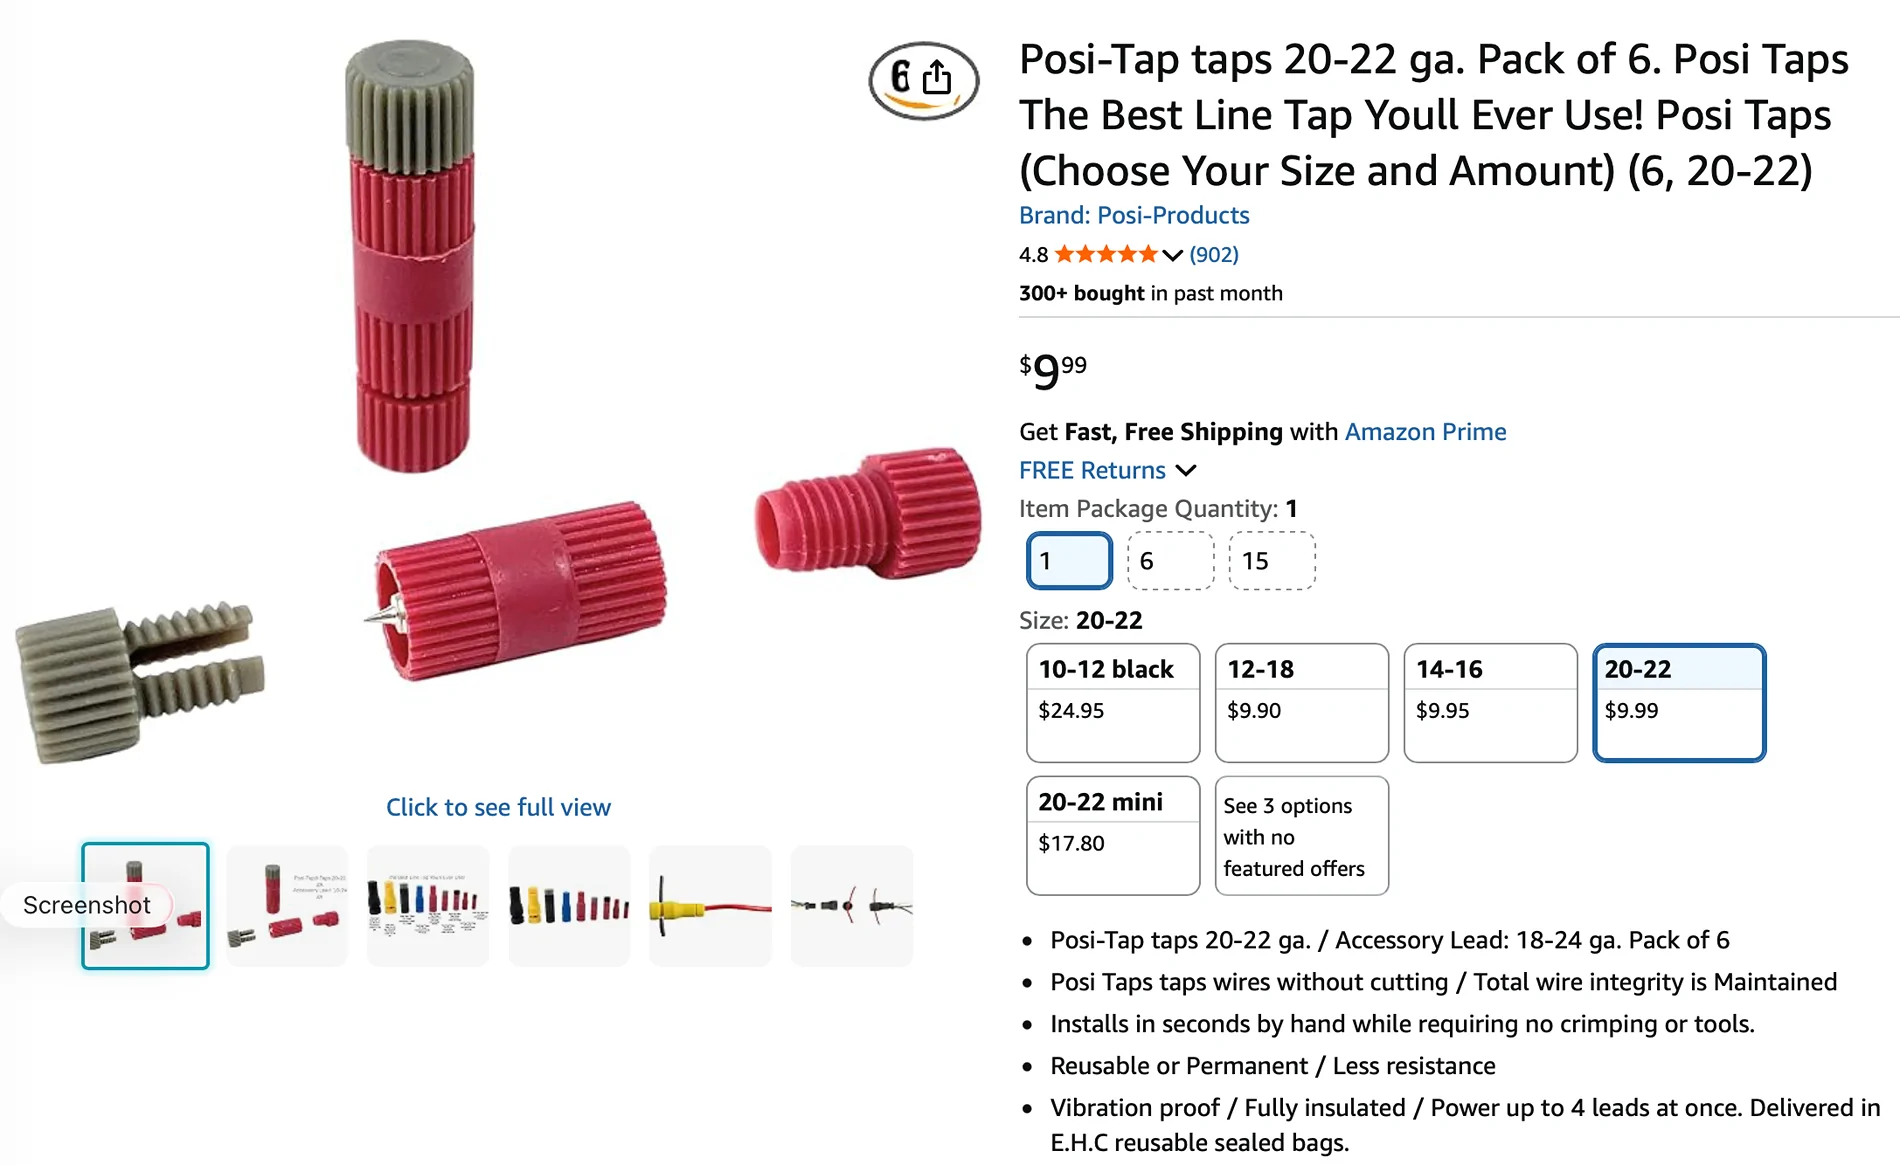
This image is looking at the pin end of the connector housing, the end that is pushed into the switch. From this, we can clearly see that pin 1 is the connection to the negative illumination supply and pin 6 is for the positive illumination supply. From the earlier Tacoma World posts Redside Electric makes insertable harness that taps into the illumination wires, but I was not able to raise Kyle with a message through the forum and there is nothing online for 4th gens from Redside, so I will tap into the right wires with some posi-taps.

Pin 2 and Pin 5 are the momentary switch pins and are connected together when the switch is pushed.

Fuel Door Actuator

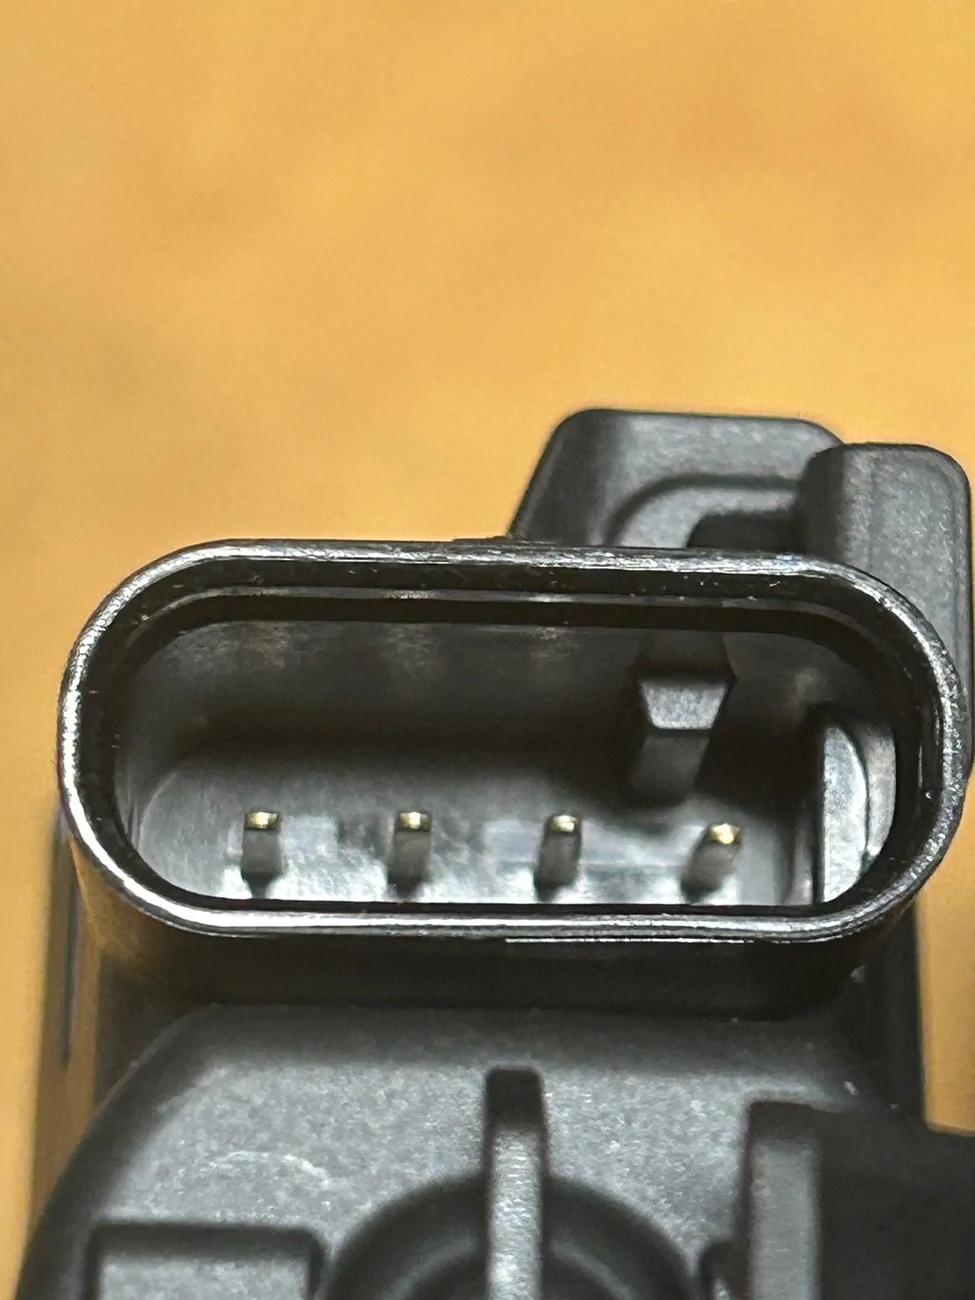
The pins are numbered inside the actuator, left to right 1 to 4:
2024 Tacoma Add fuel door release? IMG_7402


Pins 1 and 2 connect to a sensor which changes resistance between 370 Ohms and 3.7k Ohms depending on whether the door is open or closed. On the hybrid trucks, this signals the body control unit to throw a dash warning if the fuel door is left open. I'm planning to wire these to the switch area, but not sure right now if I am going to build a small circuit to drive an indicator LED. I tend not to leave the fuel door open and any LED placed adjacent to the Fuel Door switch is obscured from the driver's seat by the turn signal stalk.

Pins 3 and 4 are the connections to the actuator. Pin 3 is ground and Pin 4, when momentarily connected to +12v opens the fuel door. The actuator has a resistance of ~30 Ohms, and so will pull ~400mA. Since the switch is already a momentary "push to operate" switch, I am not currently planning to build a monostable circuit to drive the actuator, but just make a simple connection.

Power

The next question is where to take the power from. For security, having it always operating seems less than ideal. When the key fob is brought near the car the interior lights operate and likely some other circuits, so tapping into this is an option. Alternatively, considering that the engine will be turned off when the switch would be operated means that the ignition circuit is not the best. Perhaps connecting to a circuit which operates when the door is open might be a decent compromise, but this depends on how easy it will be to find that circuit in the loom spaghetti. Fun to come!

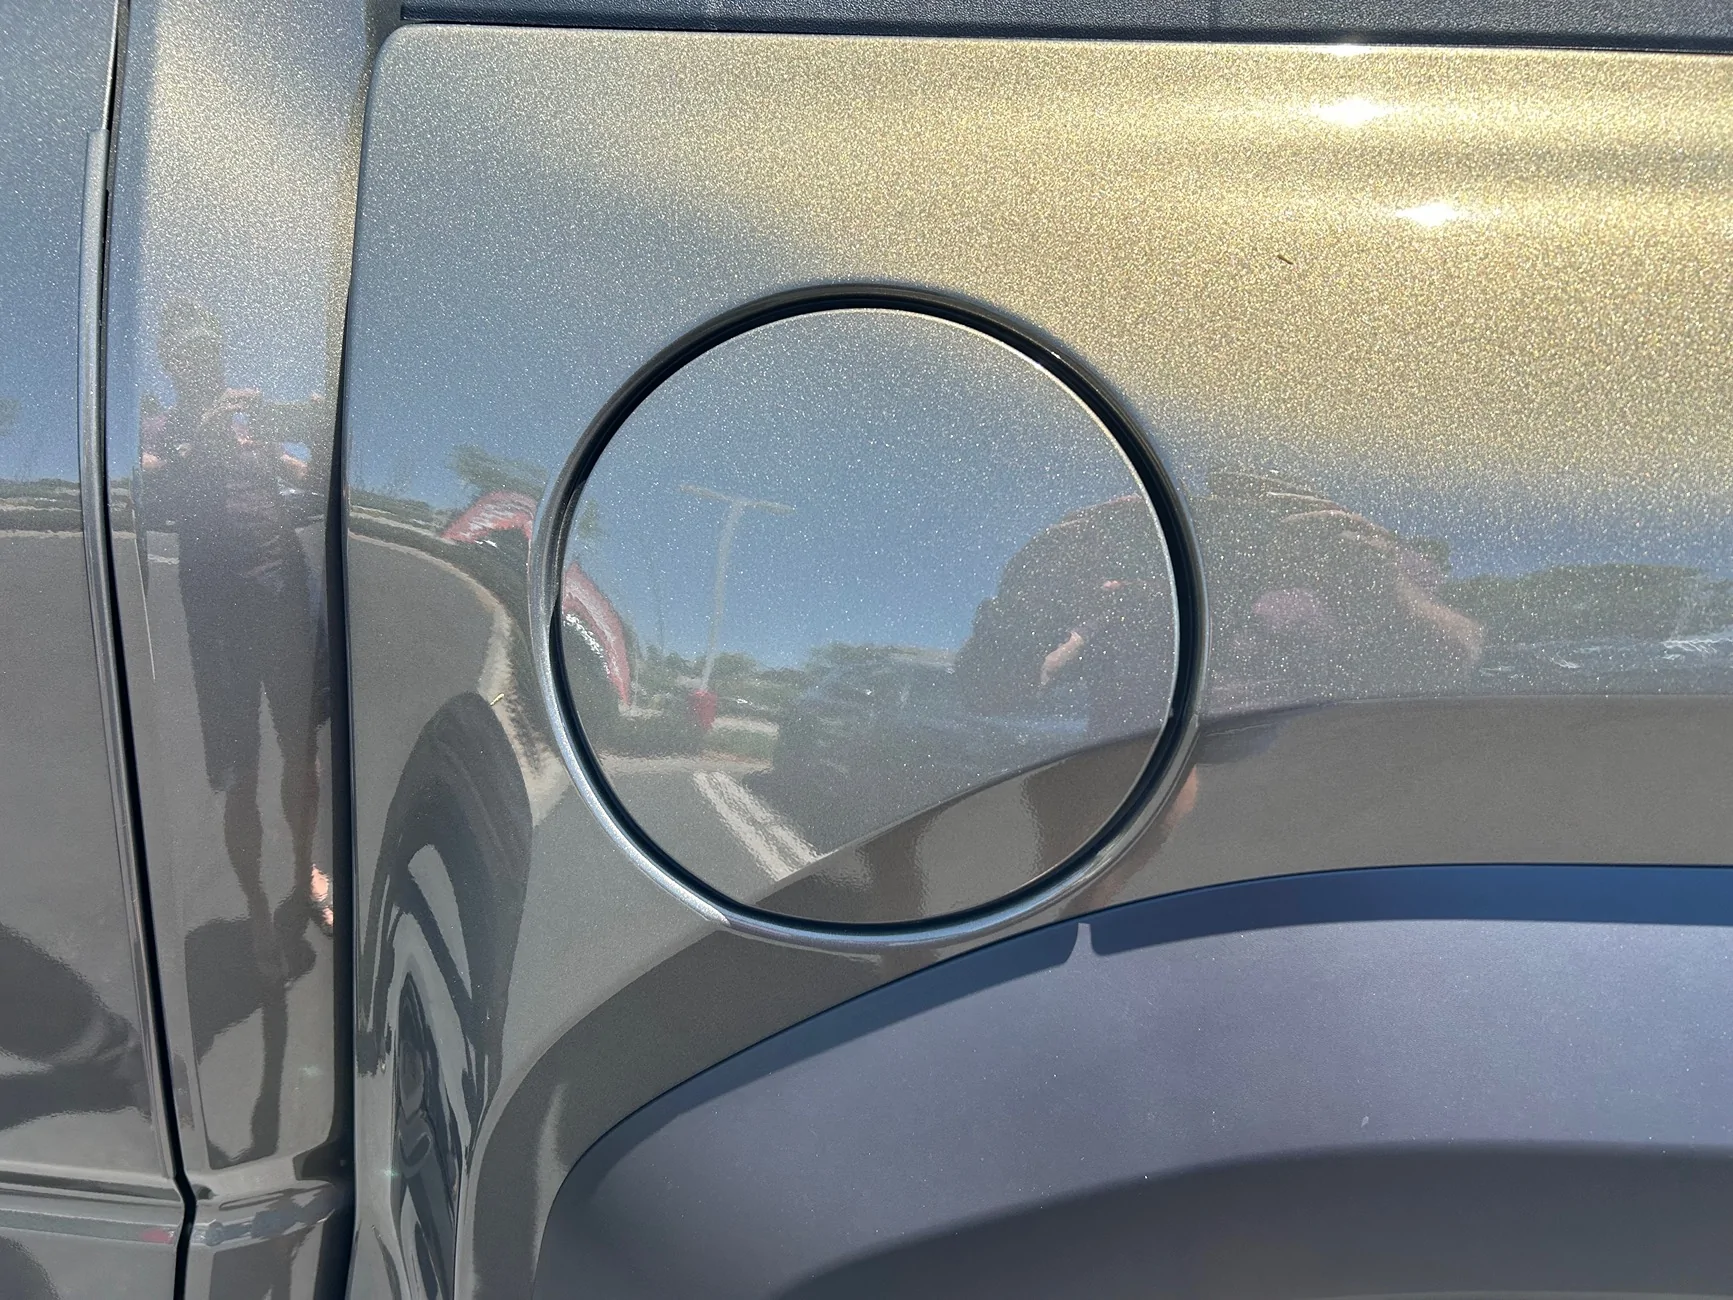
To wrap up this update, I have bench tested the components and everything works as expected. So now to find some time to find the right power supply and fit everything on the truck. I know that I will need to remove the inner rear wheel arch liner to access the back of the fuel filler and pop the clips there. I'm also hoping that removing the external fuel door and moving it to the new mechanism will be straightforward. A flat fuel filler door would be possible, they are ~$44 from Toyota, but would then need painting...I think the standard gas door will be fine:
2024 Tacoma Add fuel door release? IMG_7336
2024 Tacoma Add fuel door release? IMG_7339


If anyone does want to change the exterior fuel door, the part numbers are:

5' bed: 77351-AK010
6' bed: 77351-AK020

More to come...
 

Toy-truck

TRD Off-Road Premium
Well-known member
Joined
Mar 5, 2024
Threads
4
Messages
103
Reaction score
62
Location
Houston, TX
Vehicle(s)
2024 Tacoma
It has been a while (and a process), so here is the state of my project to add a locking, electric release fuel door to my 2026 TRD OR Premium. Spoiler alert - I have all the pieces needed and have tested what I plan to install, but the whole is not yet on the truck.

First, a little introduction. I continue to be amazed that a $50k vehicle these days does not come with some form of locking fuel door. I realize that the fuel filler pipe makes any attempts to siphon fuel difficult, but I also don't like the idea of anything that should not be in the fuel tank being added just for fun. So, I have already put on a locking fuel cap, pretty cheap and works fine, but it is not very slick.

And, Toyota has already done the engineering and put a suitable locking, electric release fuel filler door on the hybrid trucks. I'll give the benefit of the doubt here and say that this is likely because there are some additional requirements on pressure control and venting on a hybrid vehicle and not that Toyota are just being cheap. Specifically, because the vehicle can run without the gasoline engine running, although not for long on a Tacoma, this means that hybrid vehicle fuel tanks can become pressurized and they must then be vented, and this has to be done through a complex emissions control system to achieve the lower overall emissions. Because of this, I believe that the electric fuel door on the Tacoma is a kind of interlock that allows the fuel tank to be depressurized before the driver loosens and takes off the fuel filler cap. This is achieved by pugging the fuel door release button into the body control unit, which then monitors the pressure, vents the tank and then opens the fuel door. For the purposes of this project, what this means is that the fuel door uses the hybrid body harness, which is different to the gas model body harness, so there are no wires and no connectors for a plug and play solution to adding an electric release fuel door.

Here are some photos to compare the fuel door mechanisms on a gas only and hybrid Tacoma.

Here is the gas only filler area:
IMG_7335.webp


And the one for the hybrid:
IMG_7337.webp


This is almost the same as on the gas truck, except for the electric locking/actuator mechanism on the right hand side. This has a matching piece on the moving part of the door mechanism:
IMG_7338.webp


Unlike some modern fuel doors, the actuator is only a door release mechanism. When you close the door and press it shut, the sloping cam shape on the moving part of the fuel door rotates the actuator pin, which then locks into position, holding the door shut. When the fuel release door button is pressed, the actuator operates and releases the fuel door which then pops partially open driven by a spring.

Therefore, what is needed to retrofit this?

1) The fuel door release switch, which is positioned on the left of the steering column, in the upper right area of this panel above the Aux switches:
Screenshot 2026-07-25 at 16.36.52.webp


The Toyota part number for this switch is 84841-0A030 and seems pretty expensive at $74.62 less any discount from sales that may be on at the time of ordering. As we shall see though, it is not just the look of the plastic, but also the fact that these switches all have adjustable backlights, more on this later.

IMG_7425.webp


2) The connector for this switch, thanks to some excellent posts on Tacoma World is 90980-12C78. These can be bought for little more than a dollar, but minimum postage from Japan is $70, so back to Toyota and ~$10.

IMG_7426.webp


This is just for the white connector housing, so to add the wires, I had some standard connector pins in a kit and made up 4 wires using a 625B-0.6 female pin. They are a tight fit, but once inserted fully work fine. If you want to use the Toyota provided connector pin and wire pigtail, the part number is 82998-24290 and you need 4 of these for this application. From Toyota they are ~$18, but can be had from eBay for ~$5 each.

3) The fuel filler door and actuator. These are different for a 5' and 6' bed and if you order the right part number it comes as a complete package with the motor. This is typical Toyota, but ordering just the actuator motor on its own is 50% more expensive than the whole fuel door (don't ask me how I know). The correct part numbers are:

5' bed: 77305-AK030
6' bed: 77305-AK040

Either are ~$122.81 less any sales discounts, which is only ~$7 more than the regular manual gas fuel door. This is what you get with the actuator on the right already fitted.

IMG_7423.webp


4) The connector for the actuator was a complete pain to find and after several failed attempts with a couple of different Toyota parts departments, an email exchange with Connector Experts confirmed that it is a CE4107F connector. Unfortunately for them they were selling these for ~$86 plus $20 delivery, ugh, sorry guys but I found this on Amazon:

IMG_7410.webp


These come as a male/female pair and pigtail wires in place and we only need the female side for this project.

What about the wiring connections that will be needed?

Switch

Screenshot 2026-07-25 at 17.04.48.webp


This image is looking at the pin end of the connector housing, the end that is pushed into the switch. From this, we can clearly see that pin 1 is the connection to the negative illumination supply and pin 6 is for the positive illumination supply. From the earlier Tacoma World posts Redside Electric makes insertable harness that taps into the illumination wires, but I was not able to raise Kyle with a message through the forum and there is nothing online for 4th gens from Redside, so I will tap into the right wires with some posi-taps.

Pin 2 and Pin 5 are the momentary switch pins and are connected together when the switch is pushed.

Fuel Door Actuator

The pins are numbered inside the actuator, left to right 1 to 4:
IMG_7402.webp


Pins 1 and 2 connect to a sensor which changes resistance between 370 Ohms and 3.7k Ohms depending on whether the door is open or closed. On the hybrid trucks, this signals the body control unit to throw a dash warning if the fuel door is left open. I'm planning to wire these to the switch area, but not sure right now if I am going to build a small circuit to drive an indicator LED. I tend not to leave the fuel door open and any LED placed adjacent to the Fuel Door switch is obscured from the driver's seat by the turn signal stalk.

Pins 3 and 4 are the connections to the actuator. Pin 3 is ground and Pin 4, when momentarily connected to +12v opens the fuel door. The actuator has a resistance of ~30 Ohms, and so will pull ~400mA. Since the switch is already a momentary "push to operate" switch, I am not currently planning to build a monostable circuit to drive the actuator, but just make a simple connection.

Power

The next question is where to take the power from. For security, having it always operating seems less than ideal. When the key fob is brought near the car the interior lights operate and likely some other circuits, so tapping into this is an option. Alternatively, considering that the engine will be turned off when the switch would be operated means that the ignition circuit is not the best. Perhaps connecting to a circuit which operates when the door is open might be a decent compromise, but this depends on how easy it will be to find that circuit in the loom spaghetti. Fun to come!

To wrap up this update, I have bench tested the components and everything works as expected. So now to find some time to find the right power supply and fit everything on the truck. I know that I will need to remove the inner rear wheel arch liner to access the back of the fuel filler and pop the clips there. I'm also hoping that removing the external fuel door and moving it to the new mechanism will be straightforward. A flat fuel filler door would be possible, they are ~$44 from Toyota, but would then need painting...I think the standard gas door will be fine:
IMG_7336.webp
IMG_7339.webp


If anyone does want to change the exterior fuel door, the part numbers are:

5' bed: 77351-AK010
6' bed: 77351-AK020

More to come...
You done amazing on the research and breaking down the explanation/info for us. Looking forward to the final results. Thanks.
 

MegaGlide

SR5
Member
First Name
Dave
Joined
Mar 26, 2026
Threads
4
Messages
9
Reaction score
3
Location
West Central Indiana
Vehicle(s)
2025 Tacoma
It has been a while (and a process), so here is the state of my project to add a locking, electric release fuel door to my 2026 TRD OR Premium. Spoiler alert - I have all the pieces needed and have tested what I plan to install, but the whole is not yet on the truck.

First, a little introduction. I continue to be amazed that a $50k vehicle these days does not come with some form of locking fuel door. I realize that the fuel filler pipe makes any attempts to siphon fuel difficult, but I also don't like the idea of anything that should not be in the fuel tank being added just for fun. So, I have already put on a locking fuel cap, pretty cheap and works fine, but it is not very slick.

And, Toyota has already done the engineering and put a suitable locking, electric release fuel filler door on the hybrid trucks. I'll give the benefit of the doubt here and say that this is likely because there are some additional requirements on pressure control and venting on a hybrid vehicle and not that Toyota are just being cheap. Specifically, because the vehicle can run without the gasoline engine running, although not for long on a Tacoma, this means that hybrid vehicle fuel tanks can become pressurized and they must then be vented, and this has to be done through a complex emissions control system to achieve the lower overall emissions. Because of this, I believe that the electric fuel door on the Tacoma is a kind of interlock that allows the fuel tank to be depressurized before the driver loosens and takes off the fuel filler cap. This is achieved by pugging the fuel door release button into the body control unit, which then monitors the pressure, vents the tank and then opens the fuel door. For the purposes of this project, what this means is that the fuel door uses the hybrid body harness, which is different to the gas model body harness, so there are no wires and no connectors for a plug and play solution to adding an electric release fuel door.

Here are some photos to compare the fuel door mechanisms on a gas only and hybrid Tacoma.

Here is the gas only filler area:
IMG_7335.webp


And the one for the hybrid:
IMG_7337.webp


This is almost the same as on the gas truck, except for the electric locking/actuator mechanism on the right hand side. This has a matching piece on the moving part of the door mechanism:
IMG_7338.webp


Unlike some modern fuel doors, the actuator is only a door release mechanism. When you close the door and press it shut, the sloping cam shape on the moving part of the fuel door rotates the actuator pin, which then locks into position, holding the door shut. When the fuel release door button is pressed, the actuator operates and releases the fuel door which then pops partially open driven by a spring.

Therefore, what is needed to retrofit this?

1) The fuel door release switch, which is positioned on the left of the steering column, in the upper right area of this panel above the Aux switches:
Screenshot 2026-07-25 at 16.36.52.webp


The Toyota part number for this switch is 84841-0A030 and seems pretty expensive at $74.62 less any discount from sales that may be on at the time of ordering. As we shall see though, it is not just the look of the plastic, but also the fact that these switches all have adjustable backlights, more on this later.

IMG_7425.webp


2) The connector for this switch, thanks to some excellent posts on Tacoma World is 90980-12C78. These can be bought for little more than a dollar, but minimum postage from Japan is $70, so back to Toyota and ~$10.

IMG_7426.webp


This is just for the white connector housing, so to add the wires, I had some standard connector pins in a kit and made up 4 wires using a 625B-0.6 female pin. They are a tight fit, but once inserted fully work fine. If you want to use the Toyota provided connector pin and wire pigtail, the part number is 82998-24290 and you need 4 of these for this application. From Toyota they are ~$18, but can be had from eBay for ~$5 each.

3) The fuel filler door and actuator. These are different for a 5' and 6' bed and if you order the right part number it comes as a complete package with the motor. This is typical Toyota, but ordering just the actuator motor on its own is 50% more expensive than the whole fuel door (don't ask me how I know). The correct part numbers are:

5' bed: 77305-AK030
6' bed: 77305-AK040

Either are ~$122.81 less any sales discounts, which is only ~$7 more than the regular manual gas fuel door. This is what you get with the actuator on the right already fitted.

IMG_7423.webp


4) The connector for the actuator was a complete pain to find and after several failed attempts with a couple of different Toyota parts departments, an email exchange with Connector Experts confirmed that it is a CE4107F connector. Unfortunately for them they were selling these for ~$86 plus $20 delivery, ugh, sorry guys but I found this on Amazon:

IMG_7410.webp


These come as a male/female pair and pigtail wires in place and we only need the female side for this project.

What about the wiring connections that will be needed?

Switch

Screenshot 2026-07-25 at 17.04.48.webp


This image is looking at the pin end of the connector housing, the end that is pushed into the switch. From this, we can clearly see that pin 1 is the connection to the negative illumination supply and pin 6 is for the positive illumination supply. From the earlier Tacoma World posts Redside Electric makes insertable harness that taps into the illumination wires, but I was not able to raise Kyle with a message through the forum and there is nothing online for 4th gens from Redside, so I will tap into the right wires with some posi-taps.

Pin 2 and Pin 5 are the momentary switch pins and are connected together when the switch is pushed.

Fuel Door Actuator

The pins are numbered inside the actuator, left to right 1 to 4:
IMG_7402.webp


Pins 1 and 2 connect to a sensor which changes resistance between 370 Ohms and 3.7k Ohms depending on whether the door is open or closed. On the hybrid trucks, this signals the body control unit to throw a dash warning if the fuel door is left open. I'm planning to wire these to the switch area, but not sure right now if I am going to build a small circuit to drive an indicator LED. I tend not to leave the fuel door open and any LED placed adjacent to the Fuel Door switch is obscured from the driver's seat by the turn signal stalk.

Pins 3 and 4 are the connections to the actuator. Pin 3 is ground and Pin 4, when momentarily connected to +12v opens the fuel door. The actuator has a resistance of ~30 Ohms, and so will pull ~400mA. Since the switch is already a momentary "push to operate" switch, I am not currently planning to build a monostable circuit to drive the actuator, but just make a simple connection.

Power

The next question is where to take the power from. For security, having it always operating seems less than ideal. When the key fob is brought near the car the interior lights operate and likely some other circuits, so tapping into this is an option. Alternatively, considering that the engine will be turned off when the switch would be operated means that the ignition circuit is not the best. Perhaps connecting to a circuit which operates when the door is open might be a decent compromise, but this depends on how easy it will be to find that circuit in the loom spaghetti. Fun to come!

To wrap up this update, I have bench tested the components and everything works as expected. So now to find some time to find the right power supply and fit everything on the truck. I know that I will need to remove the inner rear wheel arch liner to access the back of the fuel filler and pop the clips there. I'm also hoping that removing the external fuel door and moving it to the new mechanism will be straightforward. A flat fuel filler door would be possible, they are ~$44 from Toyota, but would then need painting...I think the standard gas door will be fine:
IMG_7336.webp
IMG_7339.webp


If anyone does want to change the exterior fuel door, the part numbers are:

5' bed: 77351-AK010
6' bed: 77351-AK020

More to come...
Outstanding leg work and write-up. Looking forward to the final chapter.
 

socotaco

TRD Off-Road Premium
Member
Joined
Jan 28, 2026
Threads
1
Messages
18
Reaction score
37
Location
NorCal
Vehicle(s)
26 TRD OR
You guys spurred me on to finish up with the locking fuel door, so here is the final chapter...

Since I had all the components tested and working on the bench, I decided to start in the cabin with the switch and its relevant connections. There are several videos on line showing how to access the auxiliary switch panel and this went smoothly; I would advise removing the two screws on each side of the footwell, just ahead of the pedals, to allow the switch panel to drop down far enough without straining the plastic.

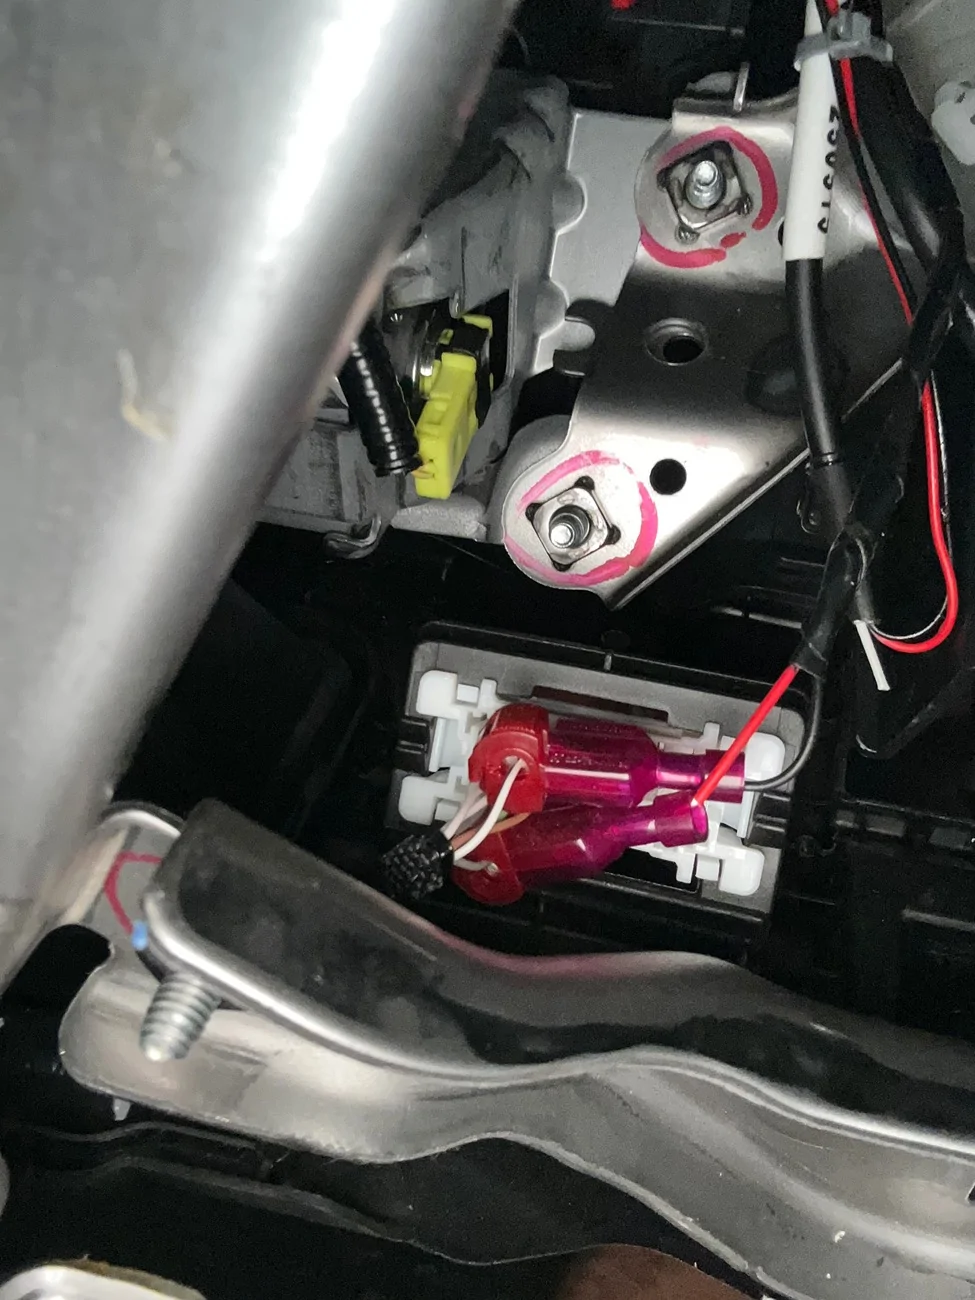
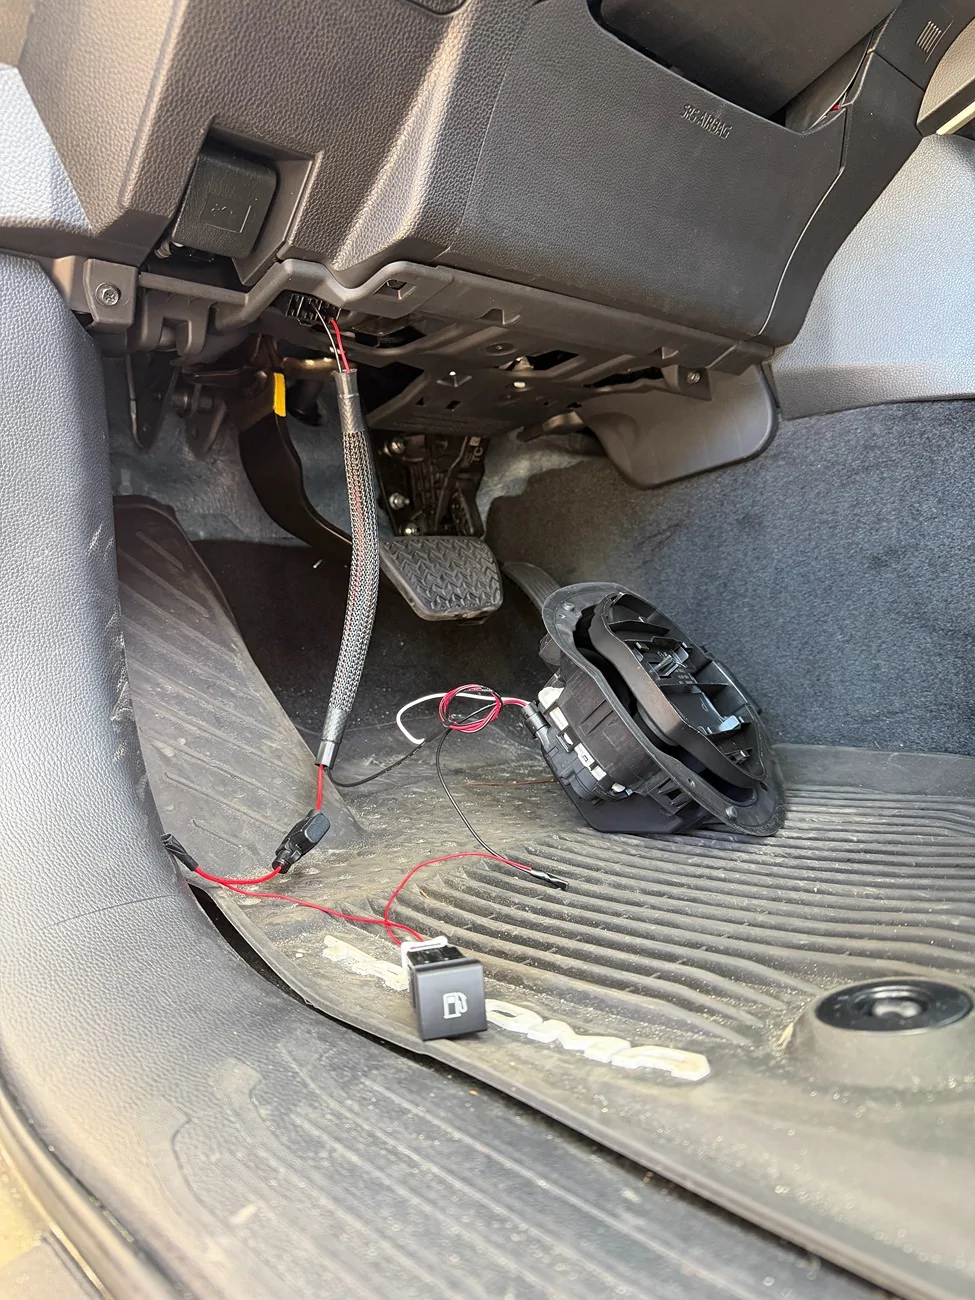
There is a myriad of wiring back there and I spent about an hour probing connectors, but could not find the wires that illuminate the puddle light on the driver's door. But I did find where the dealership had previous installed a GPS tracker. This had been removed, but the connector and wiring was still in place, and this still had power connections hooked to the back of the CAN bus connector:
2024 Tacoma Add fuel door release? IMG_7459

Red was 12v tapped into the gray wire and black was ground tapped into the white wire. In addition, the red tap already had a 3A fuse in line, so I decided to go with this to power the circuit.

I already had a long length of 4-core wire and so planned to wire all 4 connections on the fuel door (the 2 for actuation and the 2 for the sensor) and decide later whether to have some indicator light to show that the door was open. So, the circuit was straightforward, wiring the power in series with the momentary switch and the actuator.

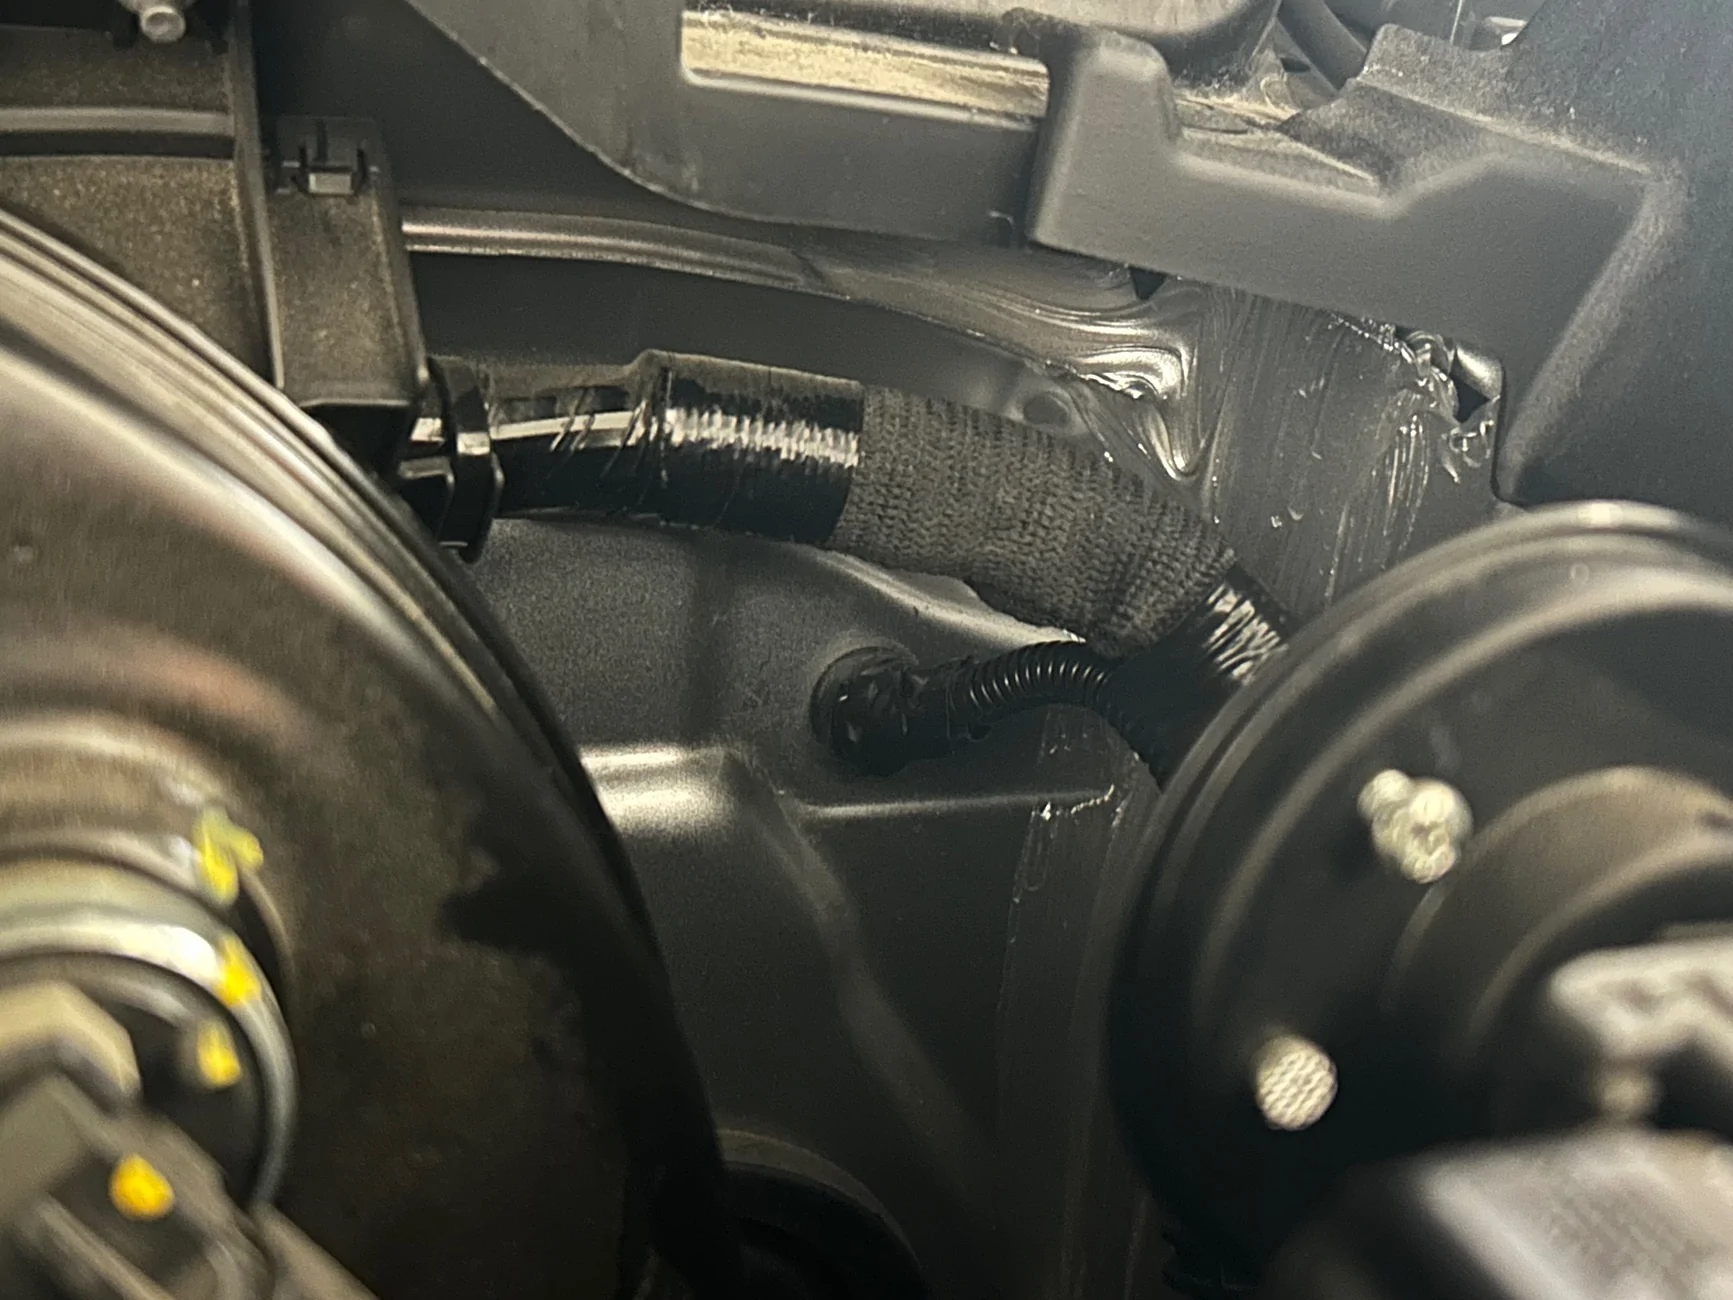
To get the cable out of the cabin, I decided to go through the engine bay, then down and along the chassis rail to the fuel door. All on the same side of the vehicle and there are brake lines and other wiring harness parts to zip tie the wire in its protective plastic cover to. While some folks have fed the wire through the main harness grommet in the drivers footwell, there is a small hole and grommet higher up on the fire wall which is much more convenient - I just replaced the blind grommet with one for a cable (15mm diameter. or 0.6") and that was done - you can see it here in the middle of the photo below.
2024 Tacoma Add fuel door release? IMG_7462


As previously mentioned, I connected the positive and negative illumination wires to one of the adjacent switches using a couple of small posi-taps - you need small ones for 20-22AWG wire:
2024 Tacoma Add fuel door release? Screenshot 2026-07-27 at 16.45.52


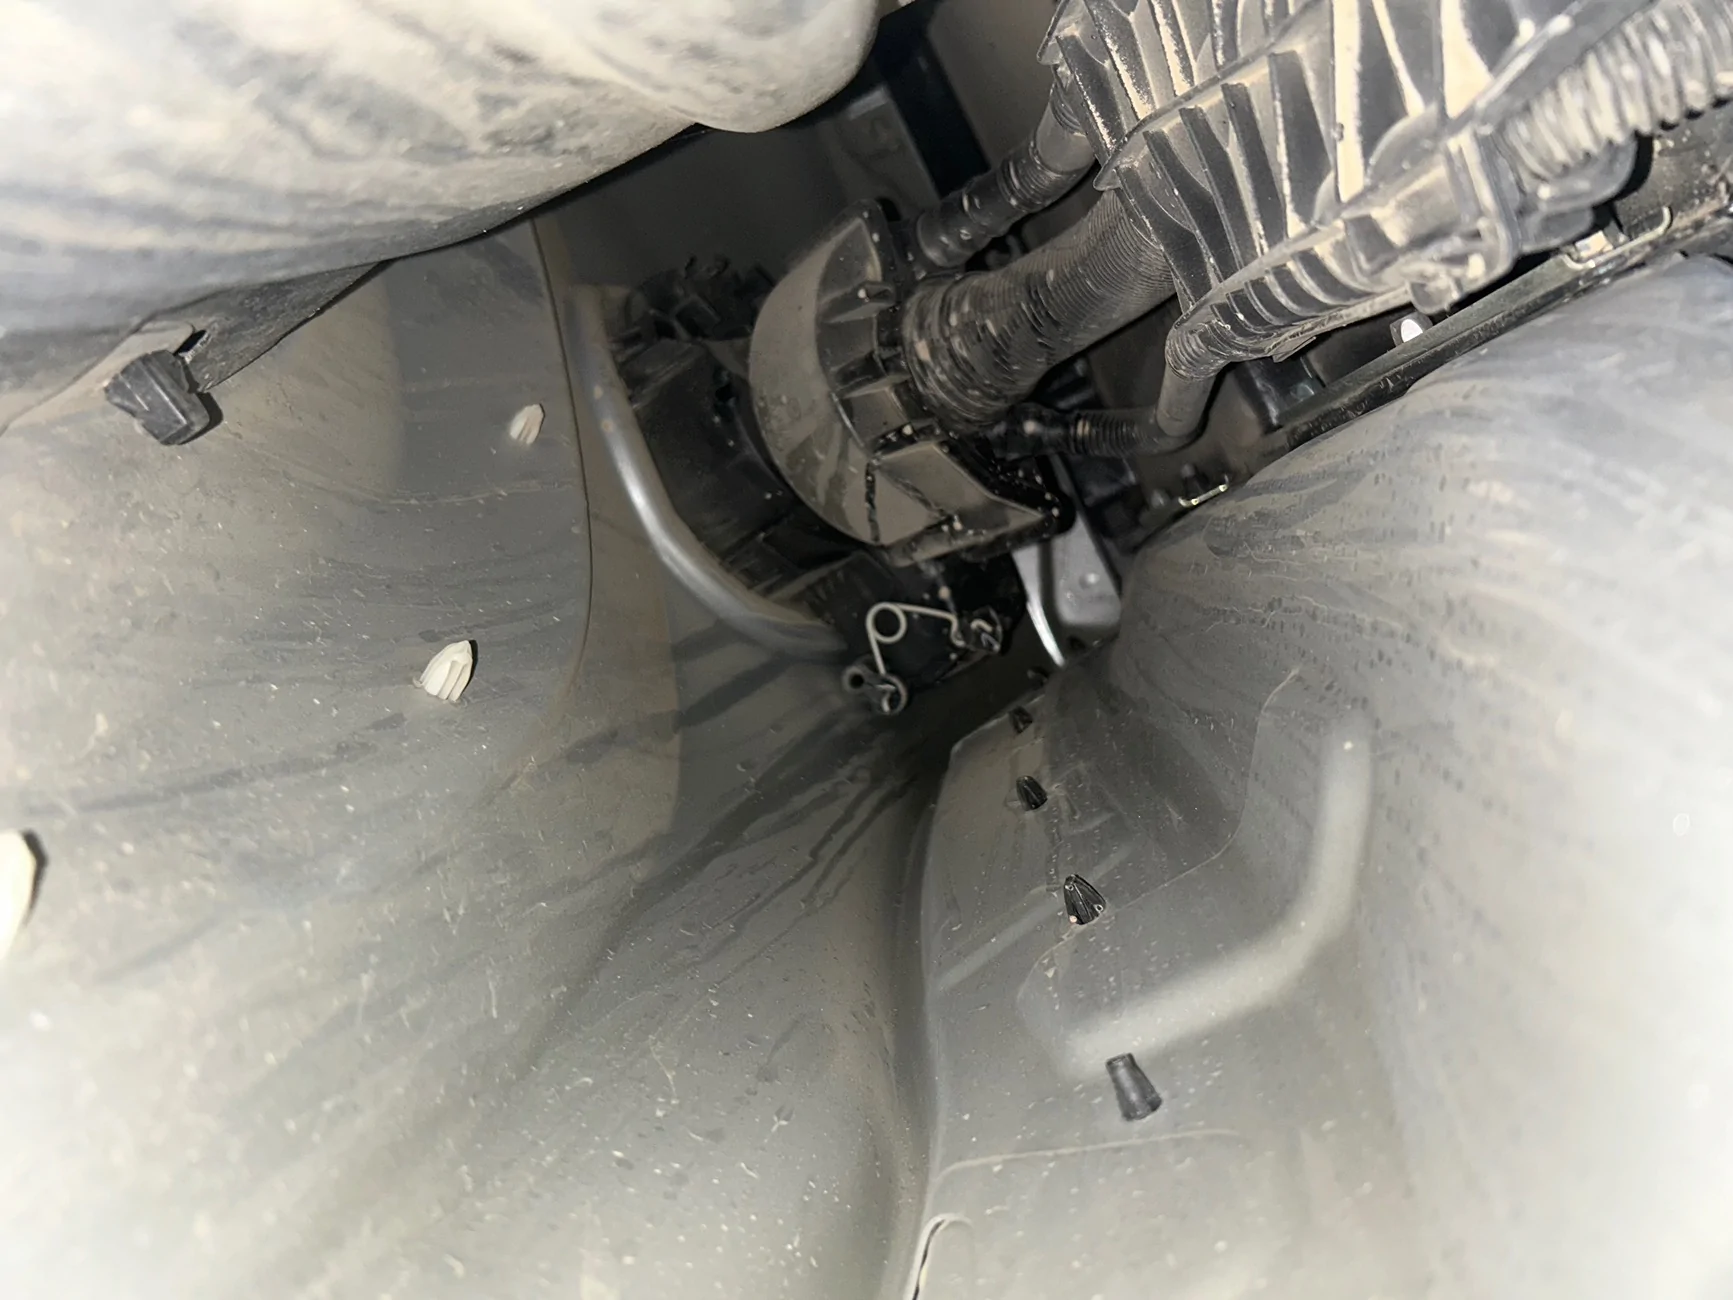
To gain access to release the fuel door from the body there are 3 push clips on the housing. The bottom two can be reached by putting an arm into the body cavity, but despite having reasonably long arms I could not reach the top one.
2024 Tacoma Add fuel door release? IMG_7428


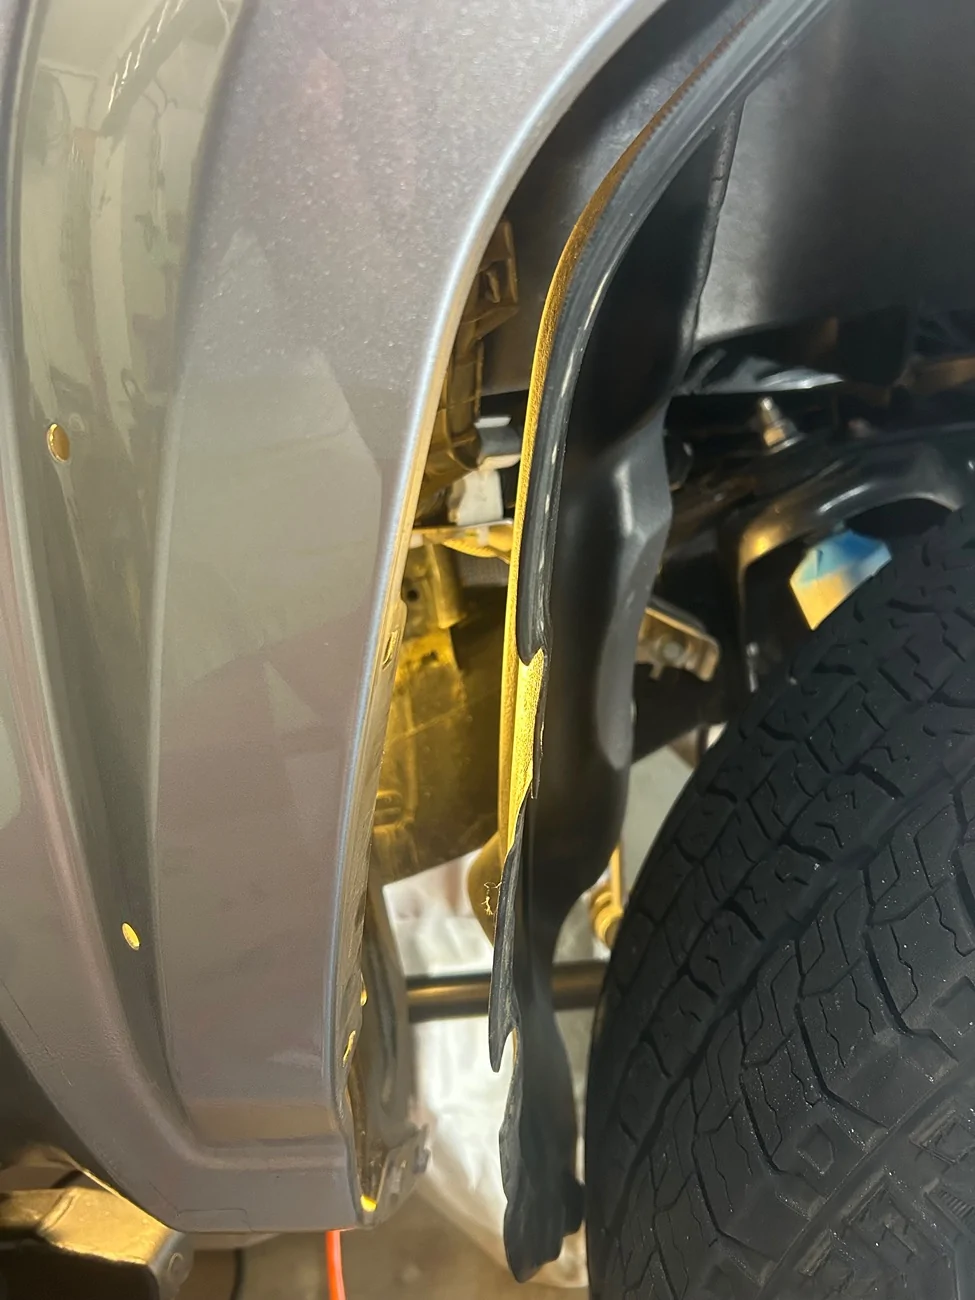
So the inner wheel arch liner has to be loosened at the front. There are videos about how to do this, but I removed the outer plastic fender flare first, removing all the 10mm bolts and then gently popping the white plastic clips, working around the flare from front to back. it's not too scary and the clips pop nicely with gentle steady pressure. Be prepared for a lot of dirt under there if you have been offroading! To release the inner wheel arch liner the clips that were retaining the 10mm bolts need to be removed. These are a pain (you can see the black clip in the top left of the photo above) and need some significant pressure on each of the side tabs and some wiggling to free them. I removed just the bottom 4, which was enough.

2024 Tacoma Add fuel door release? IMG_7461


Remove the fuel cap and the cross head screw from the outside of the fuel door (careful not to drop it into your fuel tank!) and reach inside the arch and press the 3 retaining clips on fuel door body. Close the fuel door and then gentle wiggle the whole assembly free. It comes out at an angle to clear the hinge on the left and it will not come out with the door open.

Putting the new locking fuel door assembly back in is a reversal of the removal process; engage the fuel filler neck first as it moves quite freely inside the body cavity when the door assembly is not in place. I replaced the original fuel cap I had kept and fitted the retention leash.

2024 Tacoma Add fuel door release? IMG_7460


To remove the outer, body colored shell of the fuel door, you need to lift the center clip on the opening part of the fuel door assembly. This shows the locking door, but the manual door is the same and the locking clip is the shape of a staple on its side.
2024 Tacoma Add fuel door release? IMG_7423


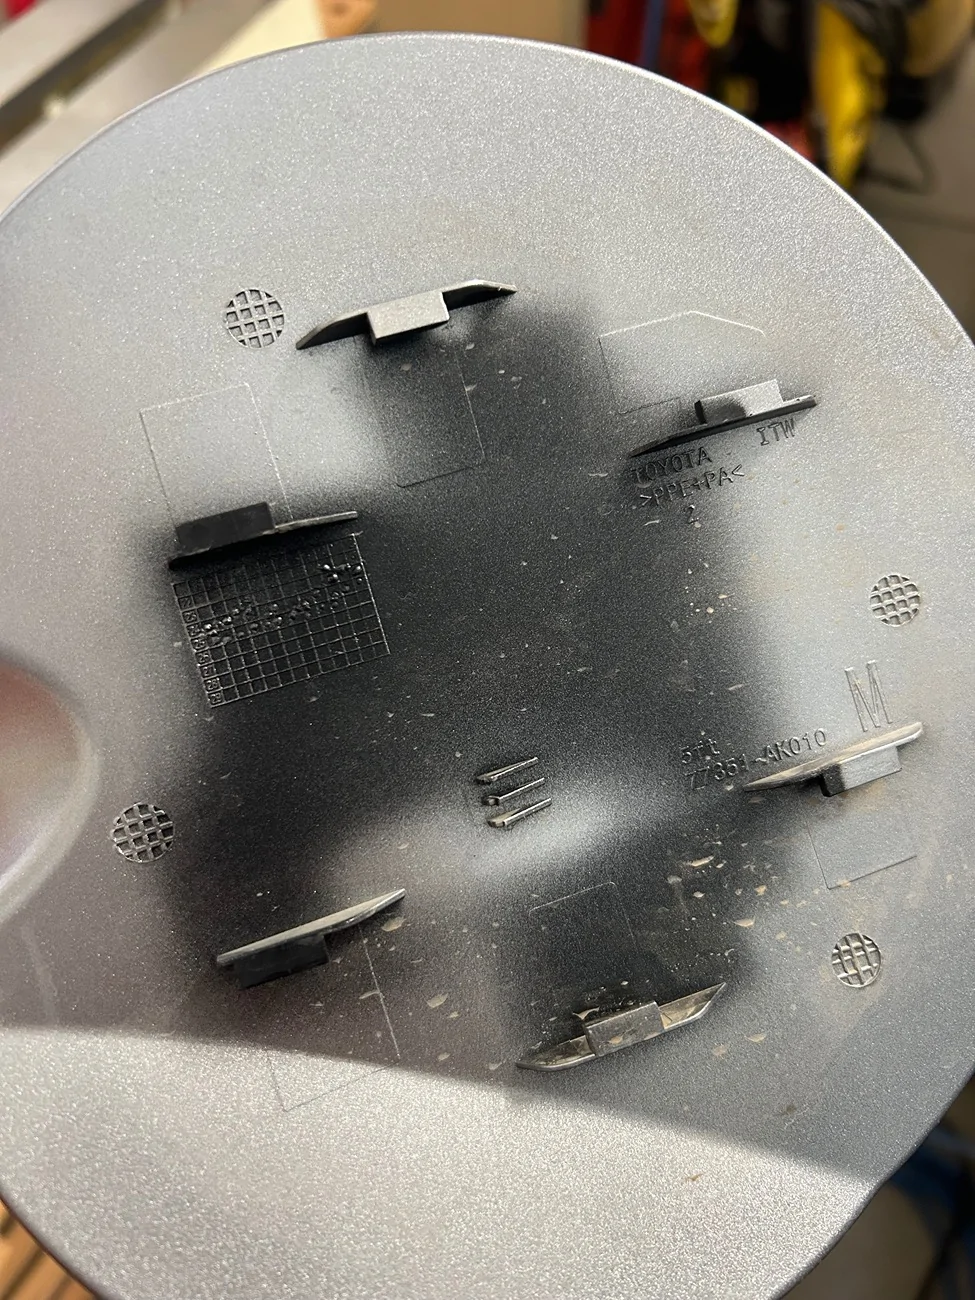
The body colored shell slides off away from the hinge. It has a number of tabs which engage with the fuel door hinge piece. Locate these on the new locking fuel door mechanism and slide back towards the hinge so that the central locking tab engages. Here's what the inside of the exterior door looks like with those 3 triangular fins in the center being the locking pieces. This went much more smoothly than I expected, very easy.

2024 Tacoma Add fuel door release? IMG_7464


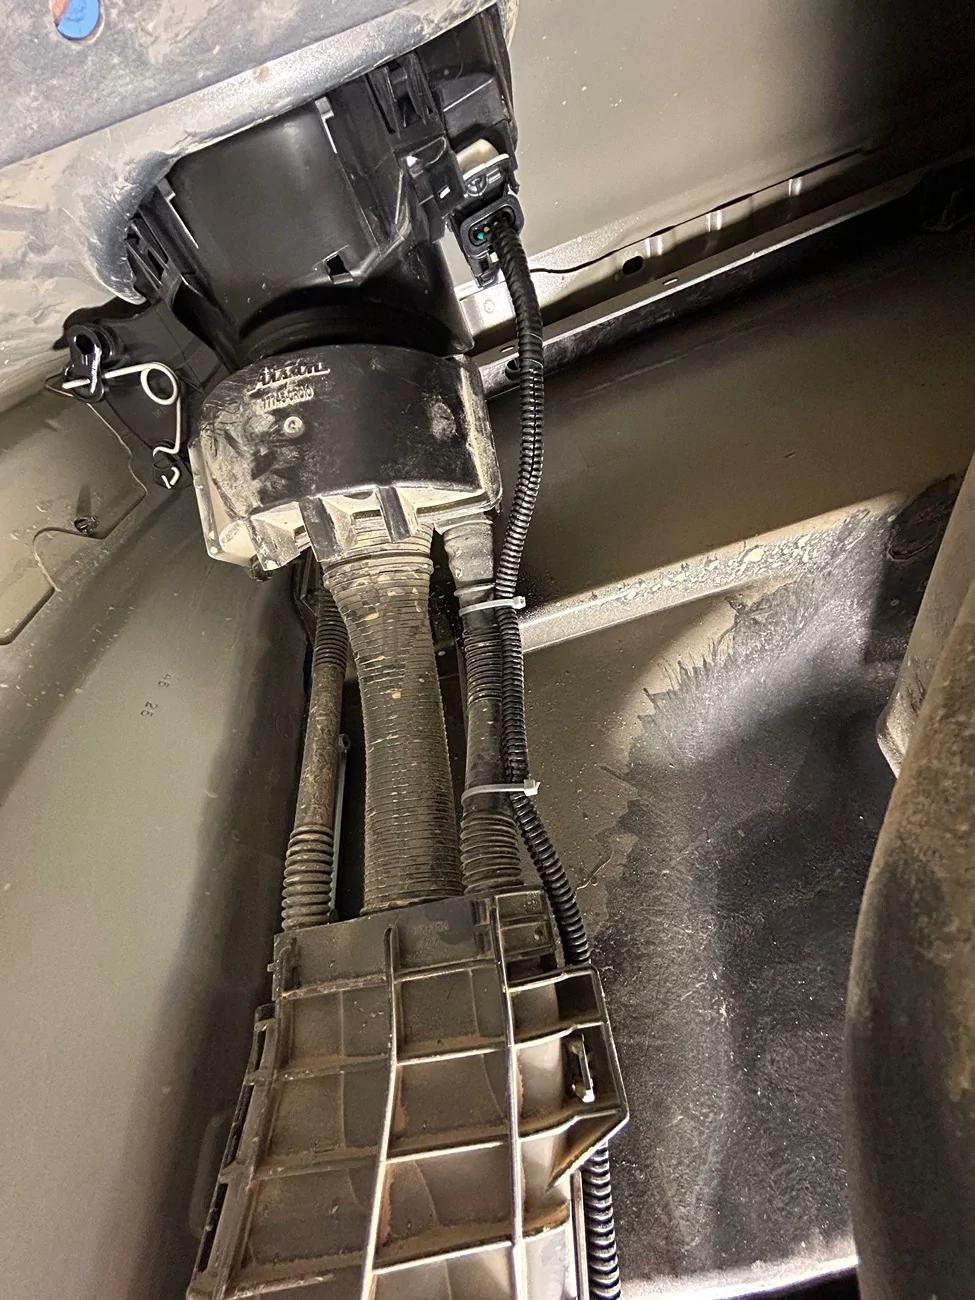
Then I measured and cut the wire and plastic protective harness tubing and soldered on the connector pigtail, sealing each wire with heat shrink tubing and black tape before closing up the loom tube. Here's a photo looking up inside the body with the new fuel door in place and the wiring going to the actuator on the right, zip tied to the existing emissions harness:
2024 Tacoma Add fuel door release? IMG_7463


Closed the wheel arch back up and all done. Here are some photos of the completed project:
2024 Tacoma Add fuel door release? IMG_7468

Interior fuel door release switch with working illumination (tough to tell in this photo, but it's working). And a video of the fuel door opening when the button is pressed:


In conclusion, this was a pretty easy project once all the correct parts had been sourced if you are comfortable with soldering wires - if not, go ahead and use some heat shrink crimp connectors. Installation on the vehicle took about 3 hours, including all the soldering and feeding of wires. Total cost was less than $275, but I had the connector pins and wire already in my project box and bought the Toyota parts in their recent July 4th sale. That's the same price as one top quality led offroad light (hmm, those new Squadron 2.0s do look the business, maybe the next project...). Certainly it is a lot more expensive than a $10 locking fuel cap, but it will get used all the time, there is no messing with keys and it is very cool.

I hope this provided some inspiration. It is possible, but I just wish Toyota had put one on as standard!
 

Sponsored

socotaco

TRD Off-Road Premium
Member
Joined
Jan 28, 2026
Threads
1
Messages
18
Reaction score
37
Location
NorCal
Vehicle(s)
26 TRD OR
A quick postscript…
I recommend disconnecting the negative lead from the battery before touching any electrics on the truck. Better safe than sorry.
 

Toy-truck

TRD Off-Road Premium
Well-known member
Joined
Mar 5, 2024
Threads
4
Messages
103
Reaction score
62
Location
Houston, TX
Vehicle(s)
2024 Tacoma
You guys spurred me on to finish up with the locking fuel door, so here is the final chapter...

Since I had all the components tested and working on the bench, I decided to start in the cabin with the switch and its relevant connections. There are several videos on line showing how to access the auxiliary switch panel and this went smoothly; I would advise removing the two screws on each side of the footwell, just ahead of the pedals, to allow the switch panel to drop down far enough without straining the plastic.

There is a myriad of wiring back there and I spent about an hour probing connectors, but could not find the wires that illuminate the puddle light on the driver's door. But I did find where the dealership had previous installed a GPS tracker. This had been removed, but the connector and wiring was still in place, and this still had power connections hooked to the back of the CAN bus connector:
IMG_7459.webp

Red was 12v tapped into the gray wire and black was ground tapped into the white wire. In addition, the red tap already had a 3A fuse in line, so I decided to go with this to power the circuit.

I already had a long length of 4-core wire and so planned to wire all 4 connections on the fuel door (the 2 for actuation and the 2 for the sensor) and decide later whether to have some indicator light to show that the door was open. So, the circuit was straightforward, wiring the power in series with the momentary switch and the actuator.

To get the cable out of the cabin, I decided to go through the engine bay, then down and along the chassis rail to the fuel door. All on the same side of the vehicle and there are brake lines and other wiring harness parts to zip tie the wire in its protective plastic cover to. While some folks have fed the wire through the main harness grommet in the drivers footwell, there is a small hole and grommet higher up on the fire wall which is much more convenient - I just replaced the blind grommet with one for a cable (15mm diameter. or 0.6") and that was done - you can see it here in the middle of the photo below.
IMG_7462.webp


As previously mentioned, I connected the positive and negative illumination wires to one of the adjacent switches using a couple of small posi-taps - you need small ones for 20-22AWG wire:
Screenshot 2026-07-27 at 16.45.52.webp


To gain access to release the fuel door from the body there are 3 push clips on the housing. The bottom two can be reached by putting an arm into the body cavity, but despite having reasonably long arms I could not reach the top one.
IMG_7428.webp


So the inner wheel arch liner has to be loosened at the front. There are videos about how to do this, but I removed the outer plastic fender flare first, removing all the 10mm bolts and then gently popping the white plastic clips, working around the flare from front to back. it's not too scary and the clips pop nicely with gentle steady pressure. Be prepared for a lot of dirt under there if you have been offroading! To release the inner wheel arch liner the clips that were retaining the 10mm bolts need to be removed. These are a pain (you can see the black clip in the top left of the photo above) and need some significant pressure on each of the side tabs and some wiggling to free them. I removed just the bottom 4, which was enough.

IMG_7461.webp


Remove the fuel cap and the cross head screw from the outside of the fuel door (careful not to drop it into your fuel tank!) and reach inside the arch and press the 3 retaining clips on fuel door body. Close the fuel door and then gentle wiggle the whole assembly free. It comes out at an angle to clear the hinge on the left and it will not come out with the door open.

Putting the new locking fuel door assembly back in is a reversal of the removal process; engage the fuel filler neck first as it moves quite freely inside the body cavity when the door assembly is not in place. I replaced the original fuel cap I had kept and fitted the retention leash.

IMG_7460.webp


To remove the outer, body colored shell of the fuel door, you need to lift the center clip on the opening part of the fuel door assembly. This shows the locking door, but the manual door is the same and the locking clip is the shape of a staple on its side.
IMG_7423.webp


The body colored shell slides off away from the hinge. It has a number of tabs which engage with the fuel door hinge piece. Locate these on the new locking fuel door mechanism and slide back towards the hinge so that the central locking tab engages. Here's what the inside of the exterior door looks like with those 3 triangular fins in the center being the locking pieces. This went much more smoothly than I expected, very easy.

IMG_7464.webp


Then I measured and cut the wire and plastic protective harness tubing and soldered on the connector pigtail, sealing each wire with heat shrink tubing and black tape before closing up the loom tube. Here's a photo looking up inside the body with the new fuel door in place and the wiring going to the actuator on the right, zip tied to the existing emissions harness:
IMG_7463.webp


Closed the wheel arch back up and all done. Here are some photos of the completed project:
IMG_7468.webp

Interior fuel door release switch with working illumination (tough to tell in this photo, but it's working). And a video of the fuel door opening when the button is pressed:


In conclusion, this was a pretty easy project once all the correct parts had been sourced if you are comfortable with soldering wires - if not, go ahead and use some heat shrink crimp connectors. Installation on the vehicle took about 3 hours, including all the soldering and feeding of wires. Total cost was less than $275, but I had the connector pins and wire already in my project box and bought the Toyota parts in their recent July 4th sale. That's the same price as one top quality led offroad light (hmm, those new Squadron 2.0s do look the business, maybe the next project...). Certainly it is a lot more expensive than a $10 locking fuel cap, but it will get used all the time, there is no messing with keys and it is very cool.

I hope this provided some inspiration. It is possible, but I just wish Toyota had put one on as standard!
Great write up! You are the man!
 

Pappy

TRD Off-Road
Well-known member
First Name
Jon
Joined
Jan 11, 2025
Threads
10
Messages
390
Reaction score
528
Location
Albuquerque, NM
Vehicle(s)
2025 Tacoma TRD-OR 6MT, 1969 FJ40, 1985 4Runner
In conclusion, this was a pretty easy project once all the correct parts had been sourced if you are comfortable with soldering wires.
I have no desire to do this. But, I love this kind of problem solving. Nice job.


Top